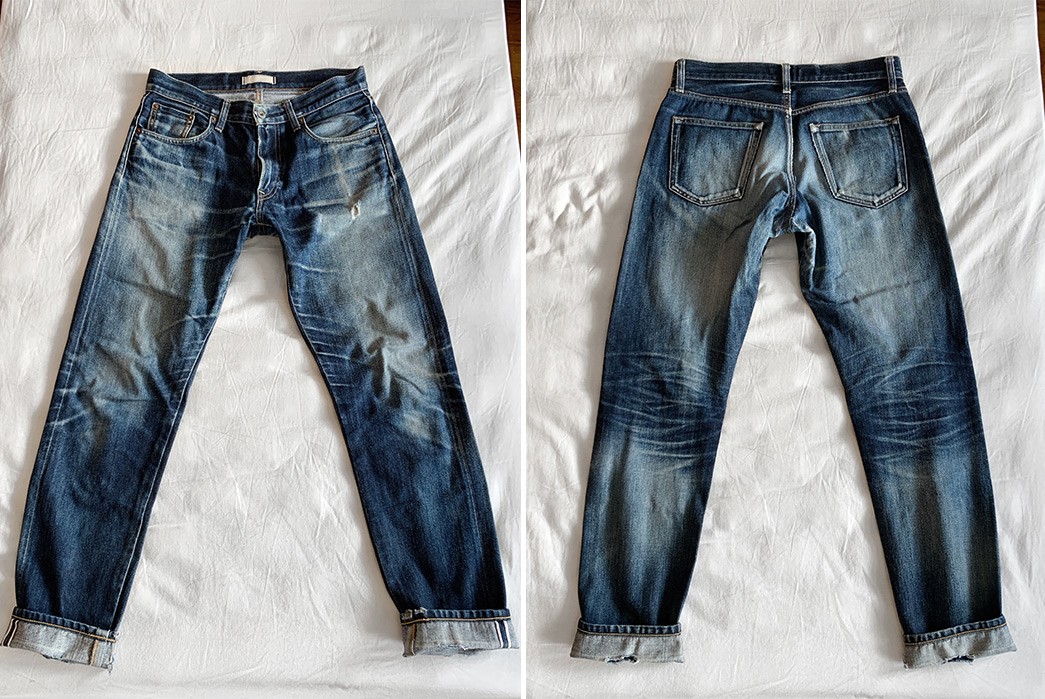
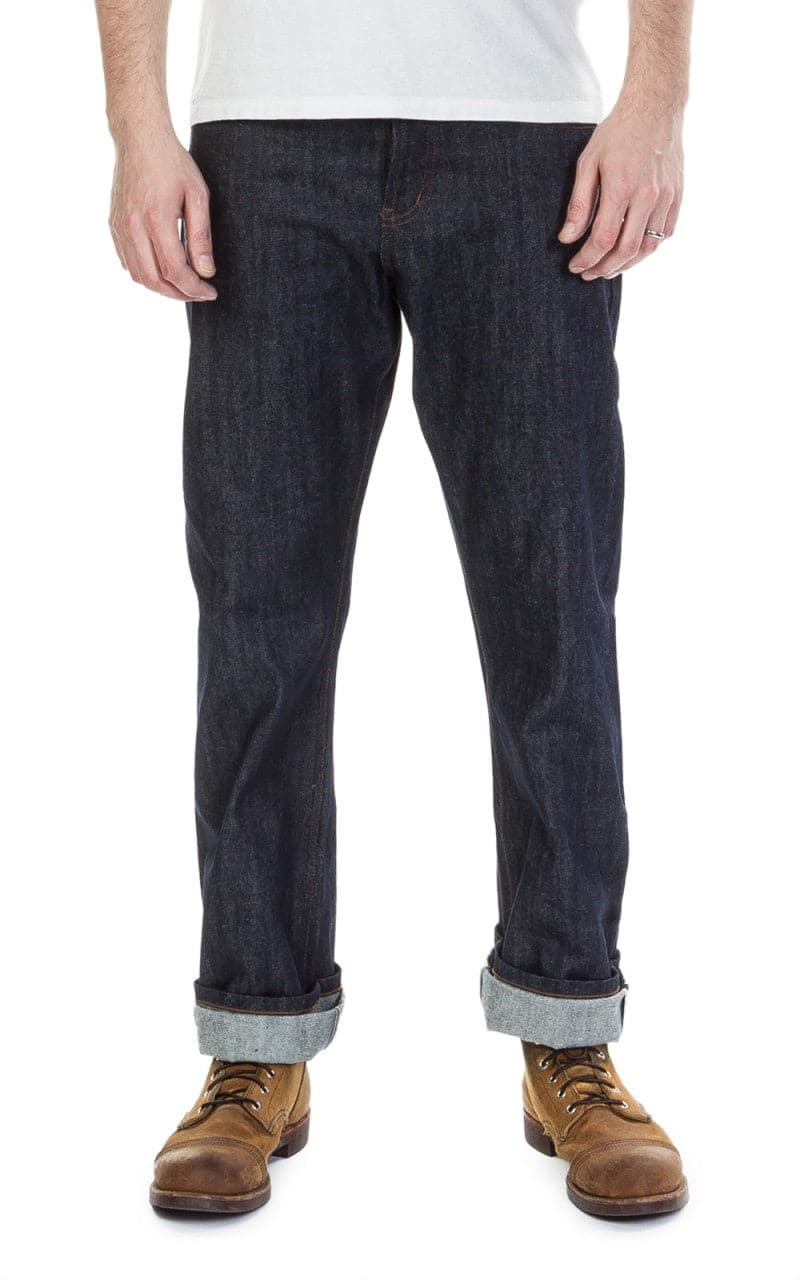
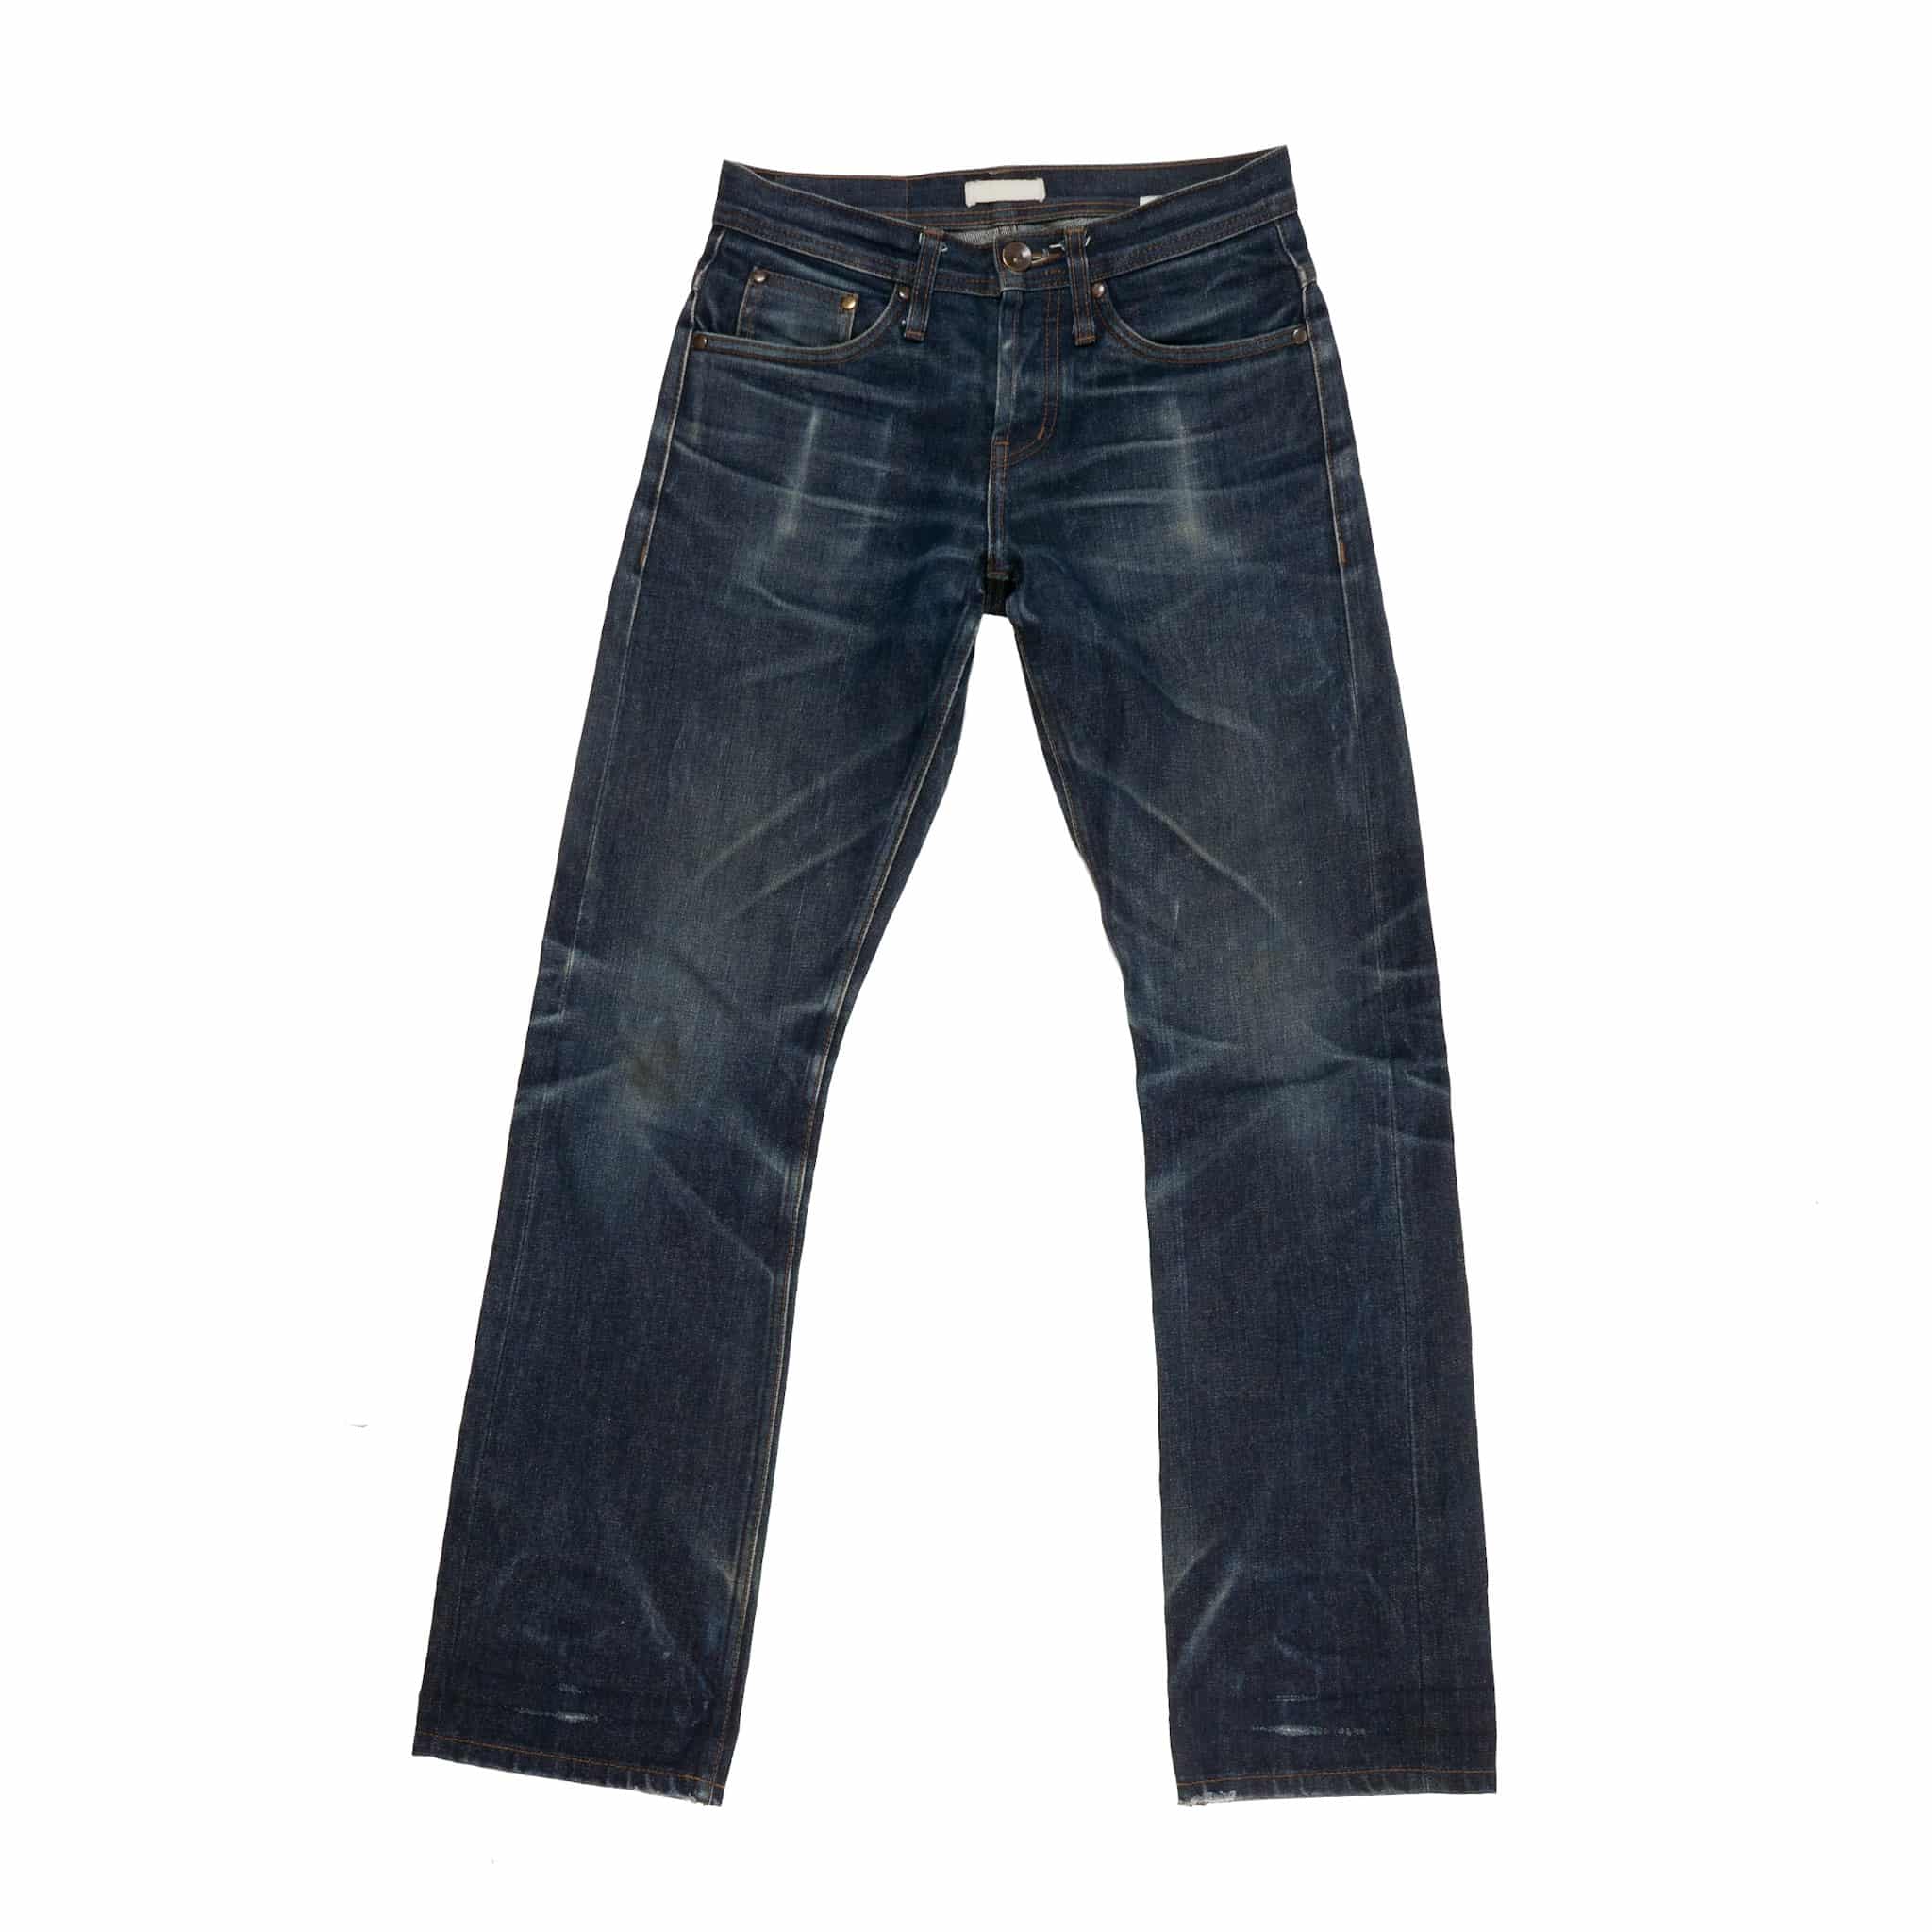
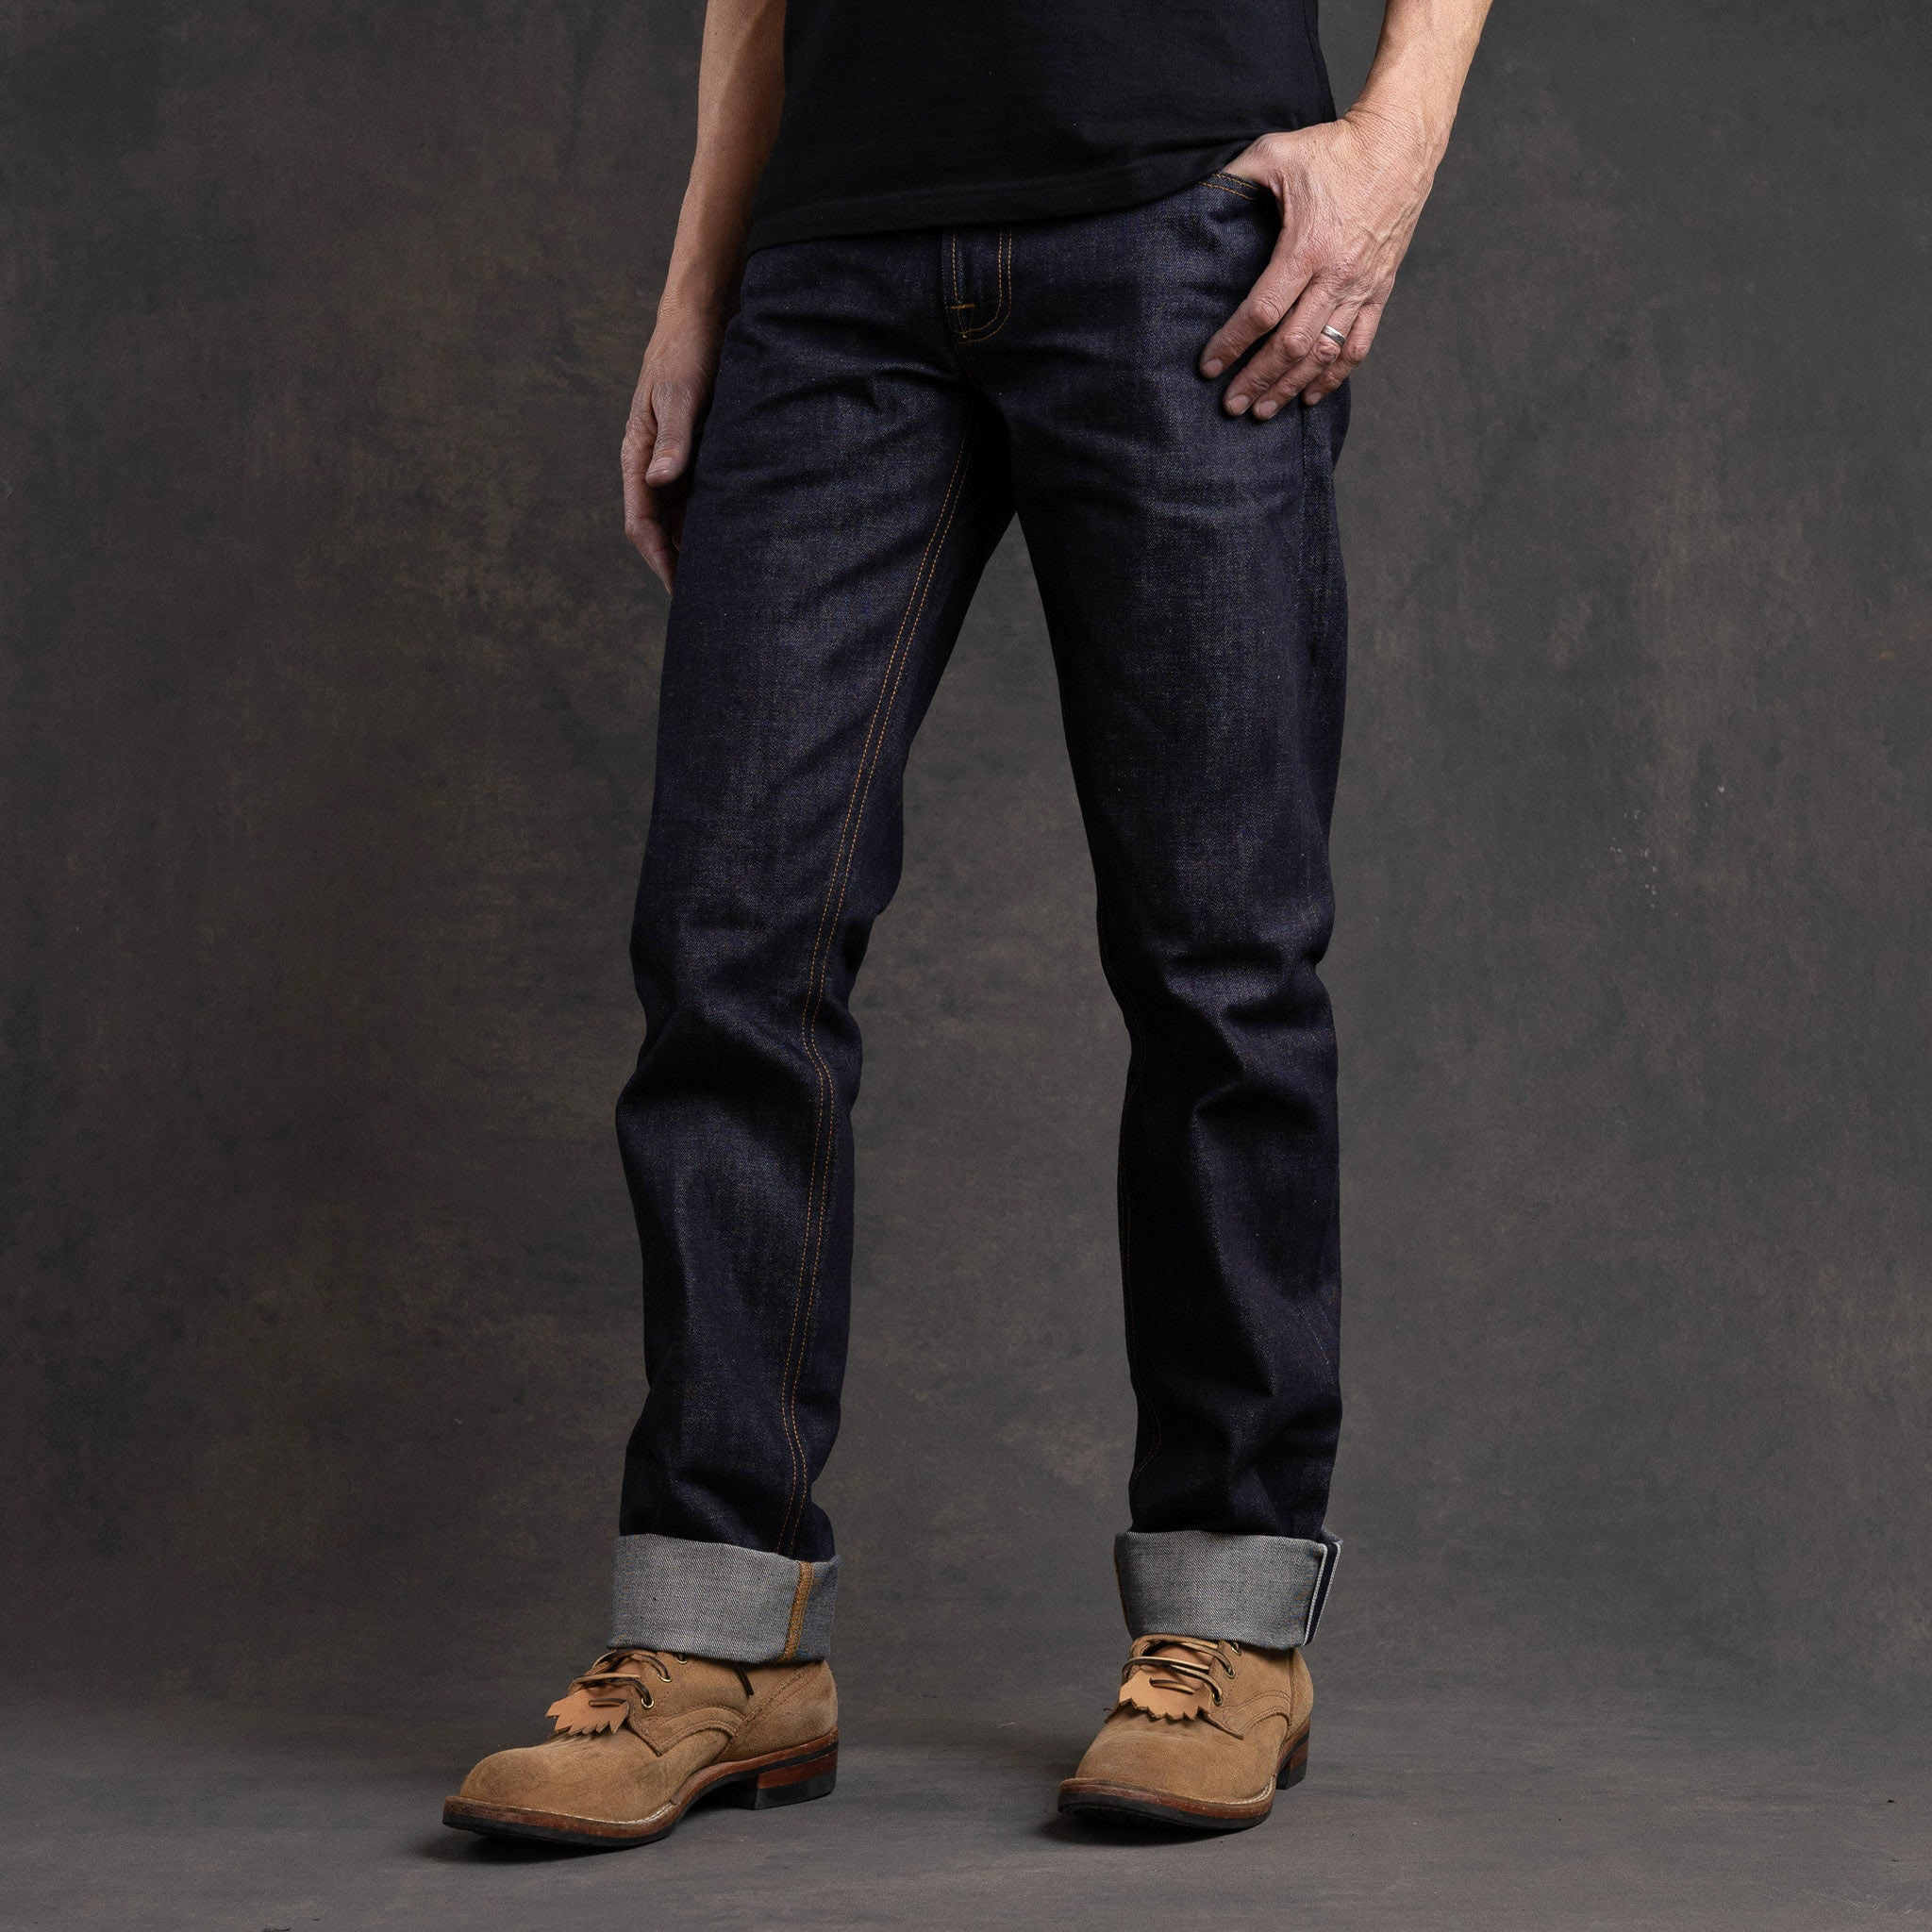
Announcing the 25 Winners of the Indigo Invitational Fading Competition Year Five
Since 2019, the Indigo Invitational Fade Competition has been a destination for denimheads who want to see how their fades stack up against the world’s best denim faders. With piles of rugged loot for the winners, it draws thousands of competitors every year.
On September 1st of last year, more than 2,500 faders lined up in the starting blocks with brand-new pairs of raw denim jeans. 365 days later, more than 650 of them crossed the finish line with faded ones. Through a rigorous, weeks-long process of selection, voting, and judging, 25 pairs have risen to the top.
Since Year Four, the competition has been split into two conferences: Rest of the World (ROW) and Southeast Asia (SEA), with a Top 10 selected from each. There’s also the Re(Pair) arm for faders on a two-year fade journey. They have their own Top 5.
The winners will now get their pick of showcases filled with prizes from participating competition sponsors and partners. But if you’re here to learn who won, we won’t delay you any longer:
IIY5 – Rest of the World Conference – Top 10
| Rank | Number | Name | Location | Competed in |
| 1 | ROW025 | Jorn-Bjorn | Norway | Iron Heart IH-555L (19 oz.) |
| 2 | ROW011 | Aaron | USA | Big John Rare 008 (15.5 oz.) |
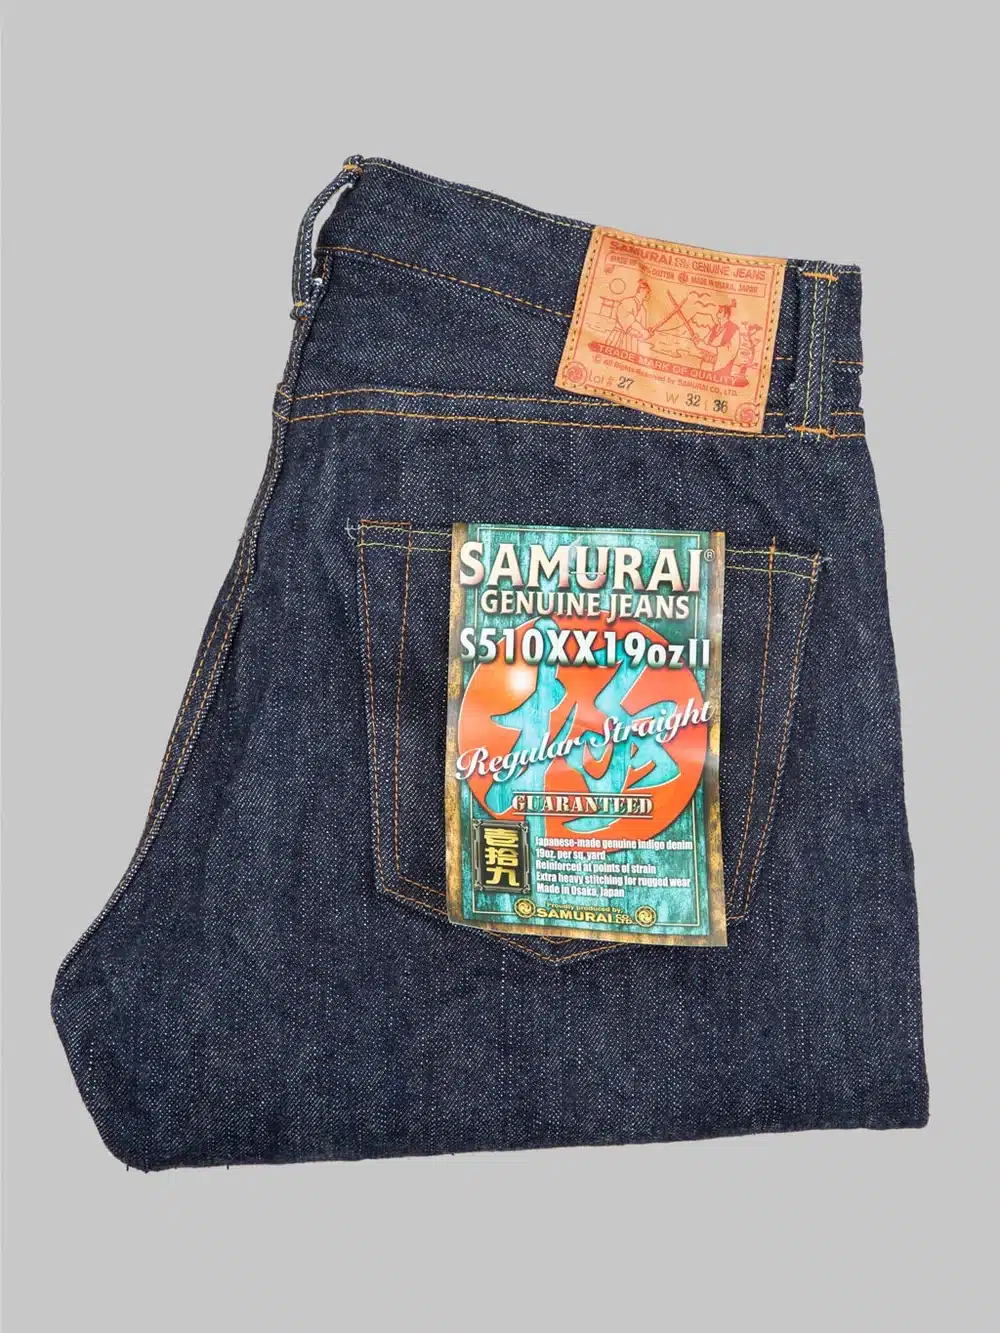
| 3 | ROW050 | Darren | Australia | Samurai S5000VX (21 oz.) |
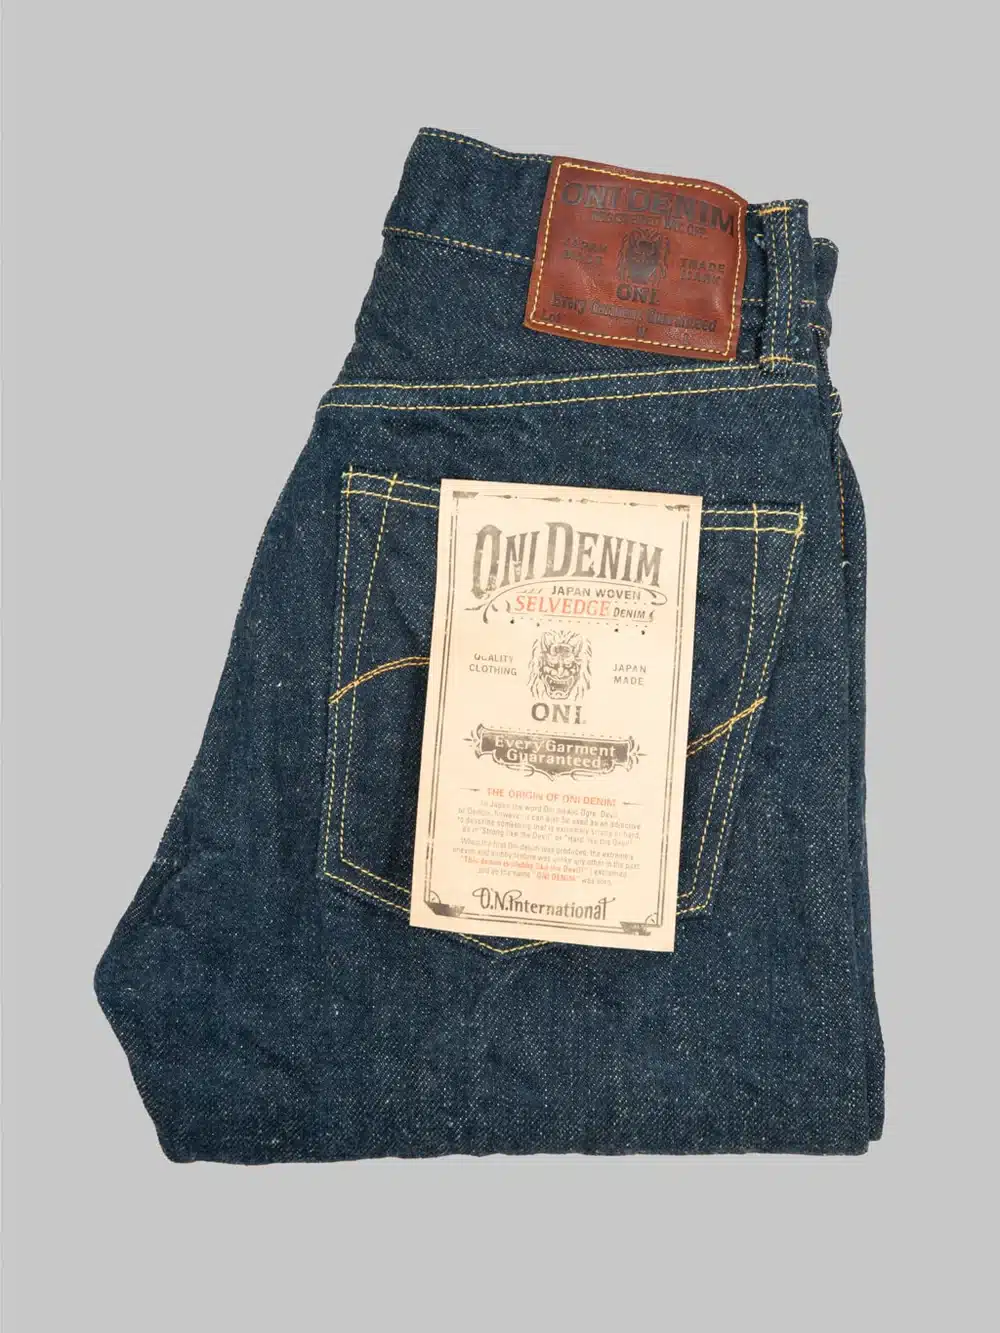
| 4 | ROW042 | George C. | USA | Oni 288ZR-KAB (20 oz.) |
| 5 | ROW040 | David T. | USA | Piger Works x II F2F20 (20 oz.) |
| 6 | ROW043 | John B. | USA | Iron Heart IH-888S-19L (19 oz.) |
| 7 | ROW031 | Eddie | USA | Piger Works x II F2F20 (20 oz.) |
| 8 | ROW022 | Dustin | USA | Piger Works x II F2F20 (20 oz.) |
| 9 | ROW006 | Daniel W. | United Kingdom | Iron Heart IH-555S-UHR (23 oz.) |
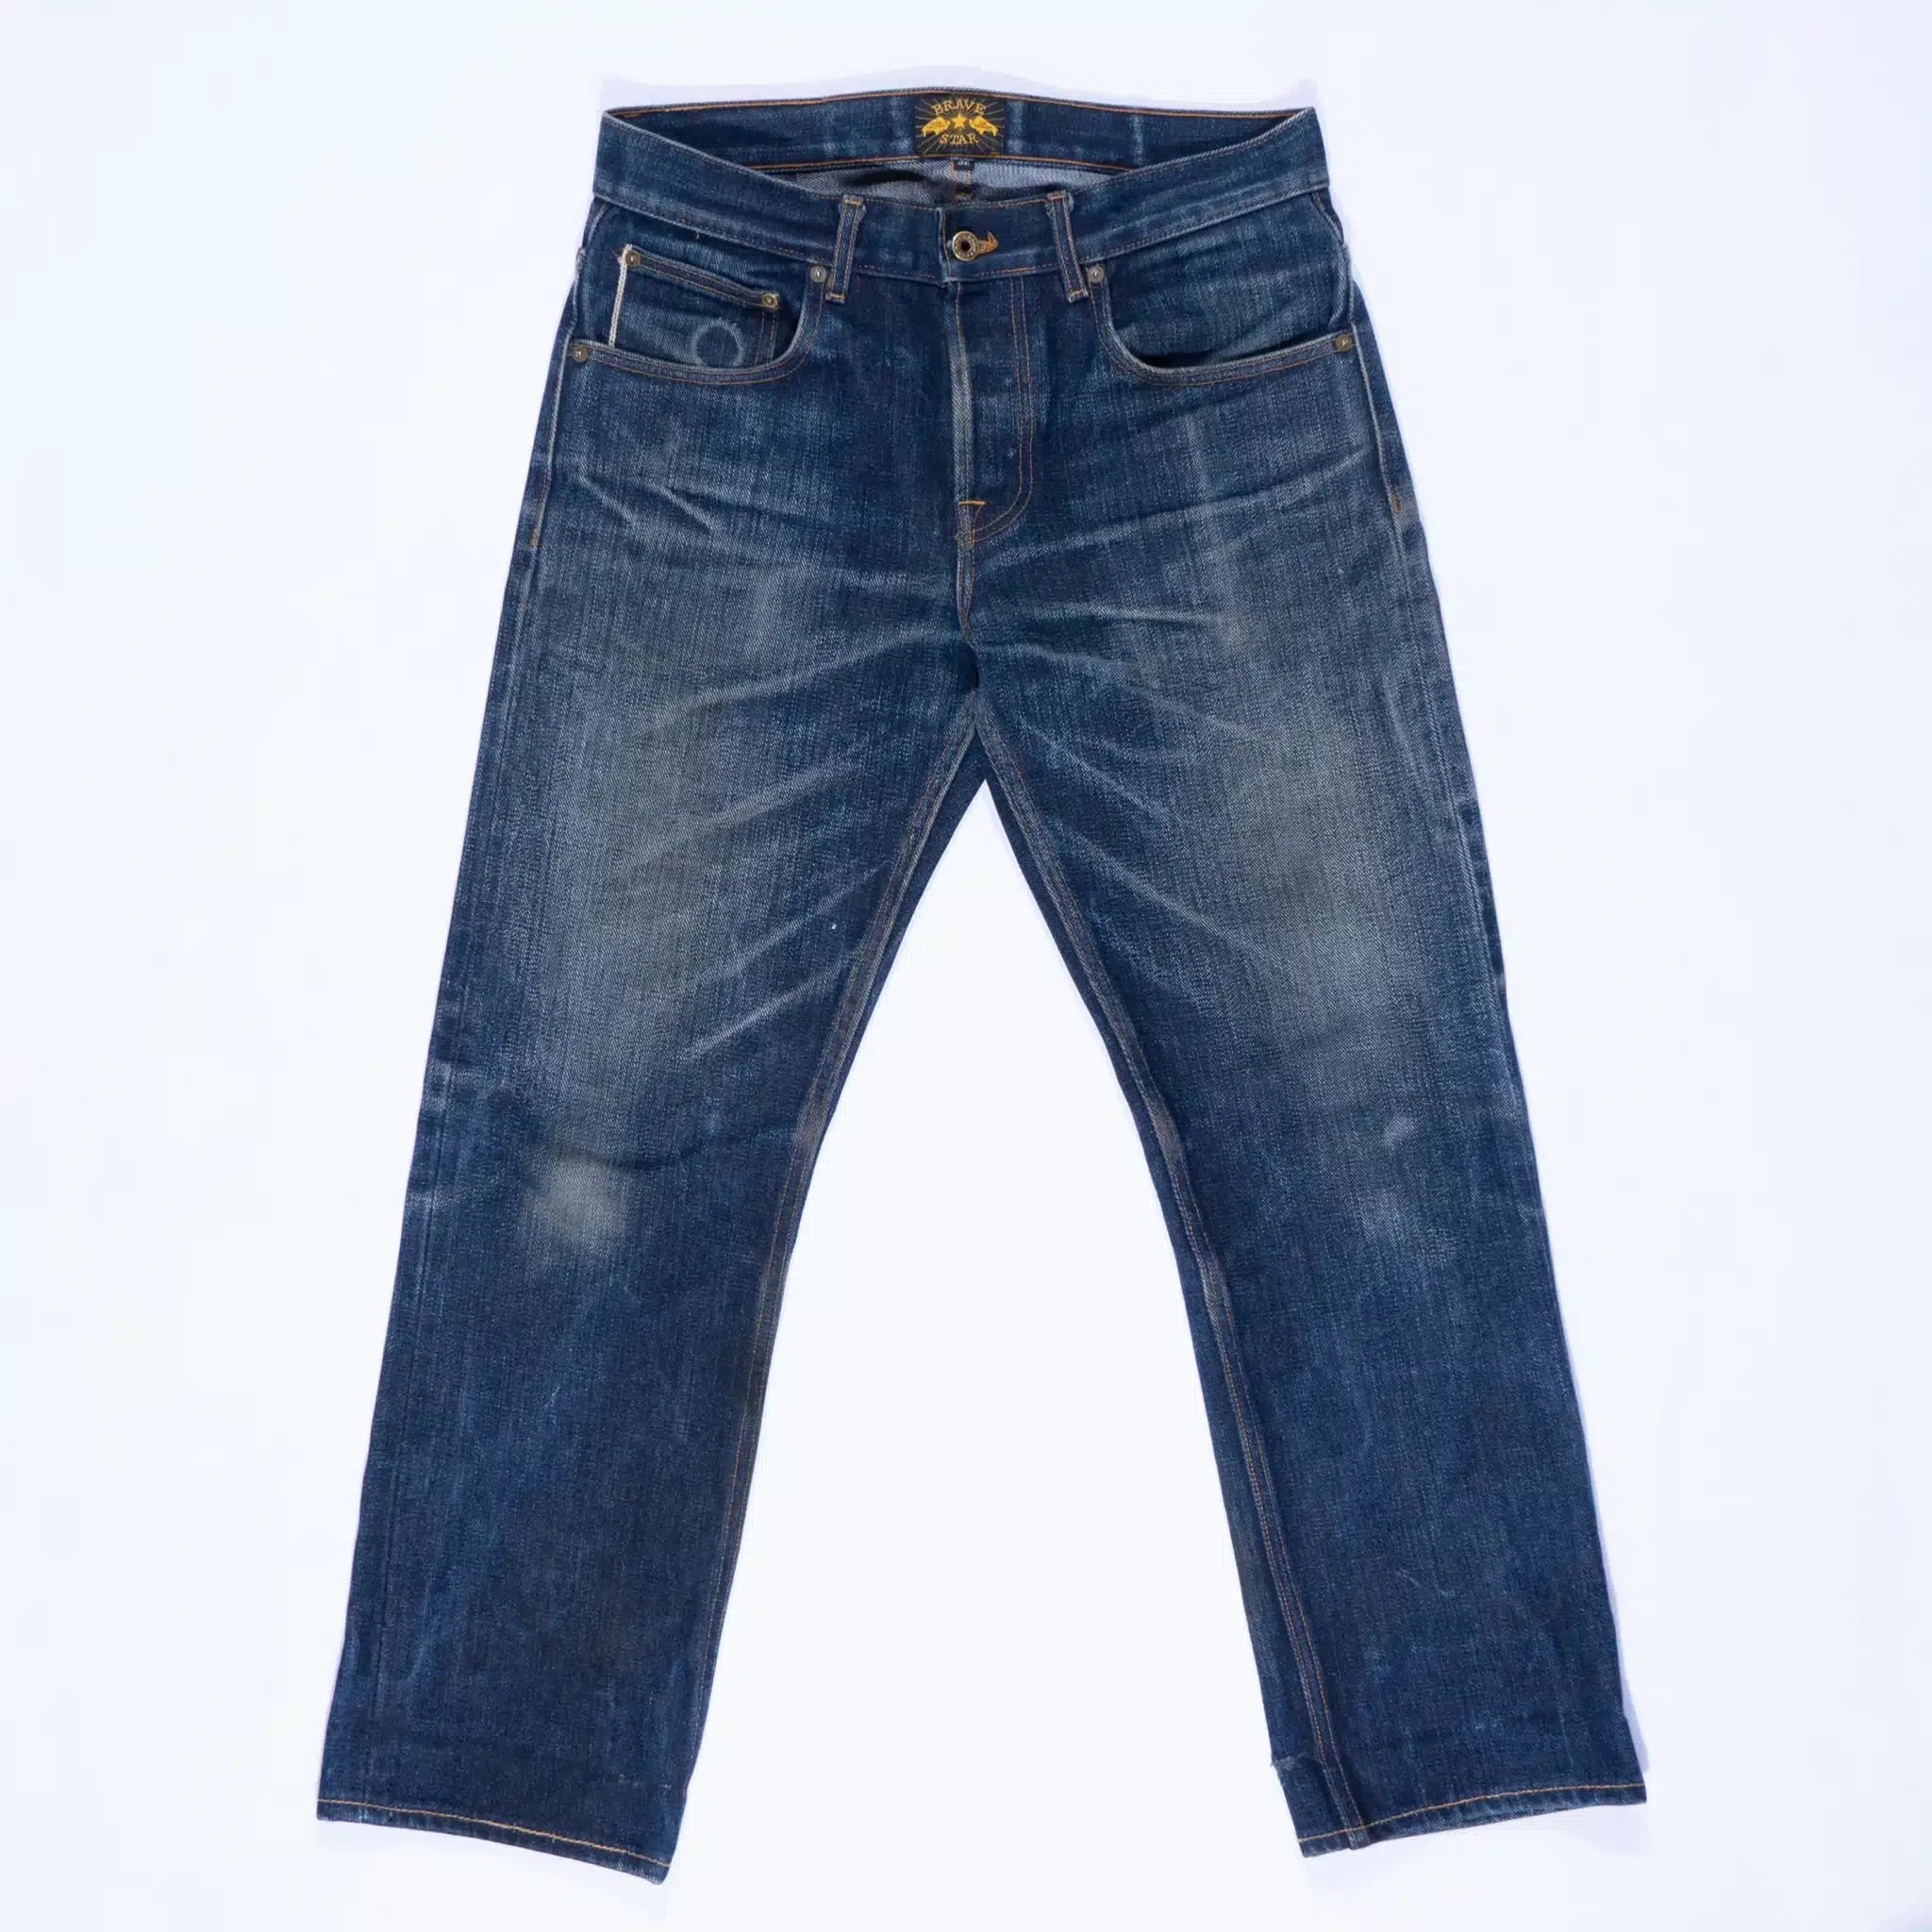
| 10 | ROW009 | Ethan | USA | Brave Star Die Hard Double (12 oz.) |
IIY5 – Southeast Asian Conference – Top 10
| Rank | Number | Name | Location | Competed in |
| 1 | SEA043 | Bima | Indonesia | Samurai S710XX (19 oz.) |
| 2 | SEA046 | Prawit | Thailand | Piger Works 20MFSI (20 oz.) |
| 3 | SEA025 | Suwit | Thailand | Piger Works x II F2F20 (20 oz. |
| 4 | SEA035 | Nigon | Thailand | Piger Works x II F2F20 (20 oz.) |
| 5 | SEA001 | Haziq | Malaysia | Pure Blue Japan PER-EX-013-1D (15 oz.) |
| 6 | SEA023 | Fajrin | Indonesia | Samurai S710XX (19 oz.) |
| 7 | SEA012 | Mohd Sukry | Malaysia | Sukajin Terletak (18 oz.) |
| 8 | SEA003 | Pathorn | Thailand | Piger Works 20MF (20 oz.) |
| 9 | SEA023 | Teerapol | Thailand | Piger Works 21BSU IBK (21 oz.) |
| 10 | SEA018 | Khomsan | Thailand | Piger Works MFSI (20 oz.) |
IIY5 – Re(Pair) – Top 5
| Rank | Number | Name | Location | Competed in |
| 1 | RE001 | Alex S. | Australia | Brave Star True Straight (21 oz.) |
| 2 | RE005 | Dimas Putra | Indonesia | Adelaide Mantis VIII (17 oz.) |
| 3 | RE003 | Jumadi | Indonesia | Momotaro 0205SP (15.7 oz.) |
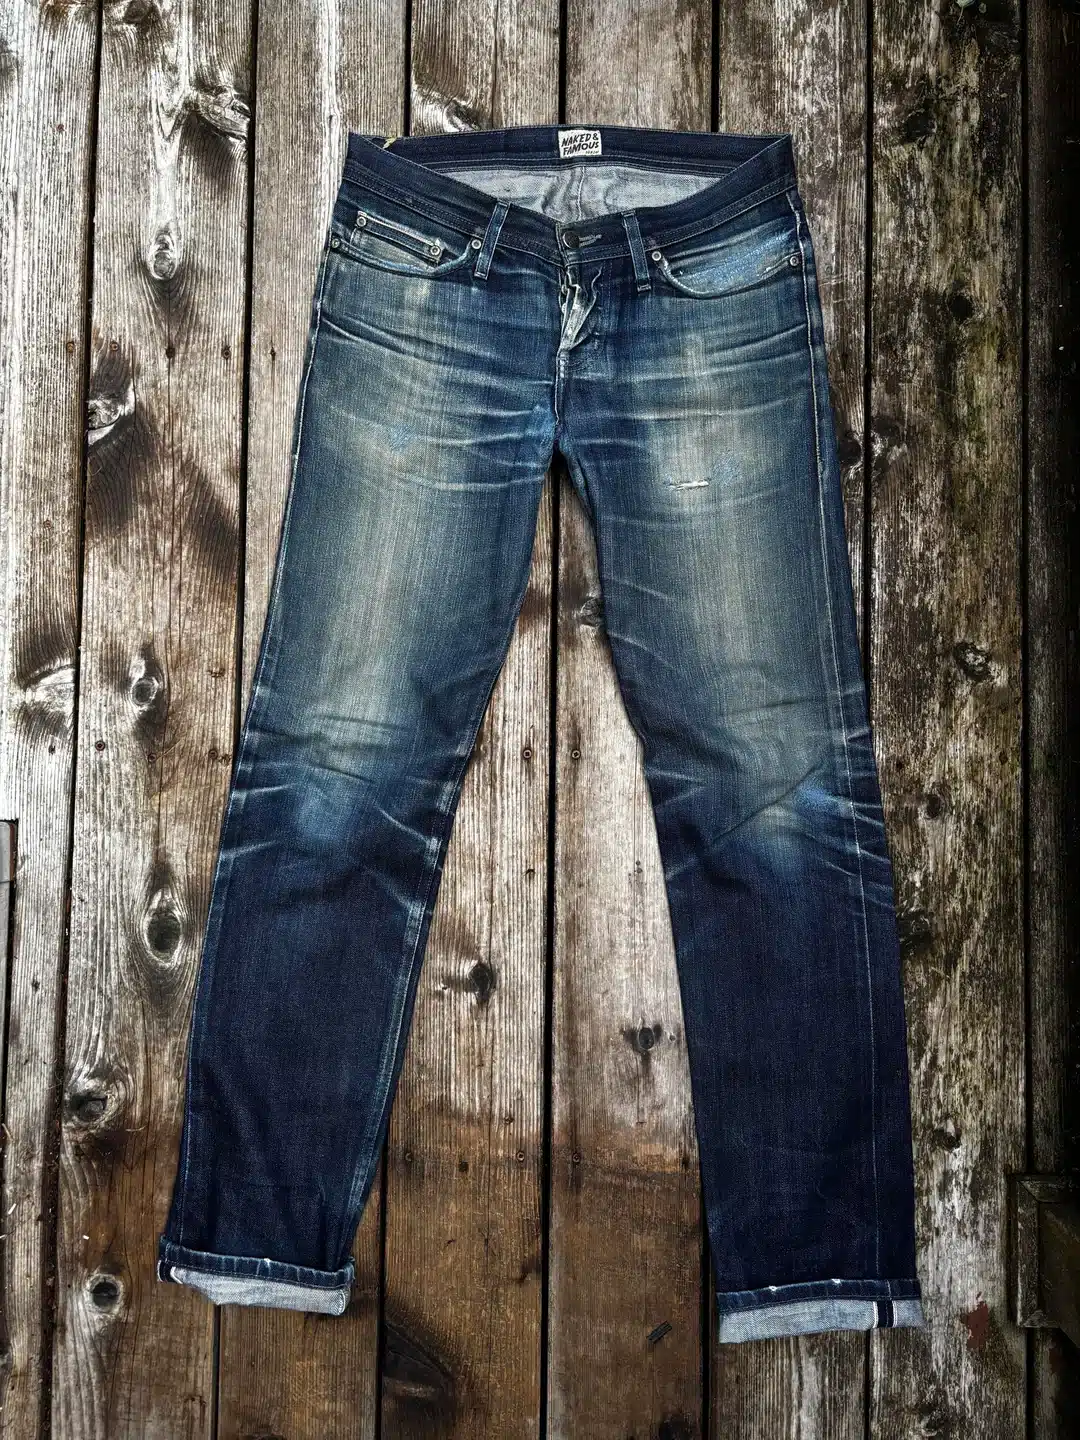
| 4 | RE017 | Richard L. | USA | Naked & Famous Greencast Slub (15 oz.) |
| 5 | RE016 | Liam | USA | Big John M104G (23 oz.) |
How the Winners Were Selected
Picking the best pairs from the field of more than 650 finishers was an intensely difficult process. I want to thank Mifflin Mabalot, Ricky Mataac, and Rudolph Caoi (all of them passionate and longstanding members of the Invitational community) for their invaluable assistance this year.
After being sorted into their appropriate conference, each fader’s submissions are scrutinized. I pick the Top 50 pairs in the Rest of the World Conference, and the team led by Mifflin Mabalot picks the Top 50 pairs in the Southeast Asian Conference.
The selected total of 100 pairs are then submitted to the Indigo Invitational community, who are asked to vote for their ten favourites. Based on these votes, sixteen pairs from each conference advance to the Top 20.
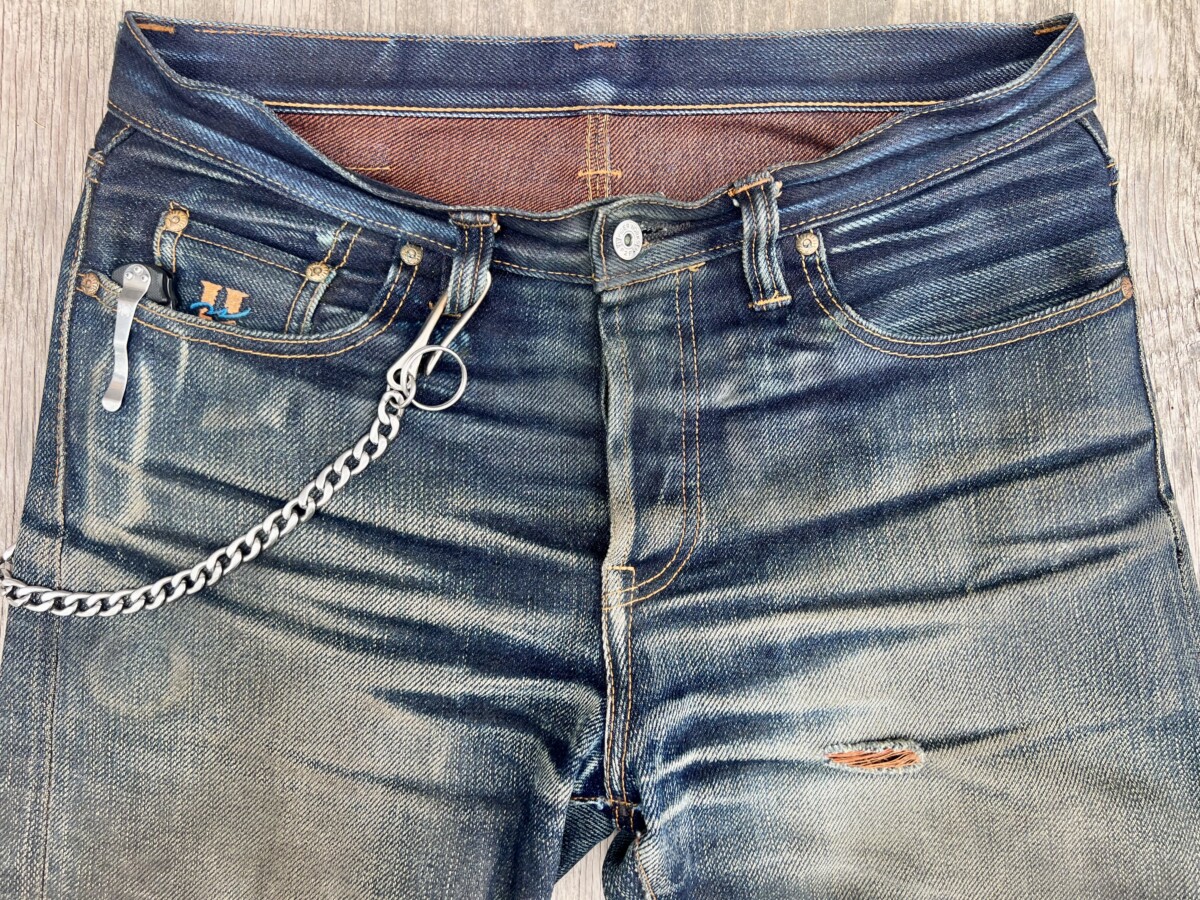
With assistance from the small community of denim enthusiasts in Oslo, I then selected four wildcard pairs from each conference to round out the Top 20.
After that, the Top 20 is submitted to the judging panel. Each conference has its own panel of denim industry insiders and knowledgeable enthusiasts. These judges lend their expertise and time to the competition without expecting anything in return. We are immensely grateful for their hard work and careful consideration.
Ruedi Karrer also helped me pick the Top 5 for the Re(Pair) category—a very small field of only 17 competitors. I was prepared to bring in another judge if we didn’t see eye to eye, but that was unnecessary. We were in complete agreement.
We’ll take a closer look at each of the winning pairs below with notes from the judges. Each pair has—I’m sure you’ll agree—earned its place. We stand behind our judges’ decisions, and we applaud the exceptional efforts of all our winning faders.
ROW Judging Panel
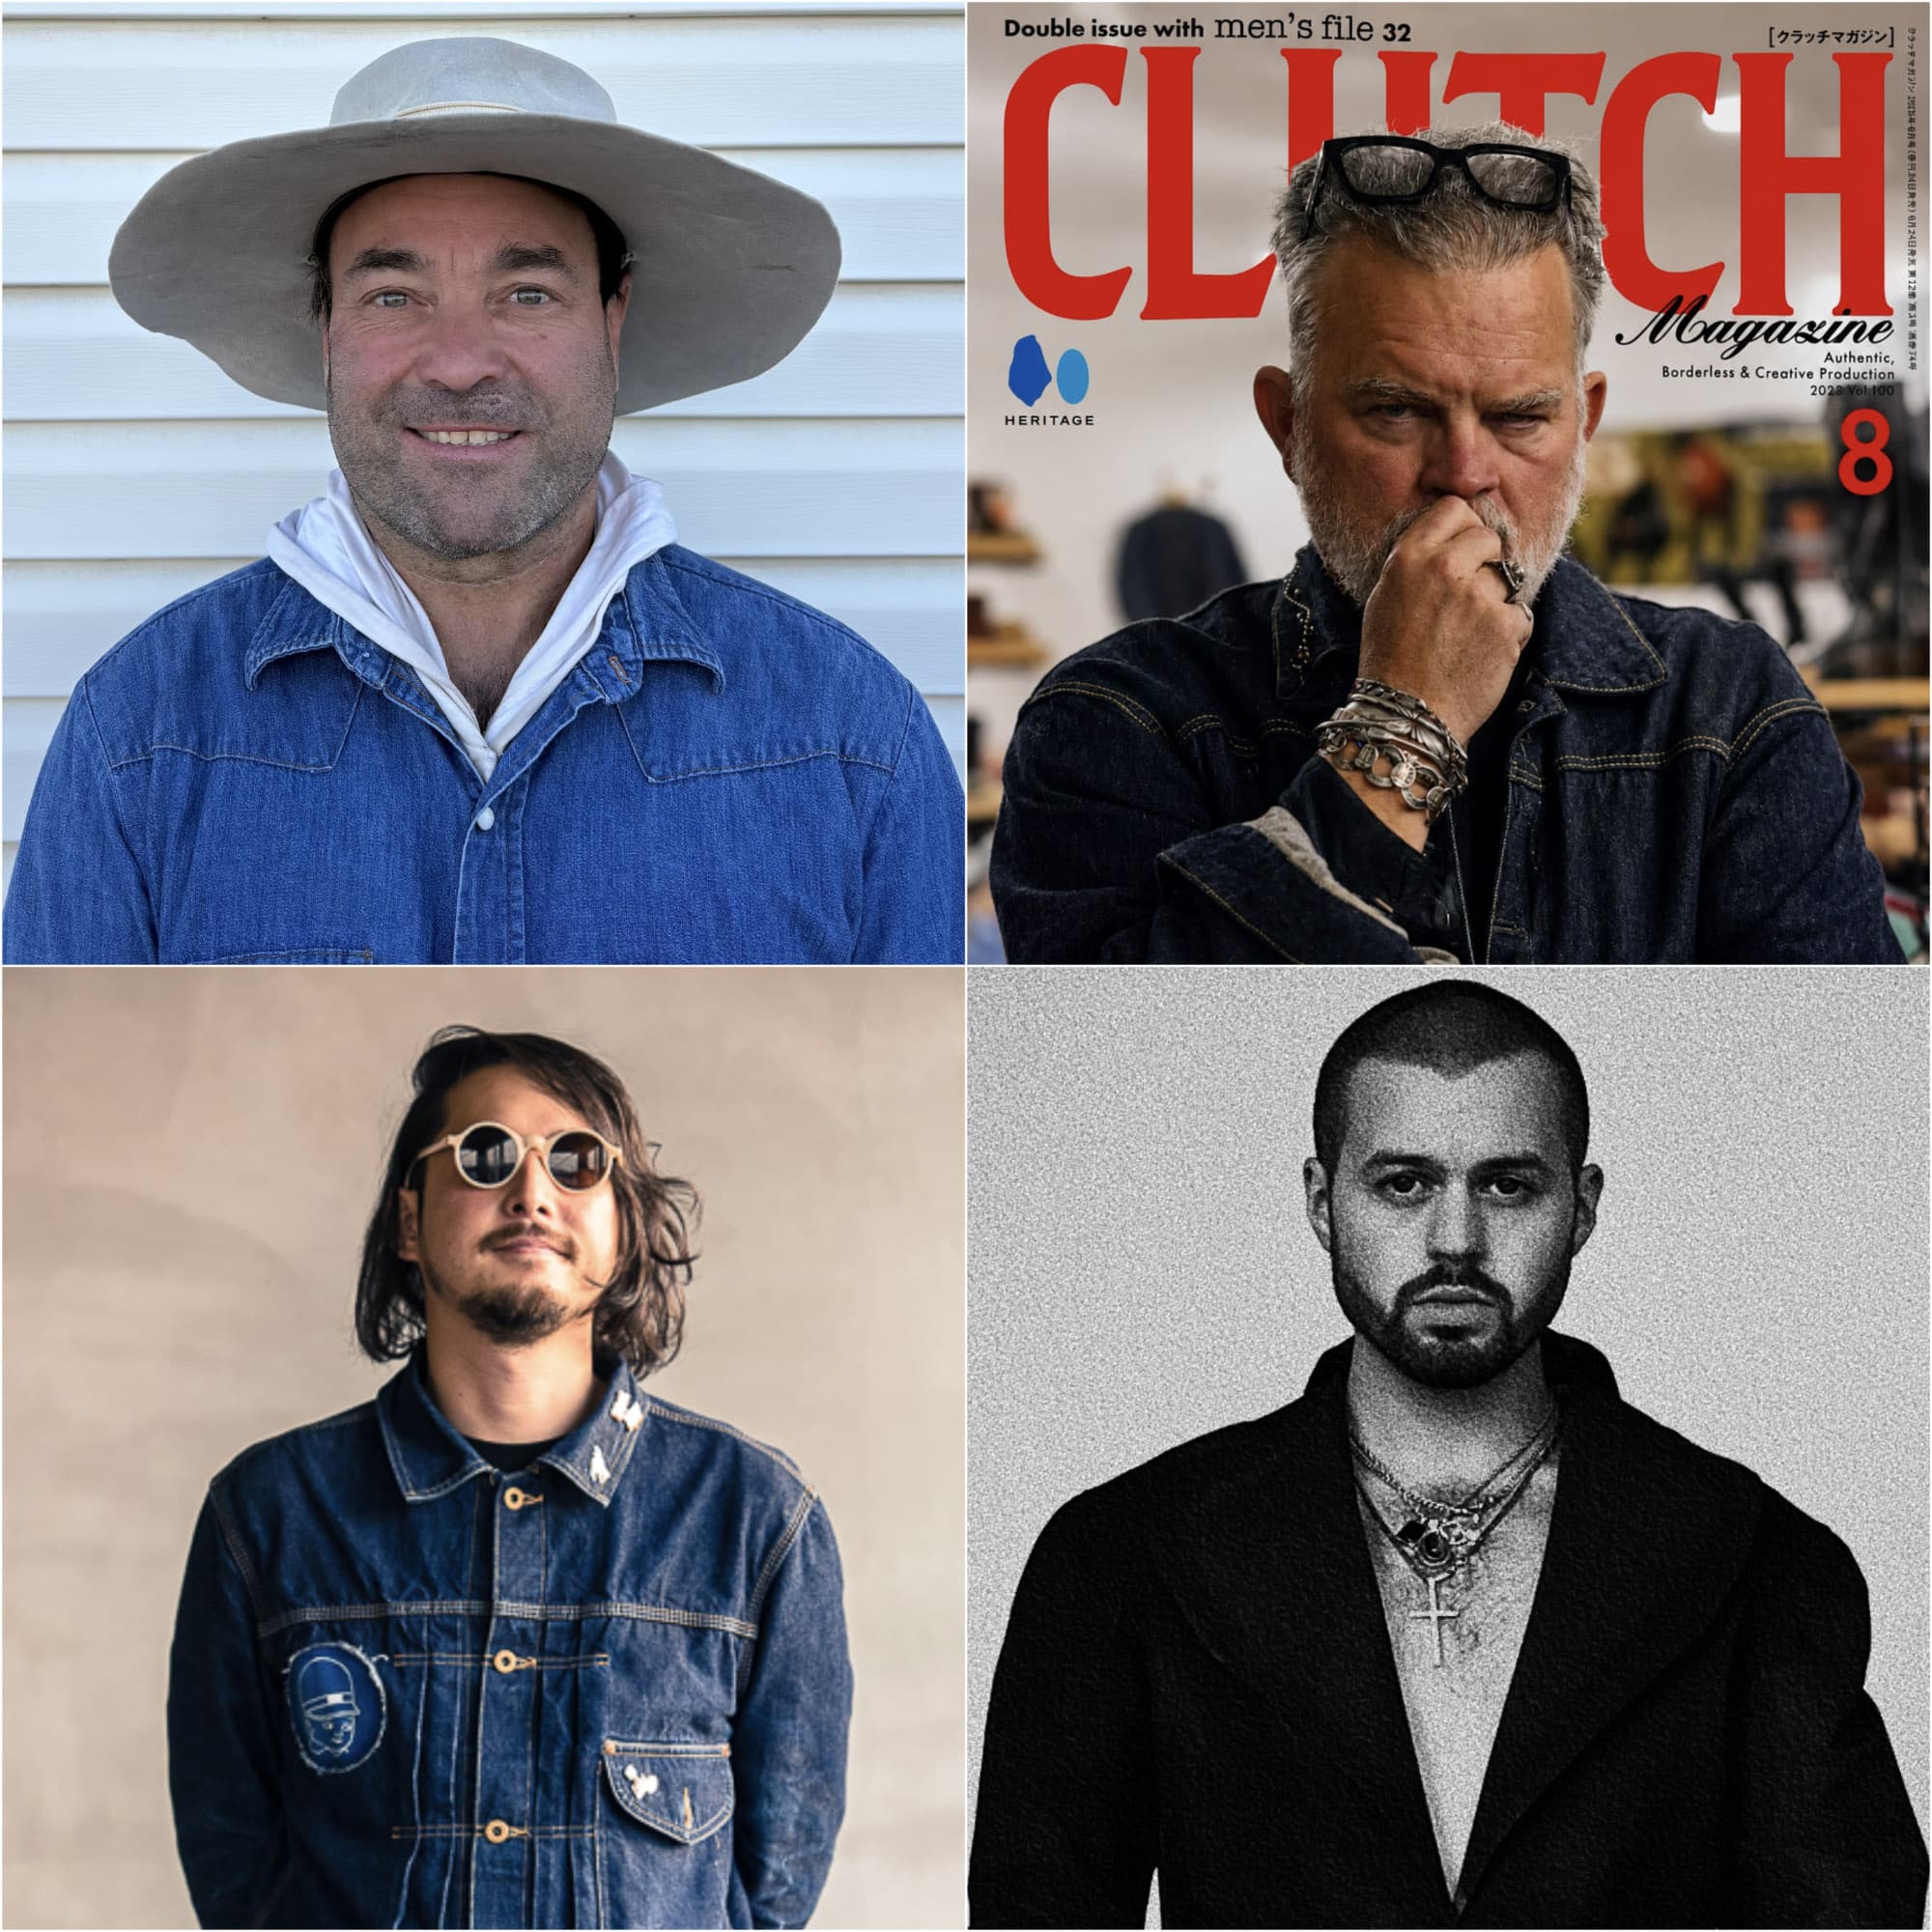
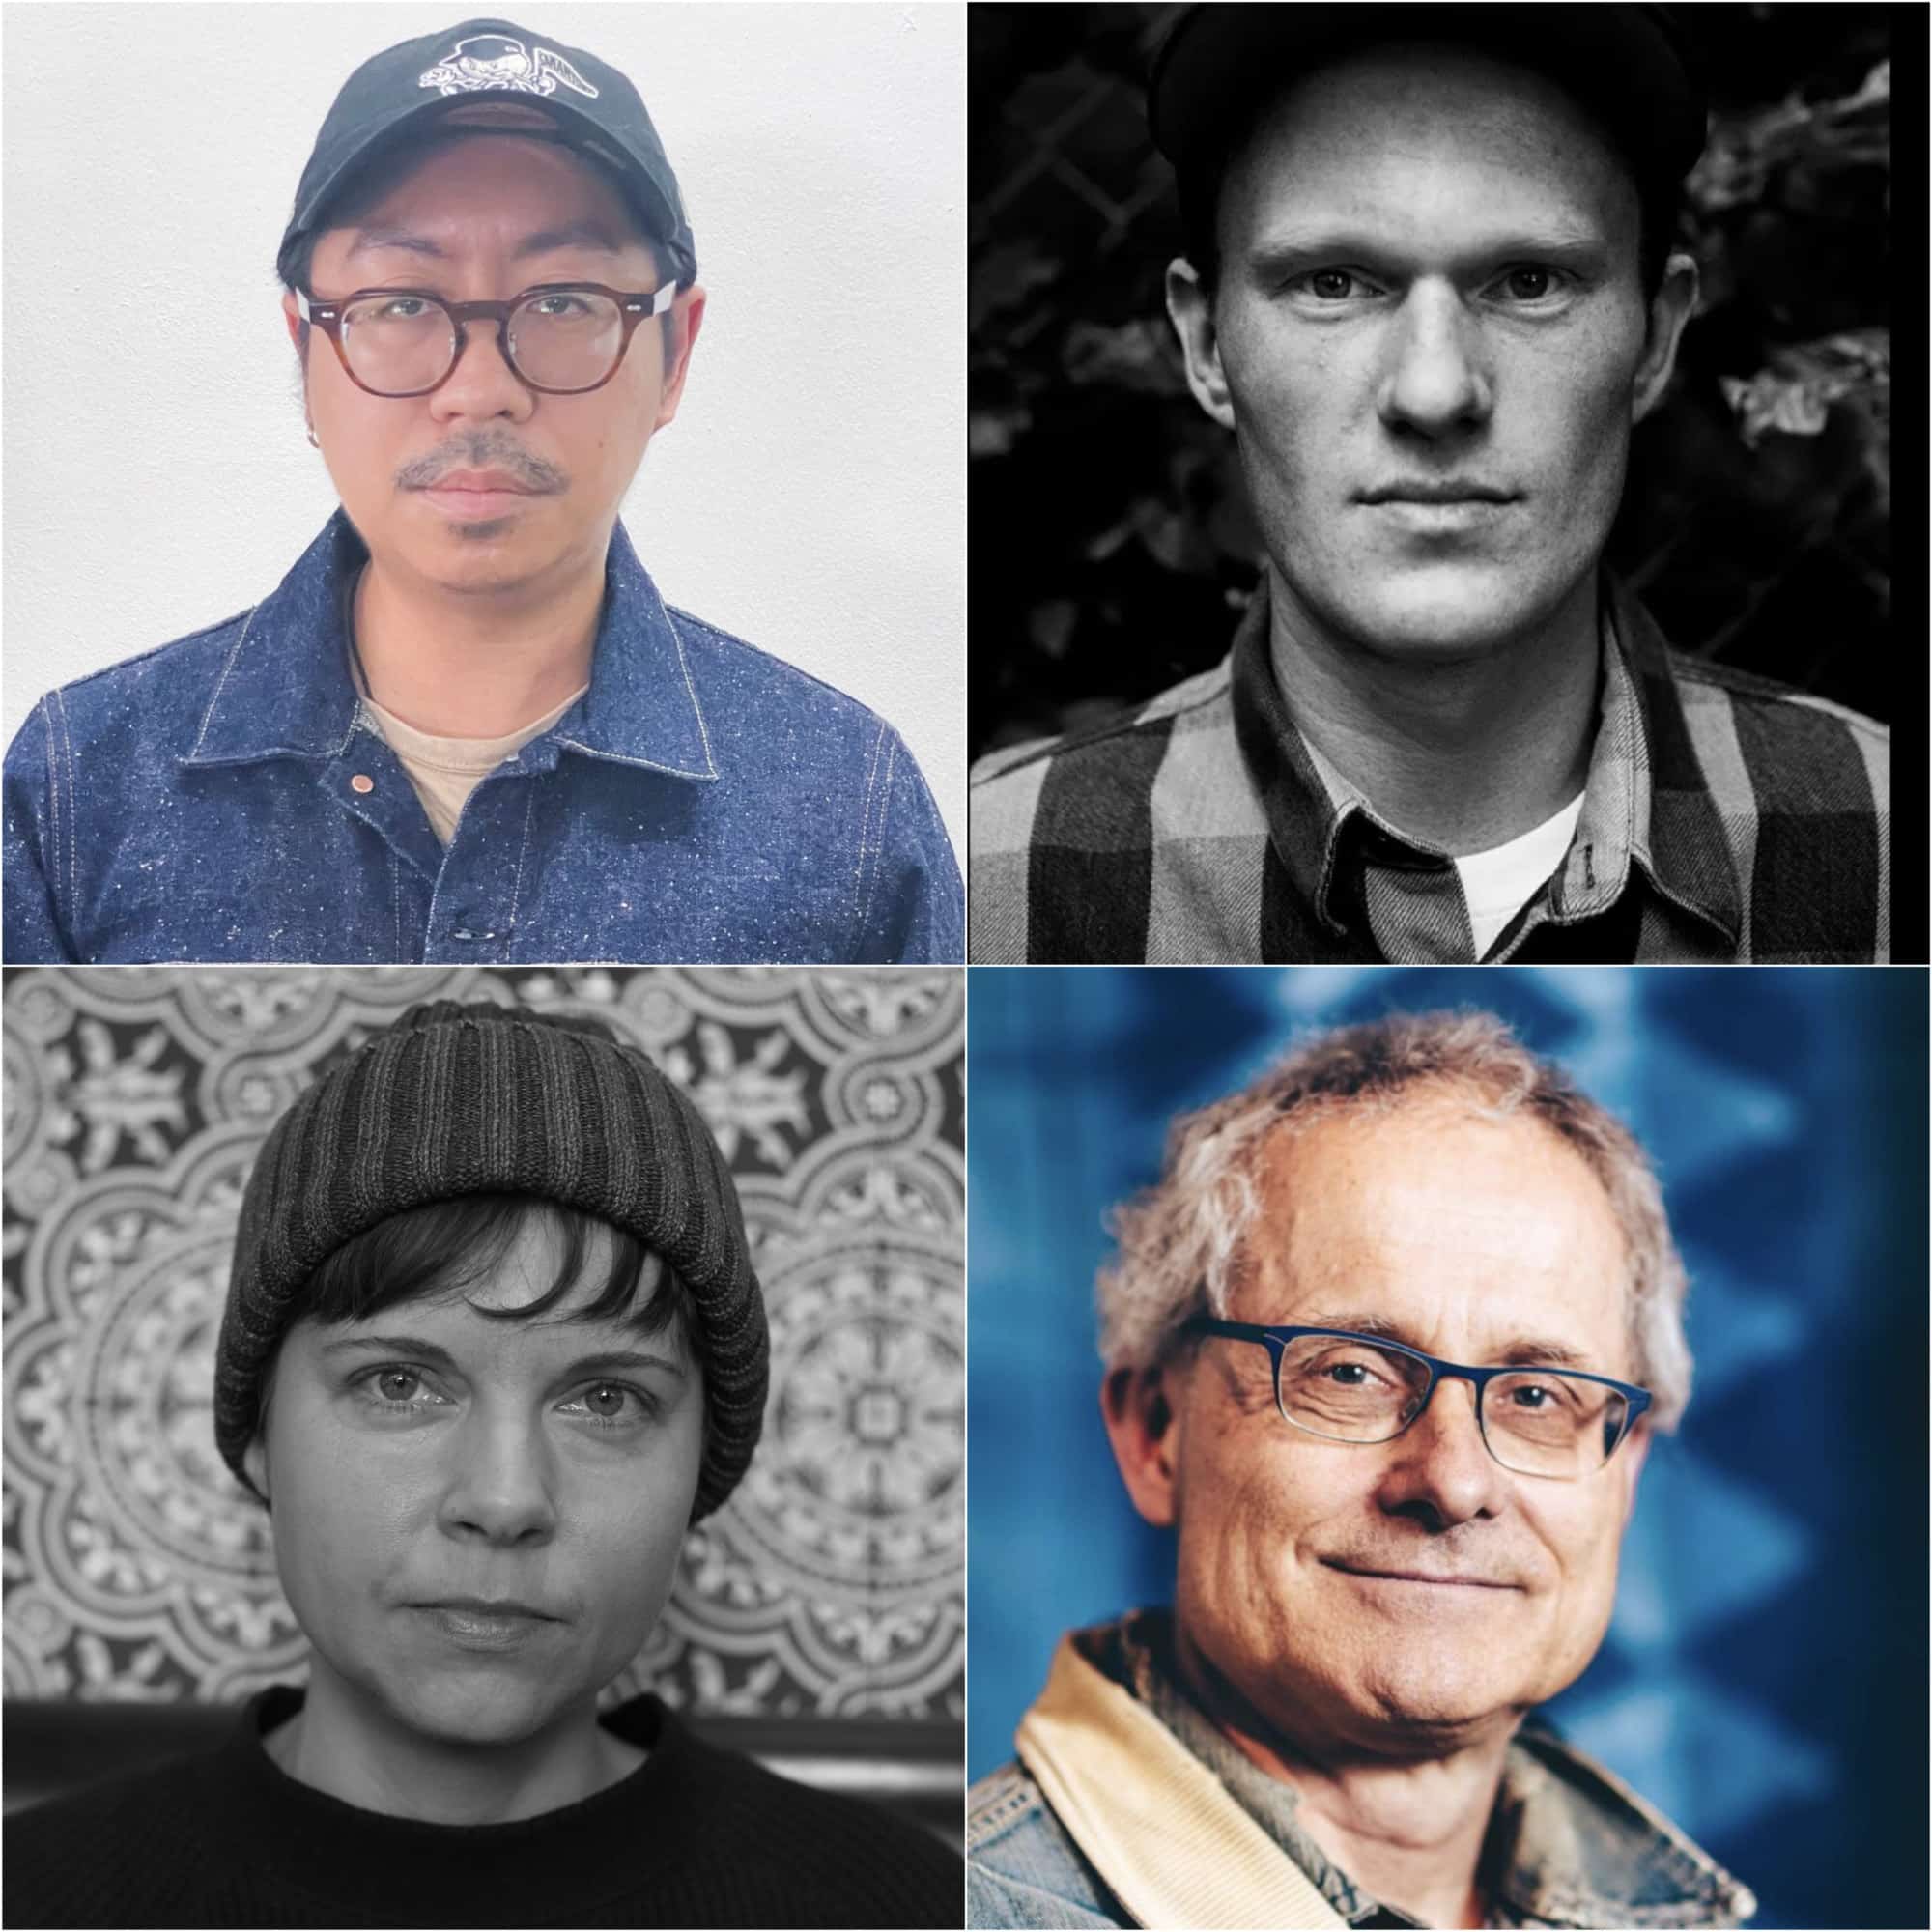
Clockwise from top left: Brit Eaton (Carpe Denim), Zip Stevenson (Stevenson Overalls), Gok (Pronto & Co), Thomas Bojer (Denimhunters), Ryo Nakakoji (TCB), Otto Alexander (Darnin Duke), Daniela Bergert (Wabi Sabi), and Ruedi Karrer (Swiss Jeans Freak)
SEA Judging Panel
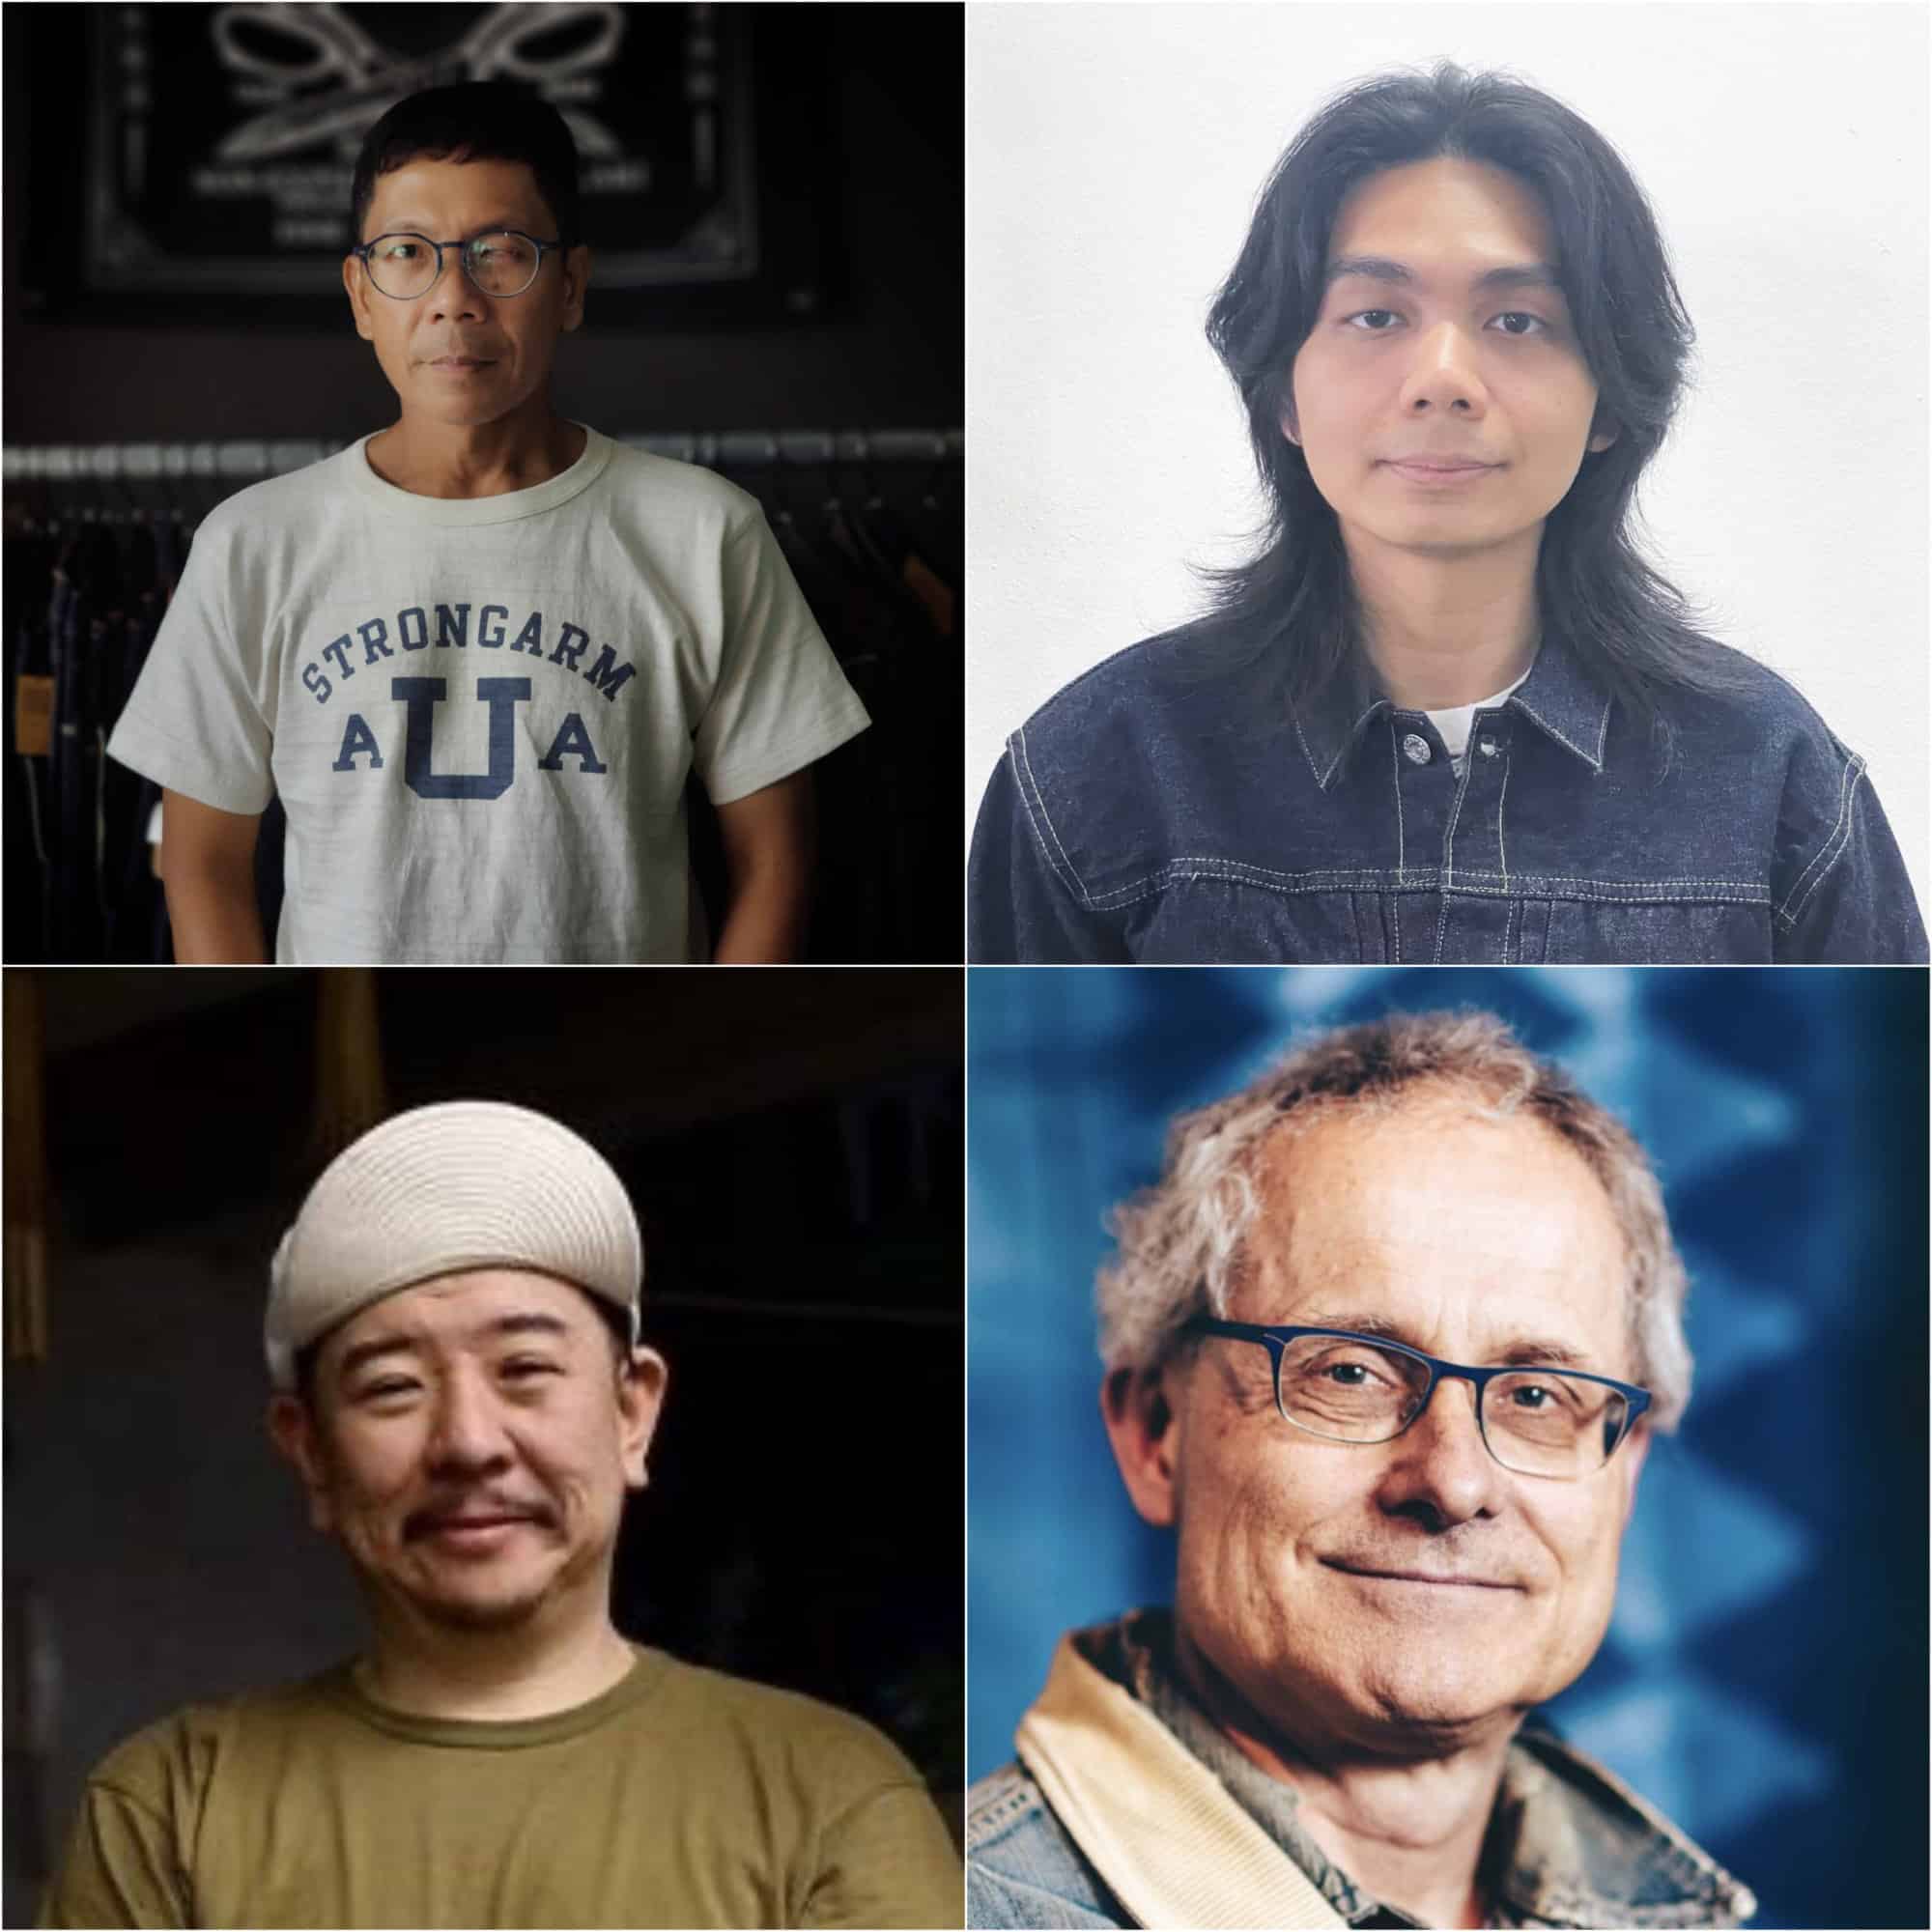
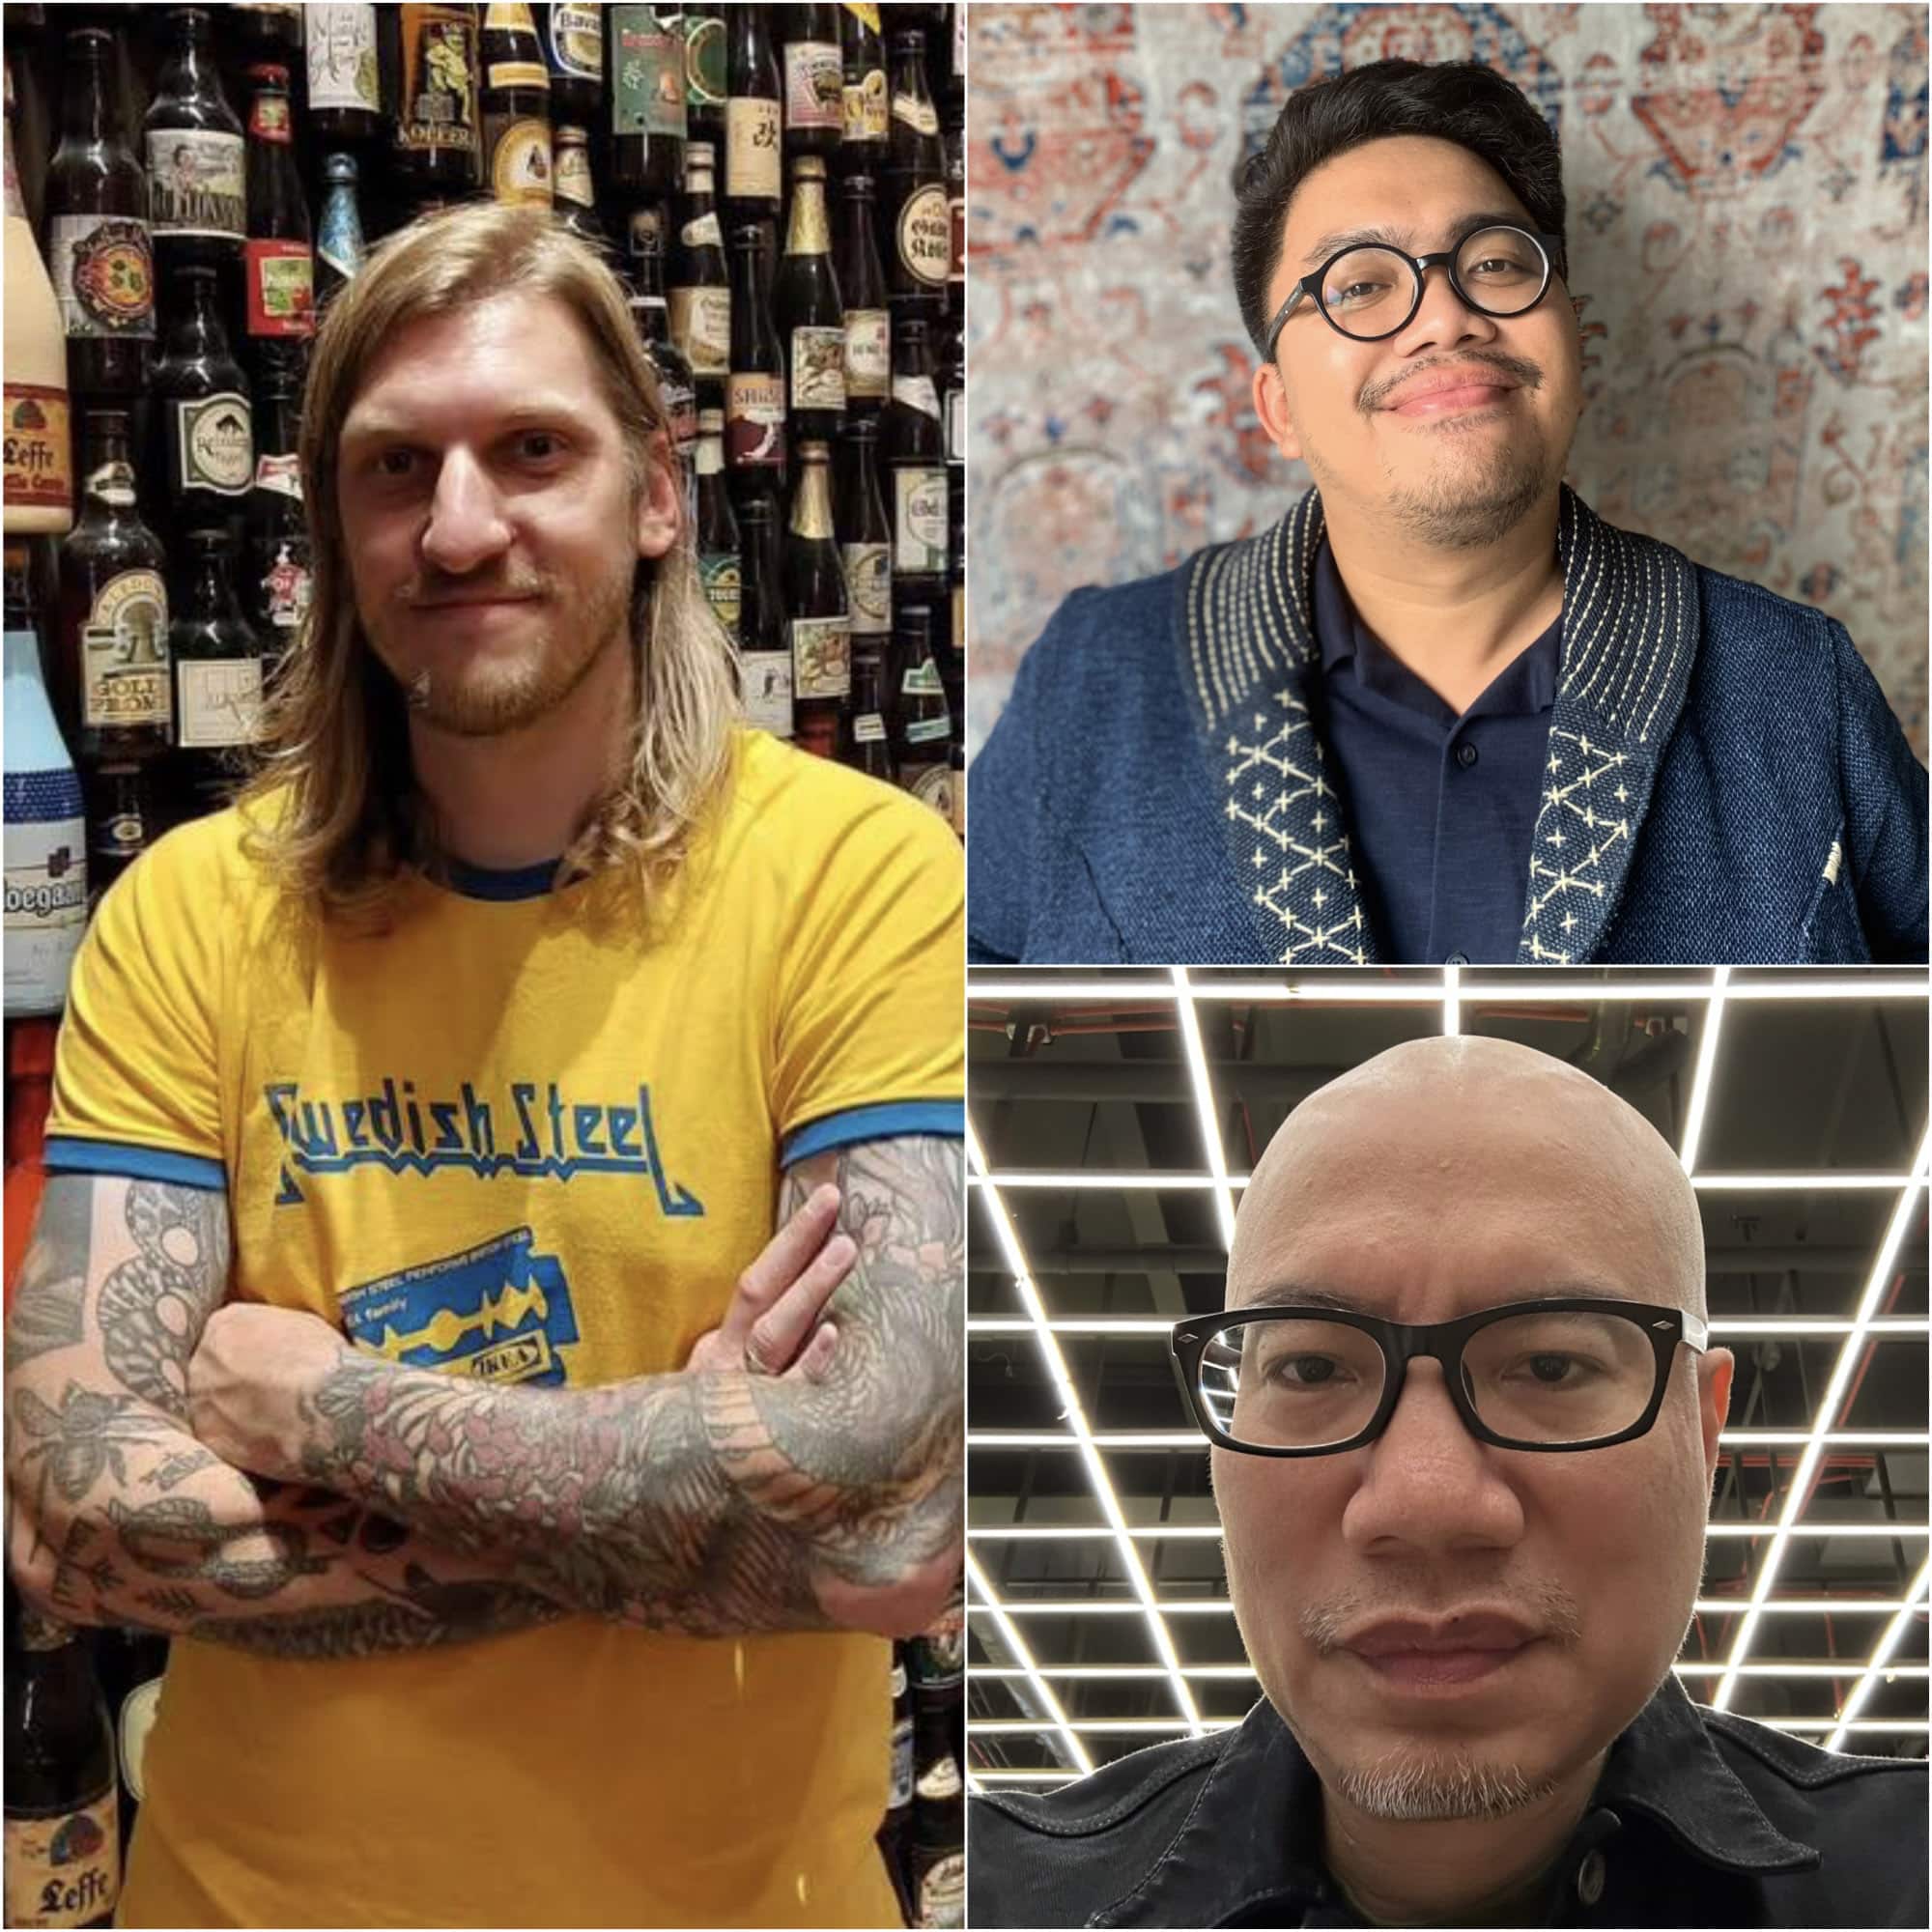
Clockwise from top left: Hasri Chie (Cheese Denim Works), Cheese (Pronto & Co), Florian Leikam (enthusiast), Noenggaling Tjatur (Denimheads Indonesia), Edie Lim (Signet), Ruedi Karrer (Swiss Jeans Freak), and Kai Huang (Denim Manila)
Why We Have Two Conferences
The two-conference system allows us to recognise more incredible faders from all around the world.
The Southeast Asian conference is mostly faders from Thailand, Malaysia, Indonesia, and The Philippines. This region is known for producing eye-catching high-contrast fades, and we gave them their own conference to give even more of these fades a chance at a podium finish.
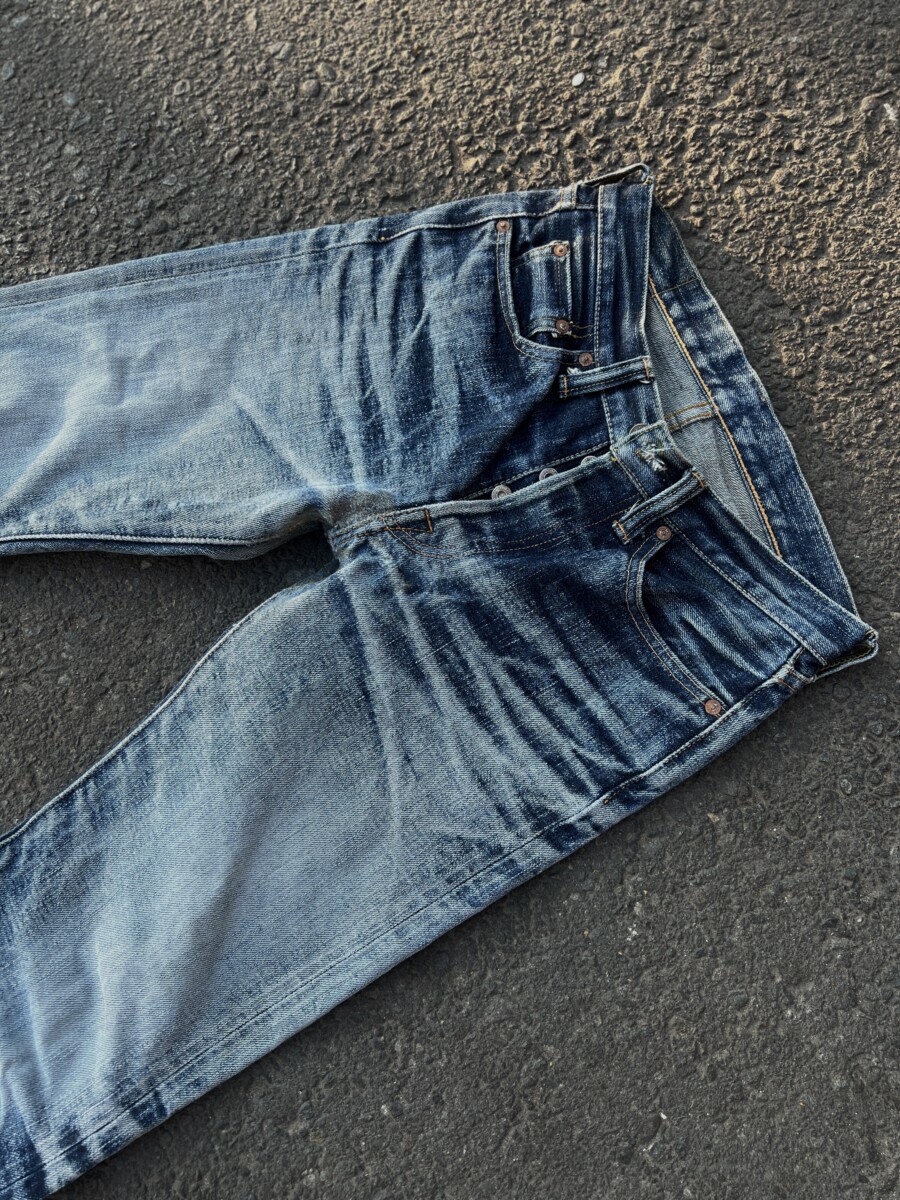
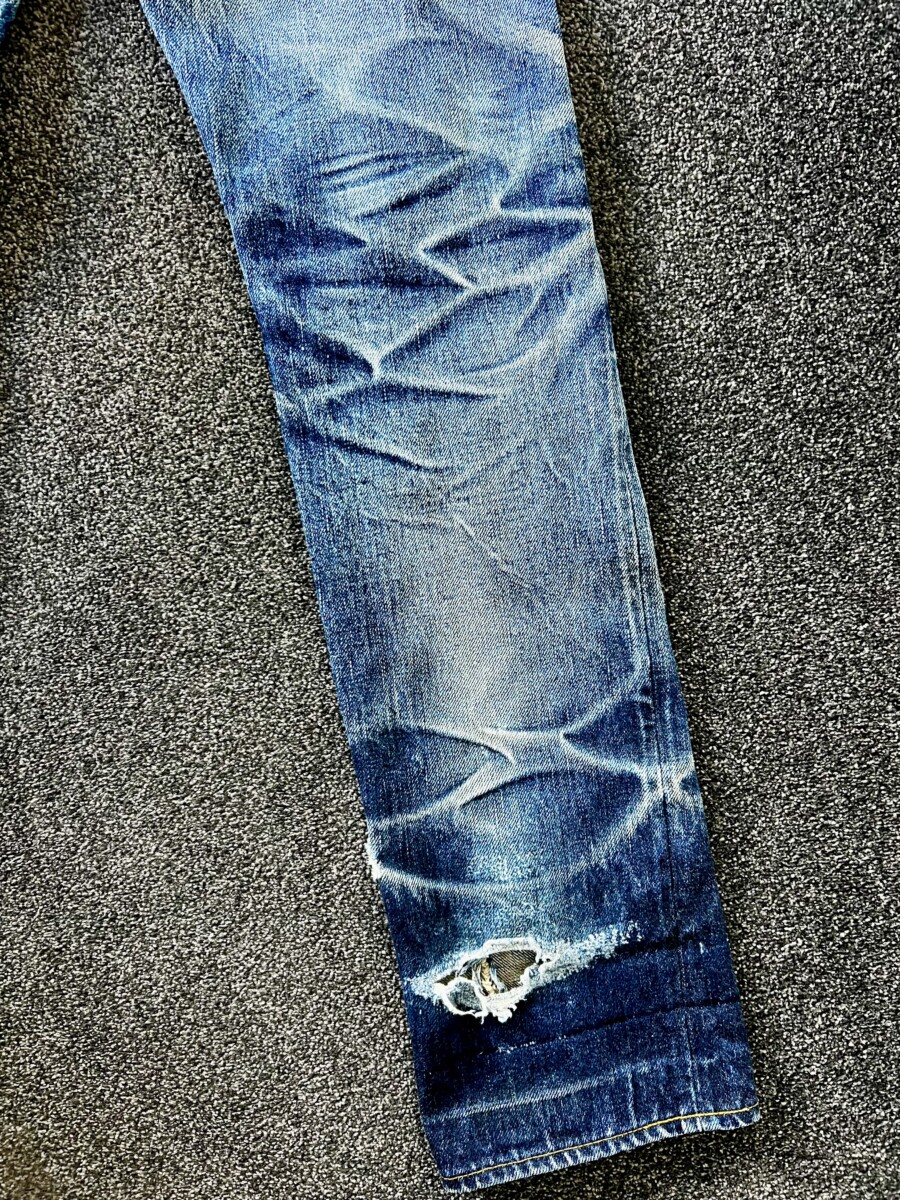
The Rest of the World conference is largely made up of faders from North America, Europe, and Australia. Fade styles in this conference vary wildly, and our two-conference system allows us to recognise more of these highly individualised fades.
Finally, our Re(Pair) arm is for faders who, having completed a full year of the competition, want to return for a second lap of the track in the same pair. It’s a much smaller group, but this arm of the competition regularly produces remarkable fades—the product of a two-year journey that tests the limits of their jeans.
A Word About Our Y5 Results
While there’s a wide range of opinions and preferences on our judging panels, all of our judges expressed a preference for natural and unforced fades. Thomas provided the following as part of his overall assessment of the field:
“The pairs I tend to respond to most are the ones where the fades feel like a consequence of wearing the jeans rather than the sole purpose of wearing them […] I’m looking for balance, texture, and wear that feels believable.”
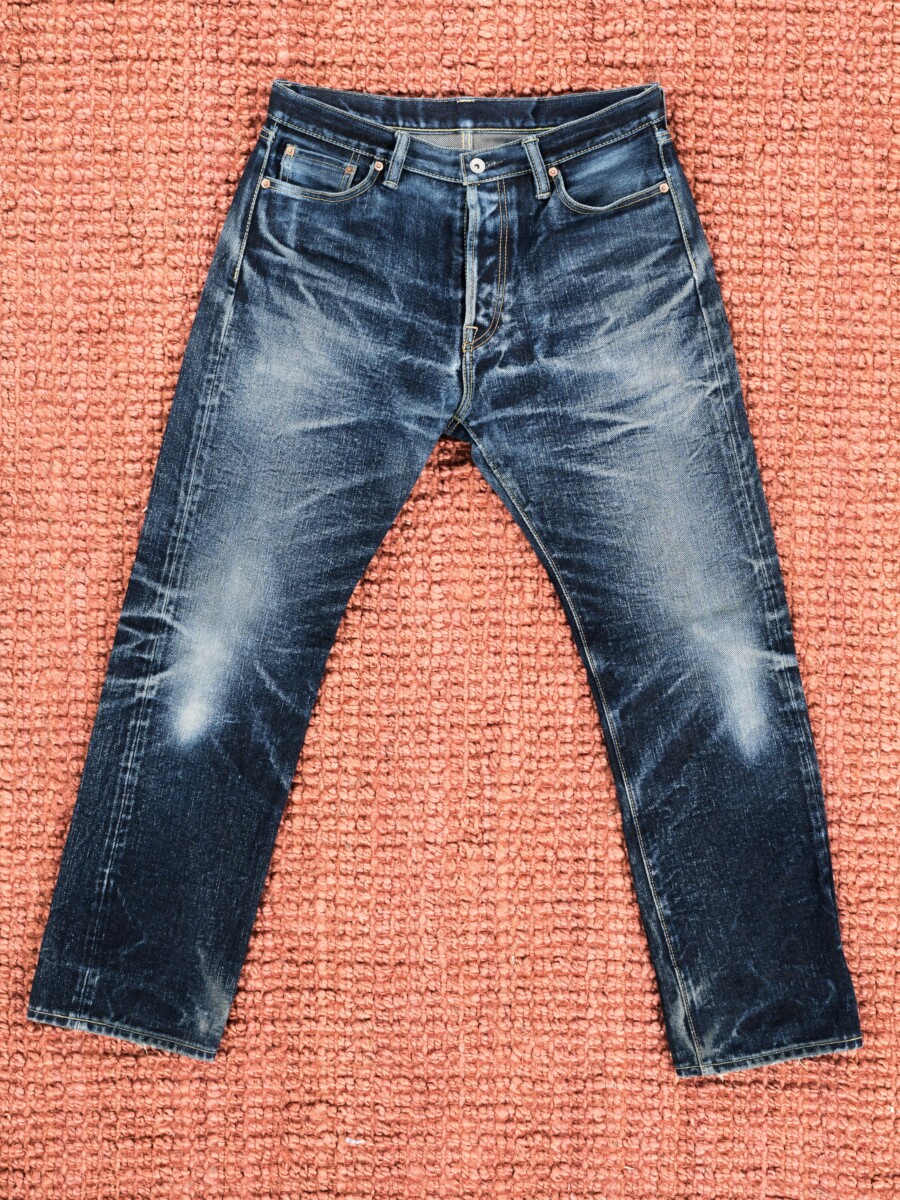
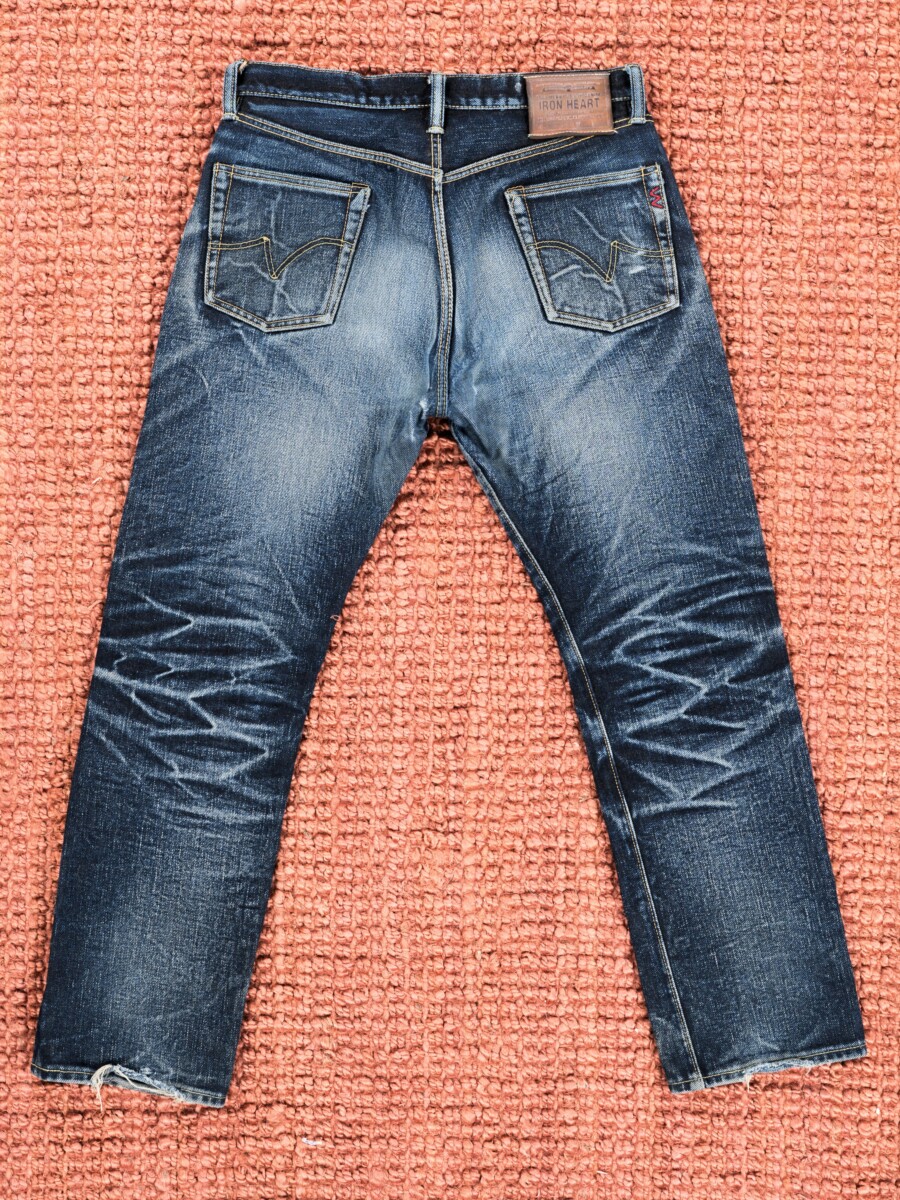
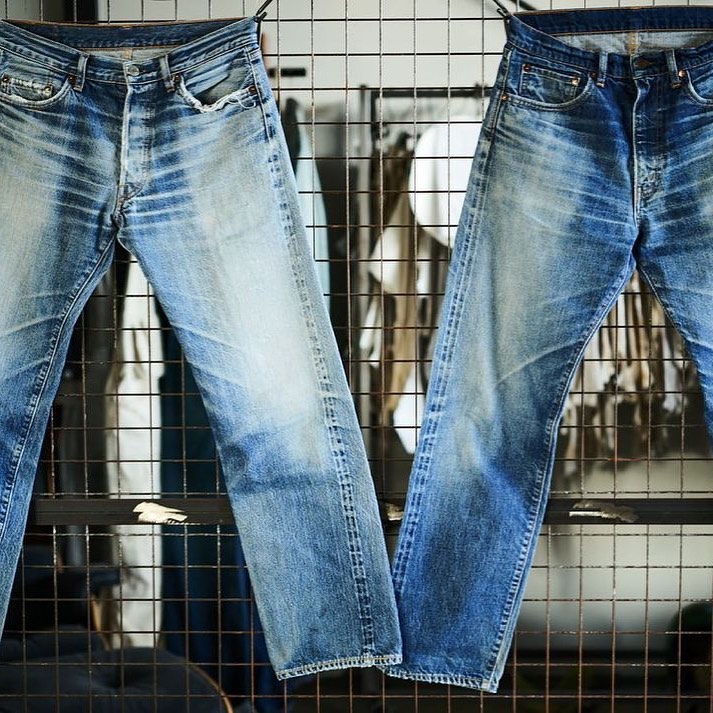
I often get asked what kind of fades the judges prefer, high contrast or vintage fades. I’ve seen over and over again that what draws the judges’ (and my) attention to a particular pair is not absolute fidelity to a particular fade style; it’s that clear and unmistakable evidence that the fader has lived a full and rich life during their trip around the sun.
The well-lived life transforms raw pairs into vivid canvases that tell a story about time, endurance, and passion. Allow yourself to be inspired by these fades, not just in terms of what you wear but what you do while you wear it.
Now, without further ado, our winners.
IIY5 Rest of the World Conference Top 10
As you’ll see later, the Southeast Asian Conference was dominated by a single brand. The Rest of the World Conference wasn’t. Iron Heart, Samurai, and Big John all stand tall on the podium, joined by Piger Works (tied with Iron Heart for most ROW Top 10 appearances) and a nice assortment of Japanese and American brands.
Voting was exceptionally tight this year, with just one point separating first from second, and second from third. Every pair in the Top 20 appeared in at least one of our judge’s Top 10s, and no single pair appeared in all of them. Two ties in the Top 10 were settled with tiebreakers (we used the community vote to break ties when necessary).
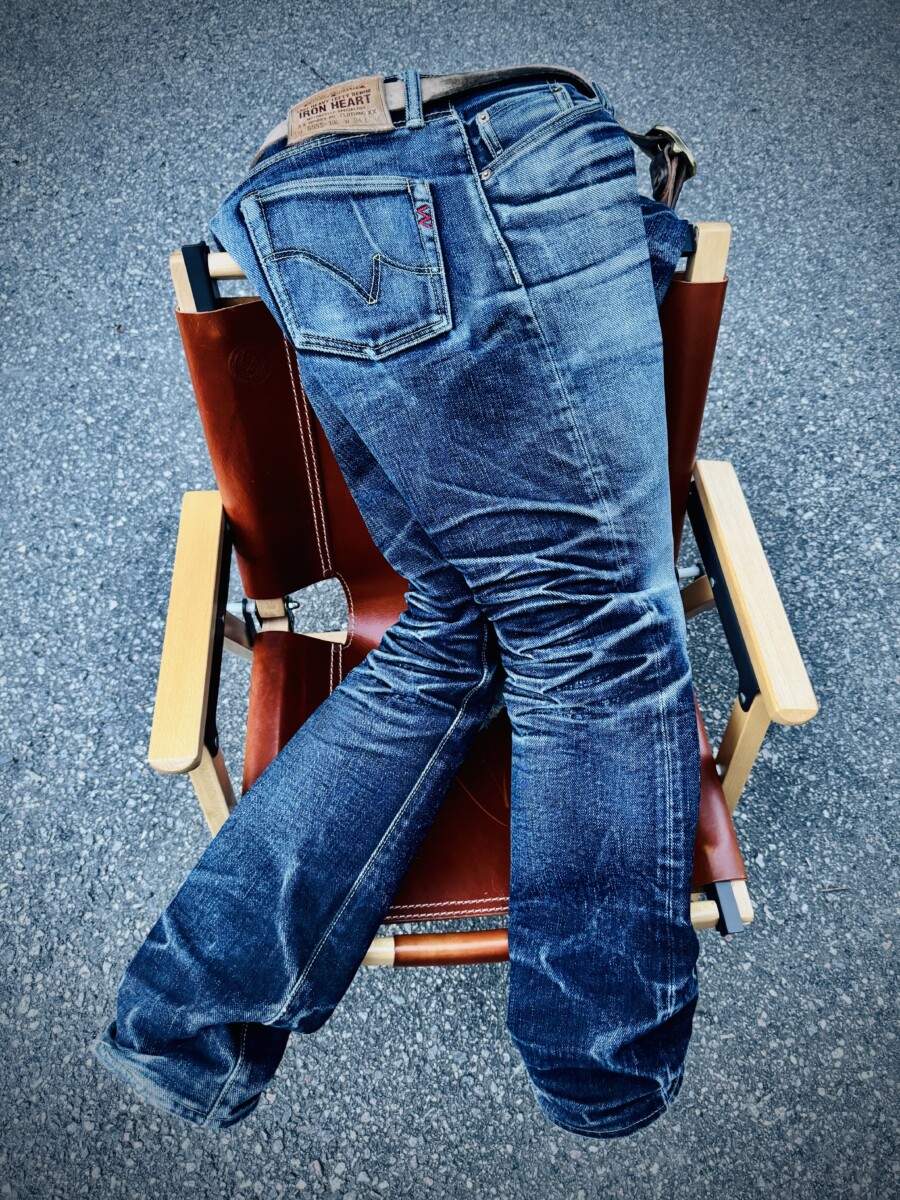
1st Place: Jorn-Bjorn Fuller-Gee (ROW025)
Competed in: Iron Heart 555-L (19 oz.) – Get them here
A fan favourite since joining the competition community in Year Four, J.B. quickly made a name for himself by documenting some of the extreme lengths he goes to when fading his selvedge in the extreme north of Norway.
He finished just off the podium last year, and he’s bested that effort this year with his gorgeously faded lefties from Iron Heart. He picked this pair because of its reputation for producing exceptionally strong fades, and it’s clear that he picked the perfect pair for fun in the midnight sun.
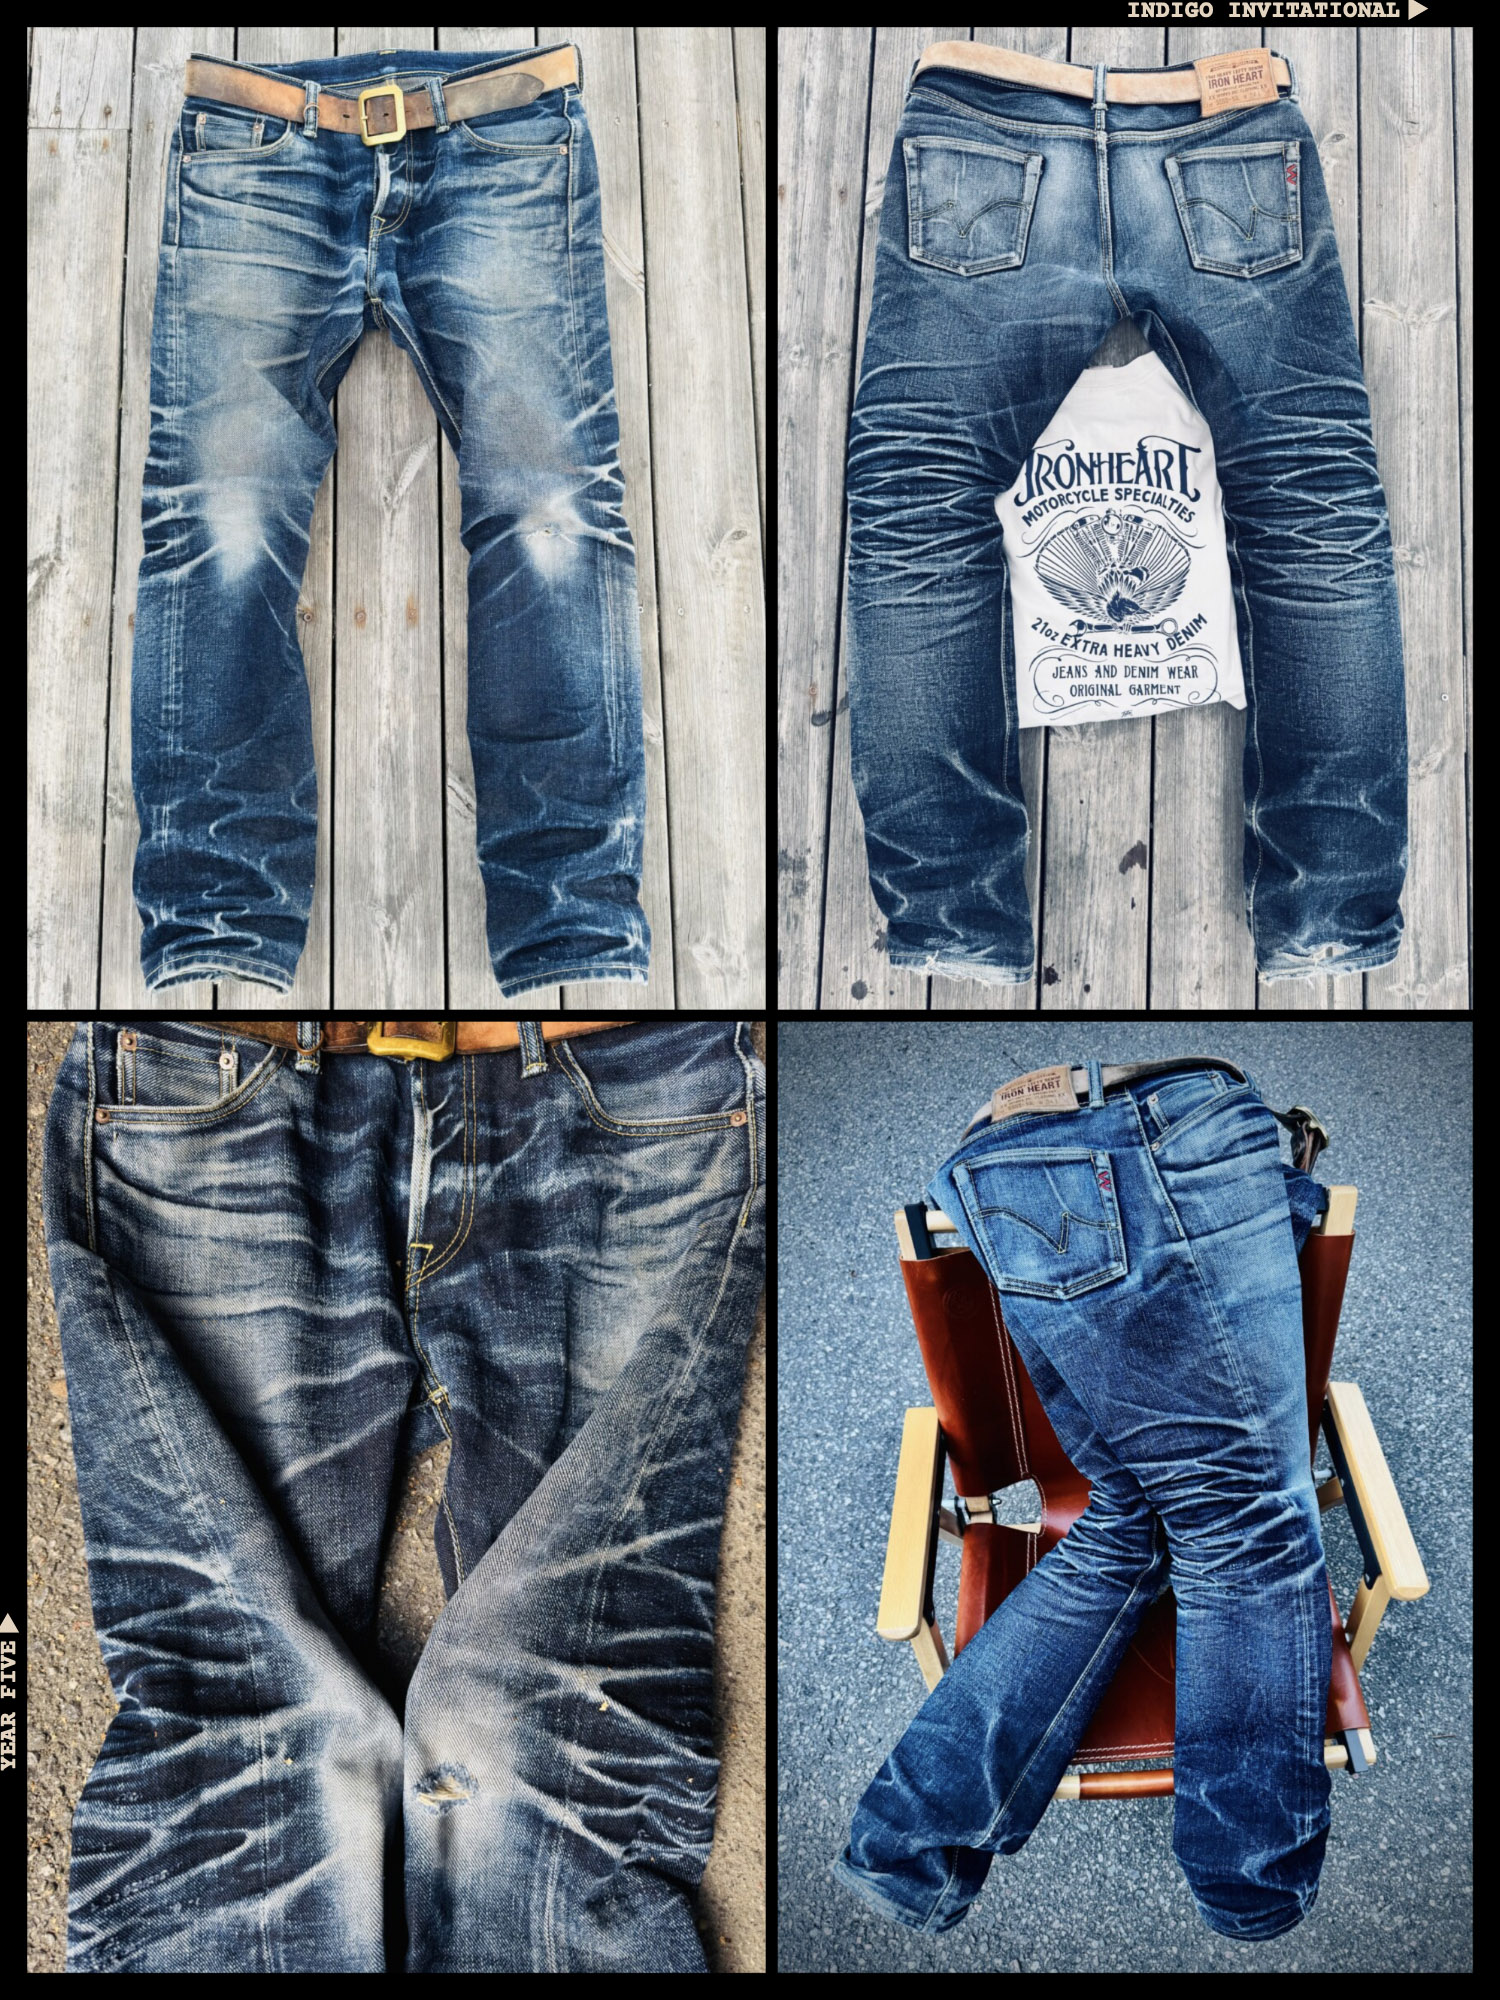
After winning the community vote, this was the pair to beat in the Rest of the World Conference. With one perfect 10, one 9, and a range of other judges cards from 4 to 8, J.B. ended his year at the top of the podium, beating out his closest competitor by a single point.
“The contrast here is brutal—in the best way” – Thomas Bojer
“The most complete fade of the Top 20 […] You can almost reconstruct how these jeans have been worn. Nothing looks too perfect, which makes them the perfect number 1.” – Otto
Iron Heart is available at: Franklin & Poe (US), Brooklyn Clothing (CA), and Iron Shop Provisions (US), and Division Road (US).
2nd Place: Aaron Kikola (ROW011)
Competed in: Big John Rare 008 (15.5 oz.) – Get them here
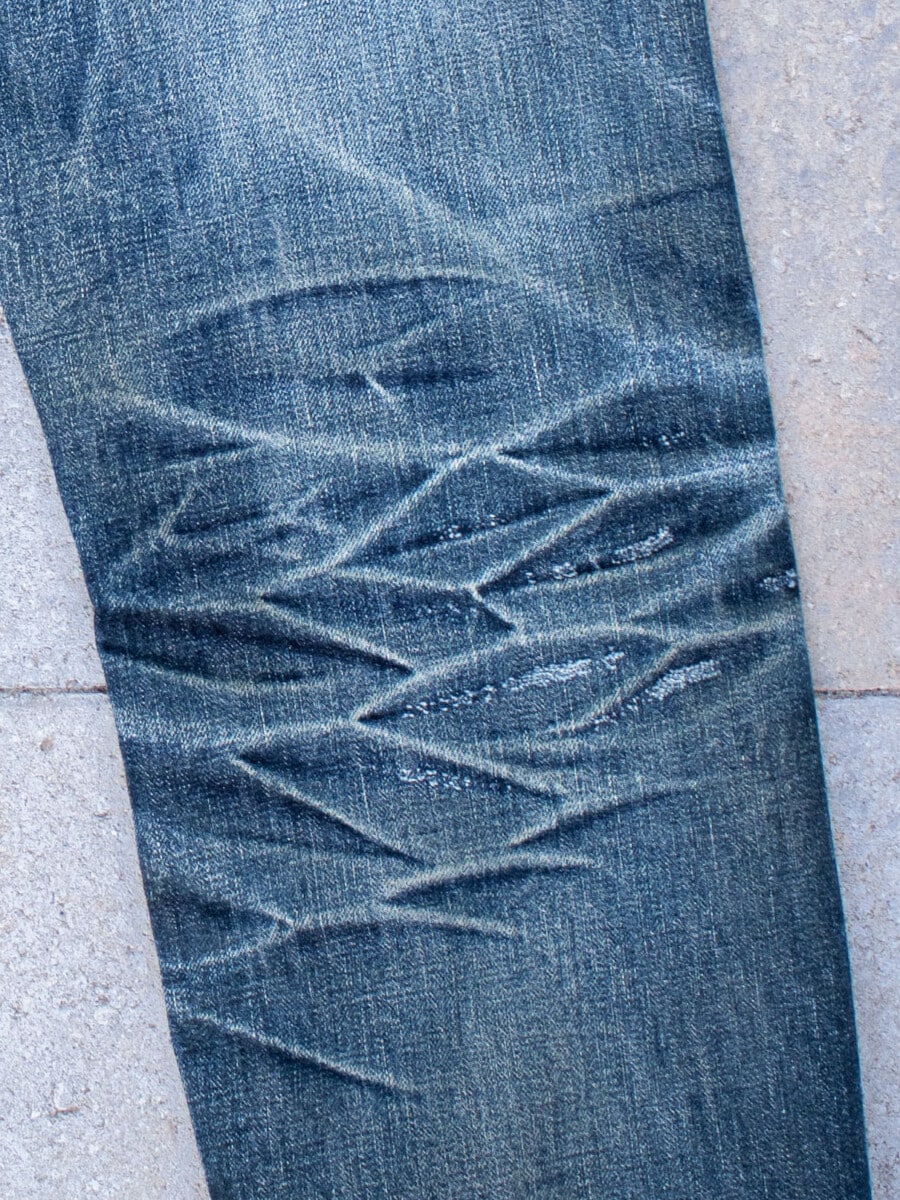
Aaron has magic legs. He’s an outdoor enthusiast, which helps explain some of his ability to bring the absolute best out of his pairs, but there’s some kind of special ingredient to his fades that makes them so arresting.
Big John gave him this pair of Rare 008s at the beginning of the year in the hopes that he’d be an excellent ambassador for the brand in the competition. We’ve been recommending this denim for years, and Aaron has shown exactly why this pair is as essential as they come.
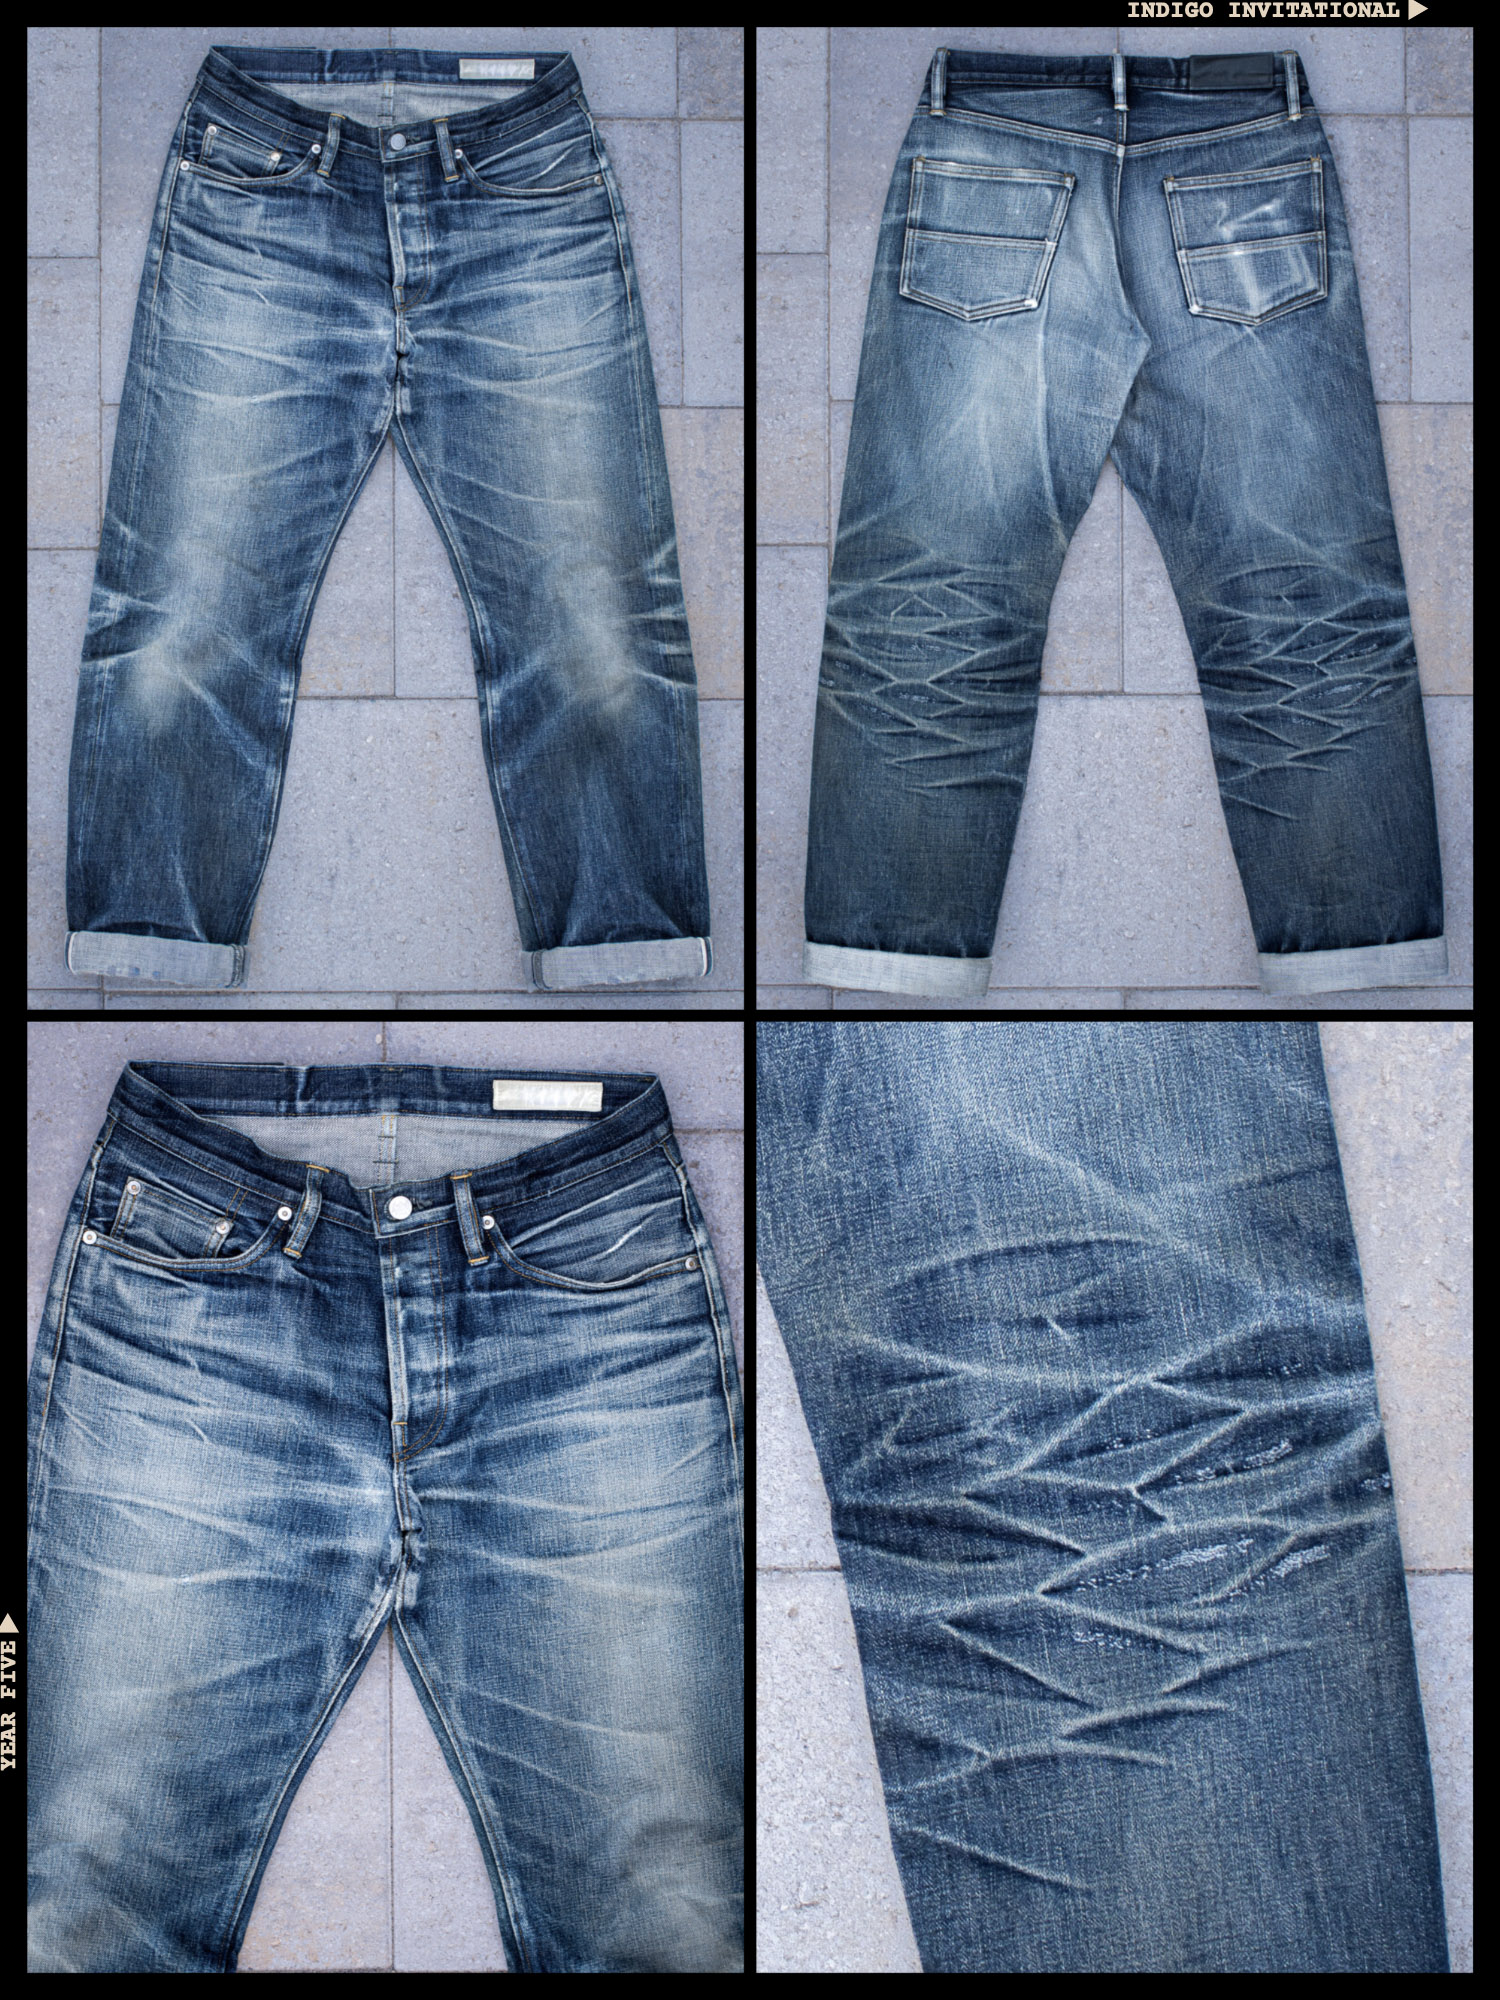
Very nearly pulled to the top of the podium by our last judge to submit his judging card, Aaron has come within a hair’s breadth of the gold medal. He was the only finisher this year to appear on 7 out of 8 of the judging cards.
“Subtle yet beautiful. Classic and timeless.” – Brit
“This is the Big John that got away from me. I passed on a pair a decade ago, and and these beautifully even, loose-fit fades—with those deep knee creases—show exactly why it has stayed a grail denim for me ever since.” – Thomas
“Natural and unexaggerated.” – Zip
Big John is sold at Redcast Heritage (ES), Cultizm (DE), Hinoya (JP), and Franklin & Poe (US)
3rd Place: Darren Middleton (ROW050)
Competed in: Samurai S5000VX (21 oz.) – Get them here
Darren has been a perennial contender in this competition for years, but he found an entirely new gear this year. His day-to-day work on Australian construction sites finally found a match in this heavy denim from Samurai. The results speak for themselves: a best-ever fade and a best-ever finish.
I spotted this one coming when we were still in the middle of the competition. Even early on, it was clear that this pair would be going very deep in the competition. He pulled away from the pack with every passing month. Explosive work from our man down under.
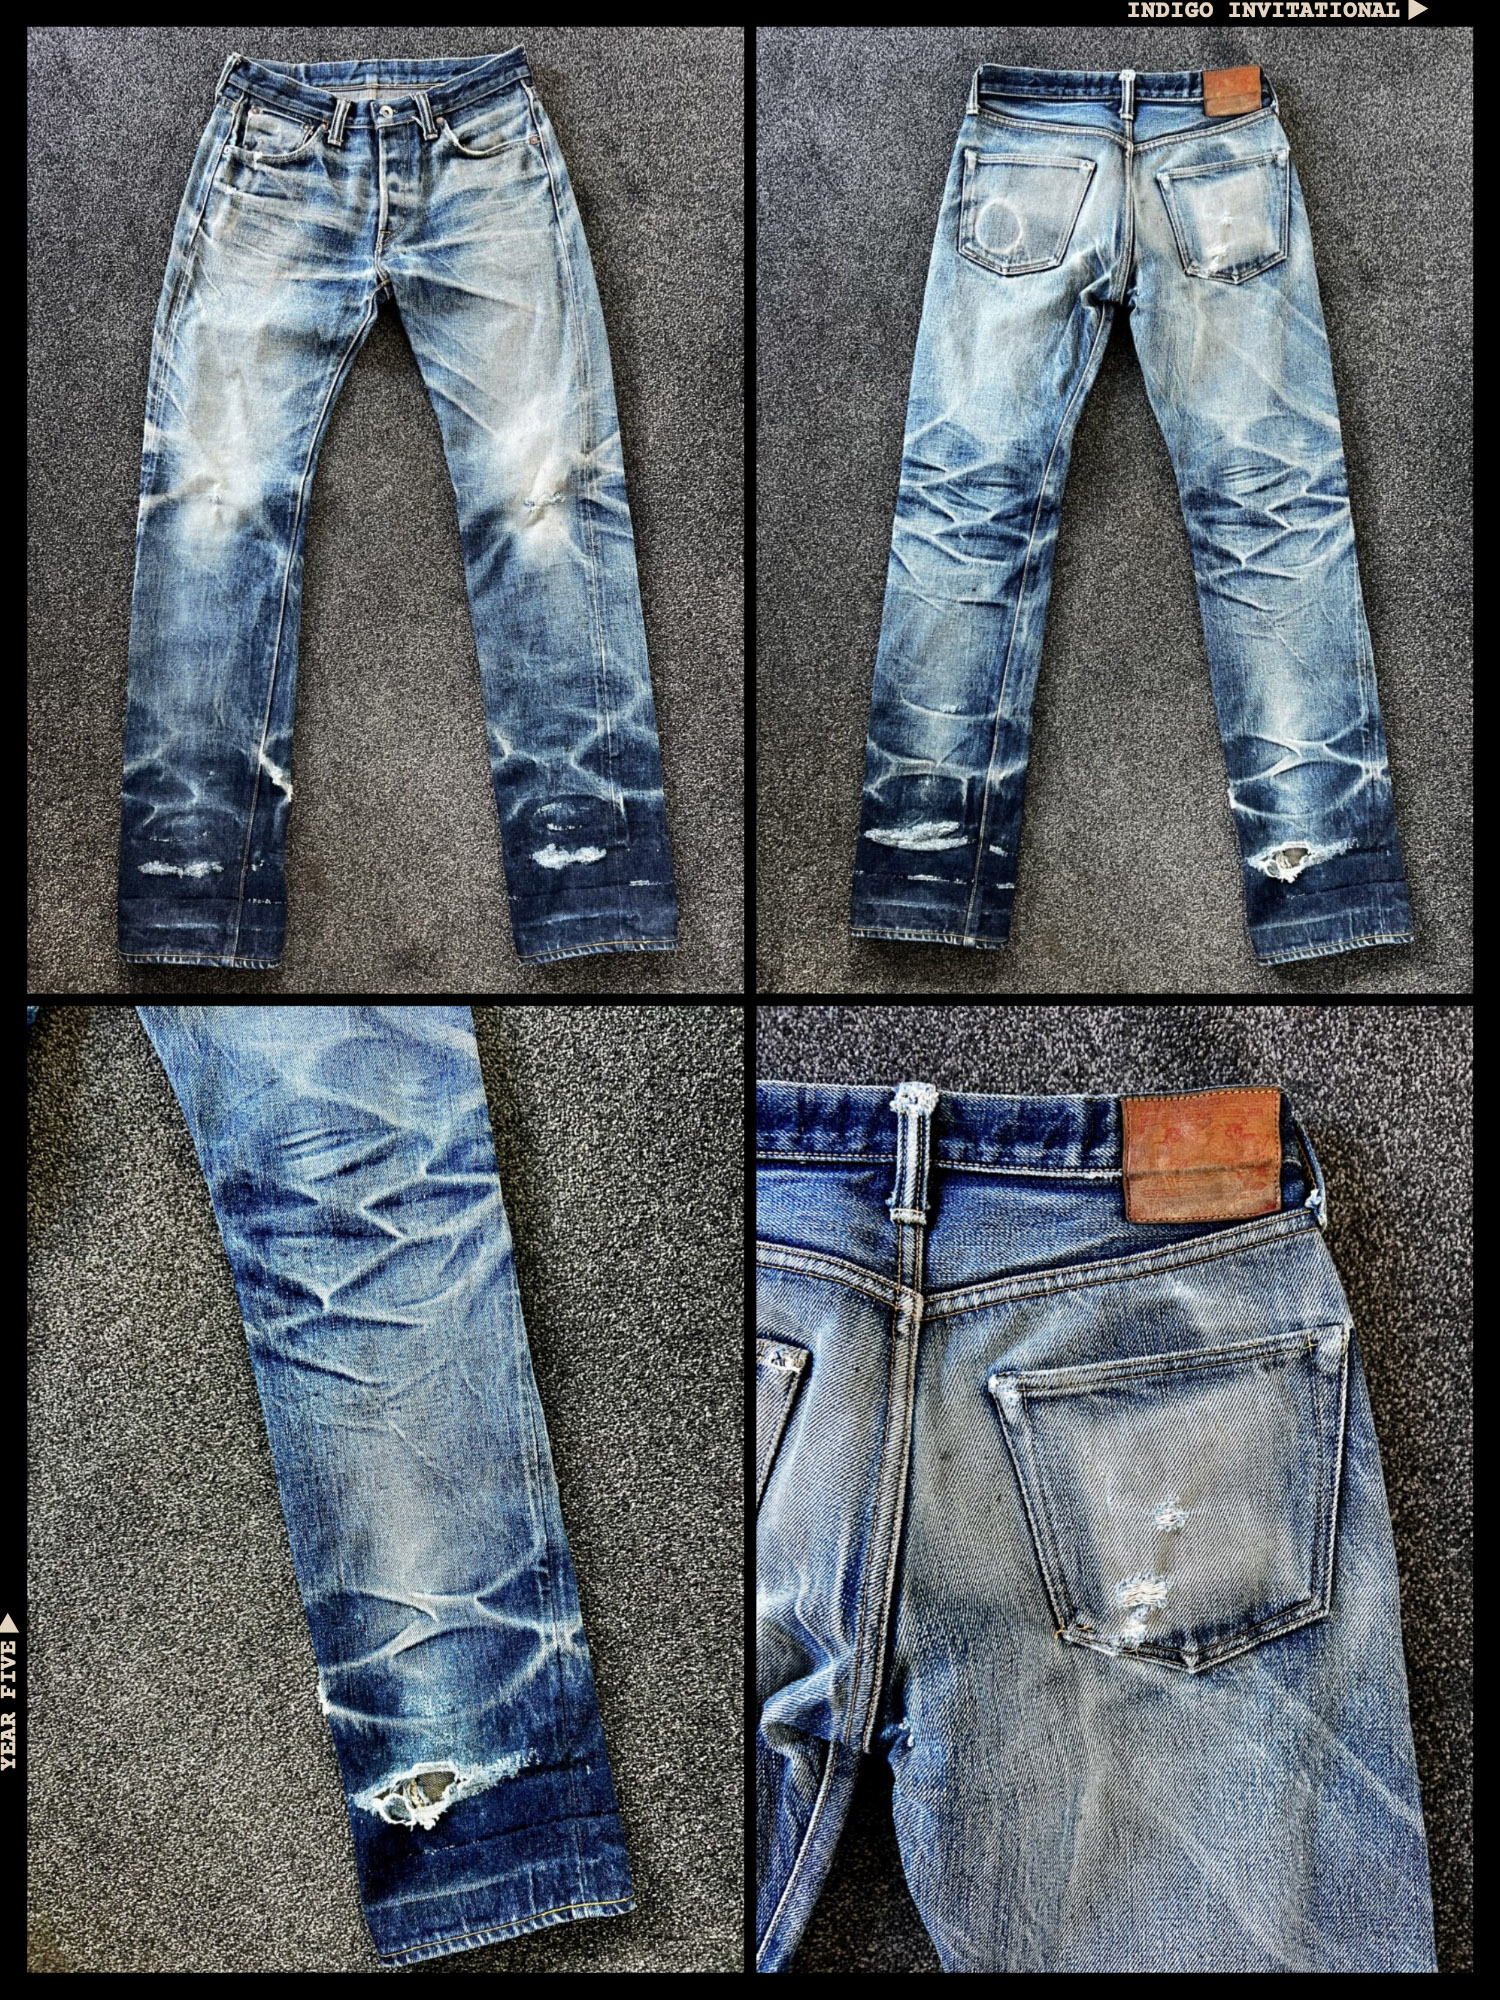
With perfect 10s from two of our judges, it looked for a while like Darren would be standing on top of the podium at the end of the year. He missed the gold medal by two points, the silver medal by just a single point.
“These have had an absolute battering. There’s loads of wear, damage, and character.” – Otto
“I could hang this one on the wall as an art piece.” – Brit
“The intensity here is absurd! Extreme, but undeniably impressive.” – Thomas
You can buy Samurai from these retailers: Franklin & Poe (US), Brooklyn Clothing (CA), Blue in Green (US), and Redcast Heritage (ES).
4th Place: George Cayea (ROW042)
Competed in: Oni 288ZR-KAB (20 oz.) – Get them here
One of our wildcard picks, mechanic and skateboarder George clawed his way into the Top 20 with his near-miraculous Secret Denim fades. Judges loved the subtlety of George’s fades, which just get better and better the closer you look at them.
Some of the credit goes to Oni here for producing this incredible denim. Renowned for its loose weave and its witchy texture, it’s far easier to wear than it is to fade. We’ve seen a fair share of it in the competition, but we’ve never seen it faded quite like this.
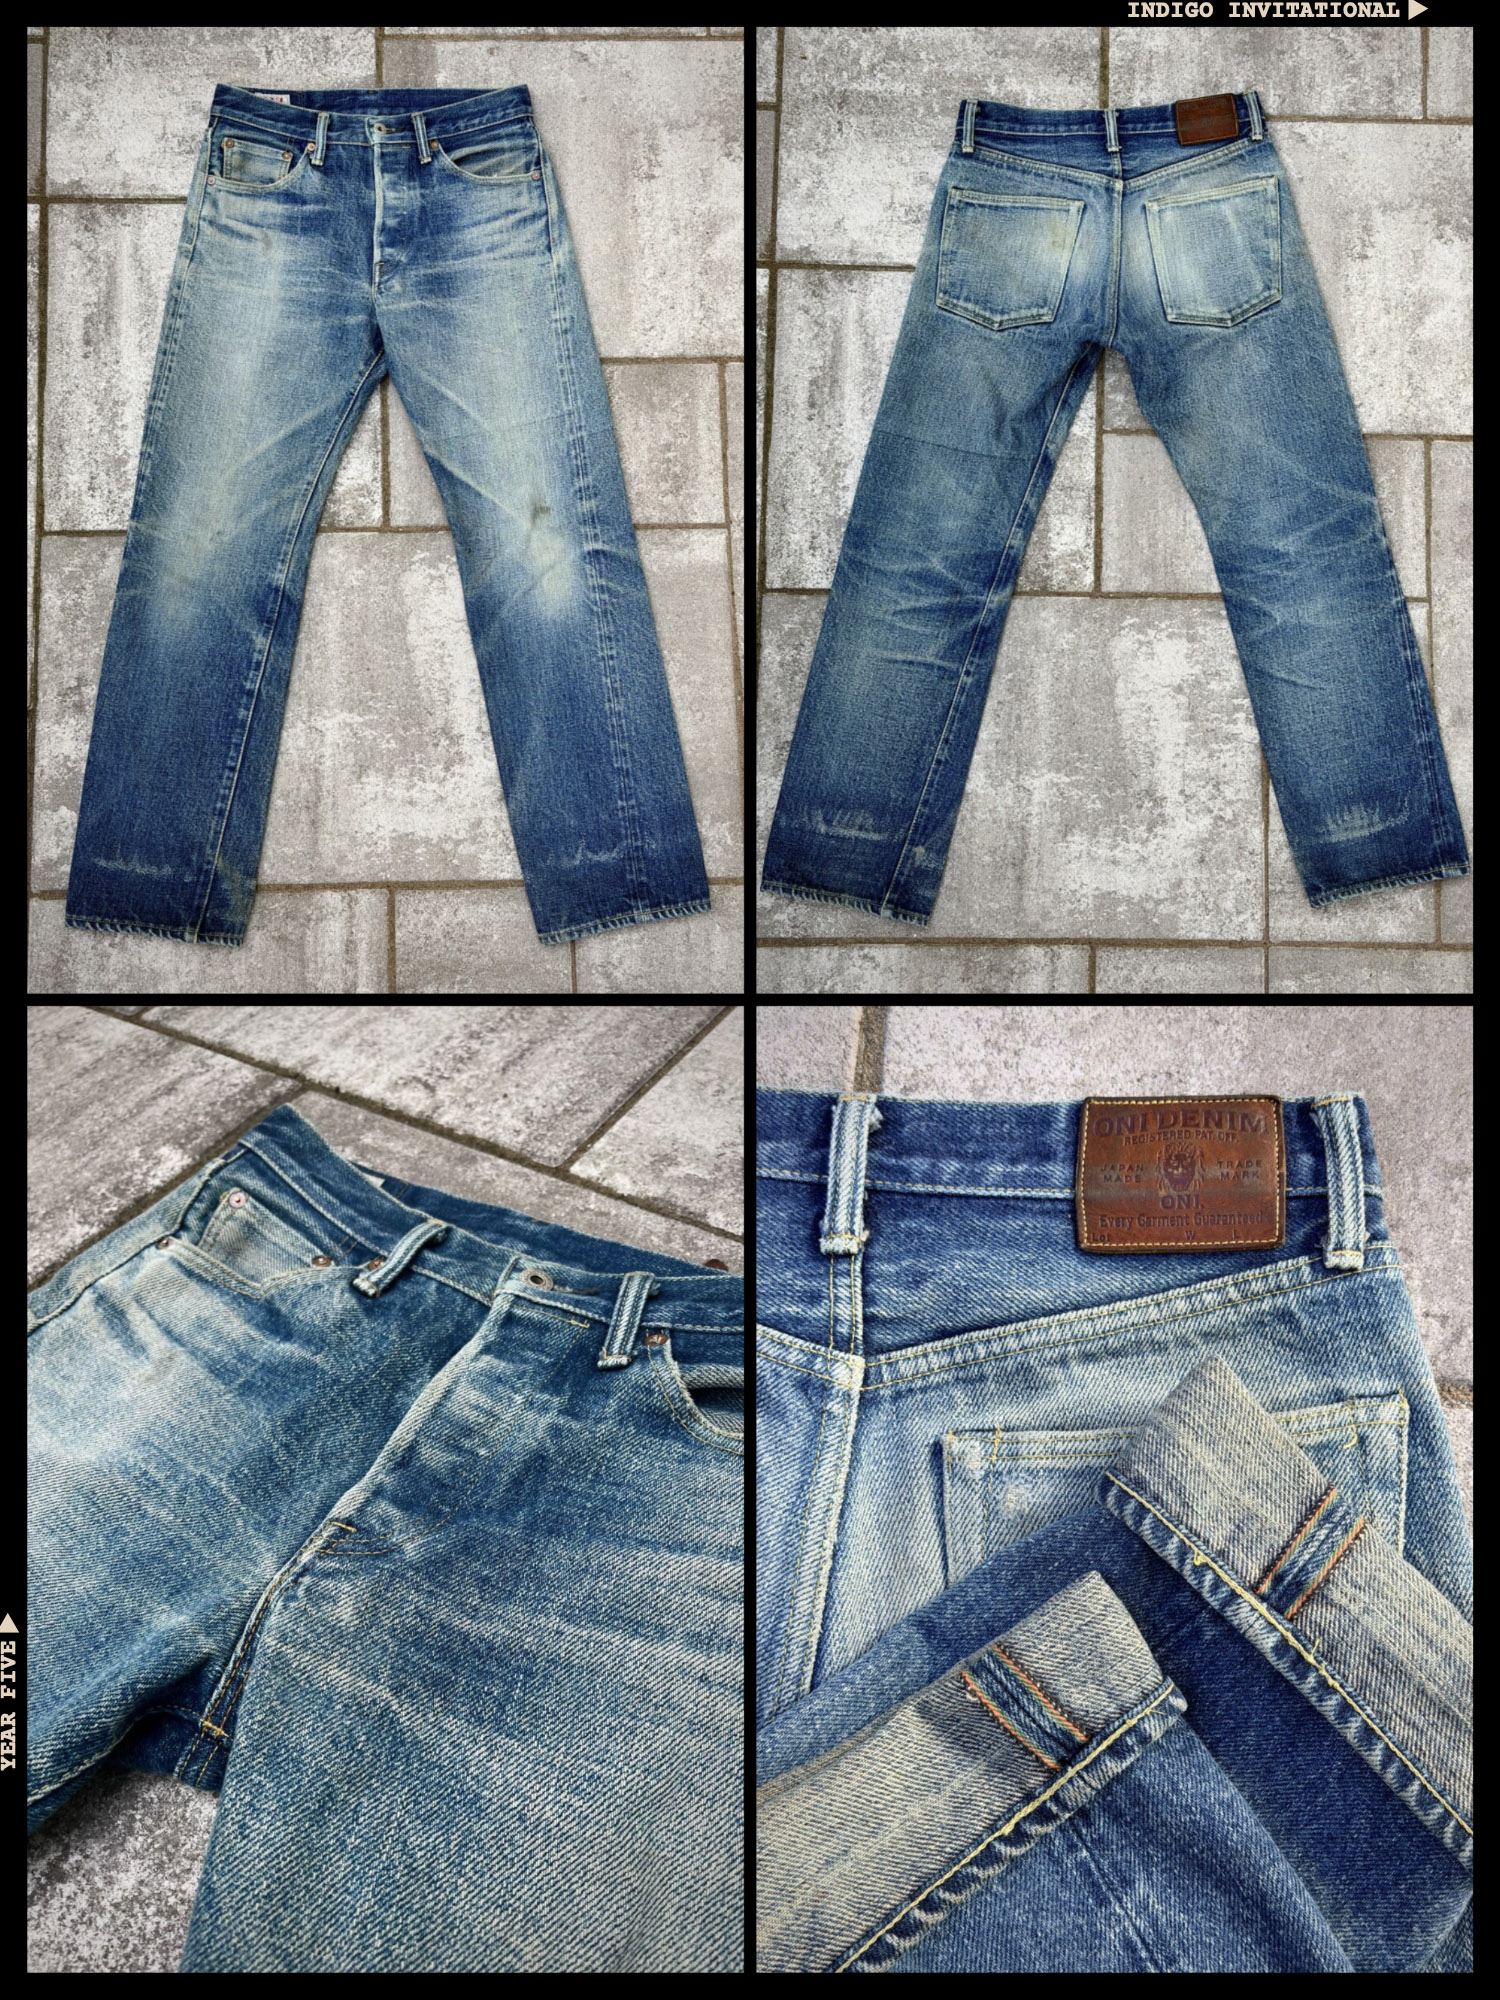
Like Darren, George rose and fell in the rankings with each new judging card that was submitted. Just as it had been during the community vote, his pair was passed over by some of our judges. The three judges who were caught in this pair’s trance gave it perfect or nearly perfect marks.
“I actually really like how beaten up and vintage they look.” – Otto
“The Secret Denim has faded subtly and authentically rather than chasing maximum contrast. It is a pair that rewards looking closely.” – Thomas
Oni is sold at: Redcast Heritage (ES), Cultizm (DE), Franklin & Poe (US), Blue in Green (US), and Hinoya (JP)
5th Place: David Thorn (ROW040)
Competed in: Piger Works x II F2F20 (20 oz.)
From very early in this competition, it was clear that David was going to do something magical with his PIgers. Razor-sharp combs and whiskers began to emerge in the first few months, and the fades picked up speed as we neared the finish line.
The most popular single pair in the competition this year, the F2F20 (a collaboration between Piger Works and the Indigo Invitational) demonstrated the kind of awesome fade potential that we hoped for when designing this pair. We’re very proud to see these pairs perform as well as they have in the competition.
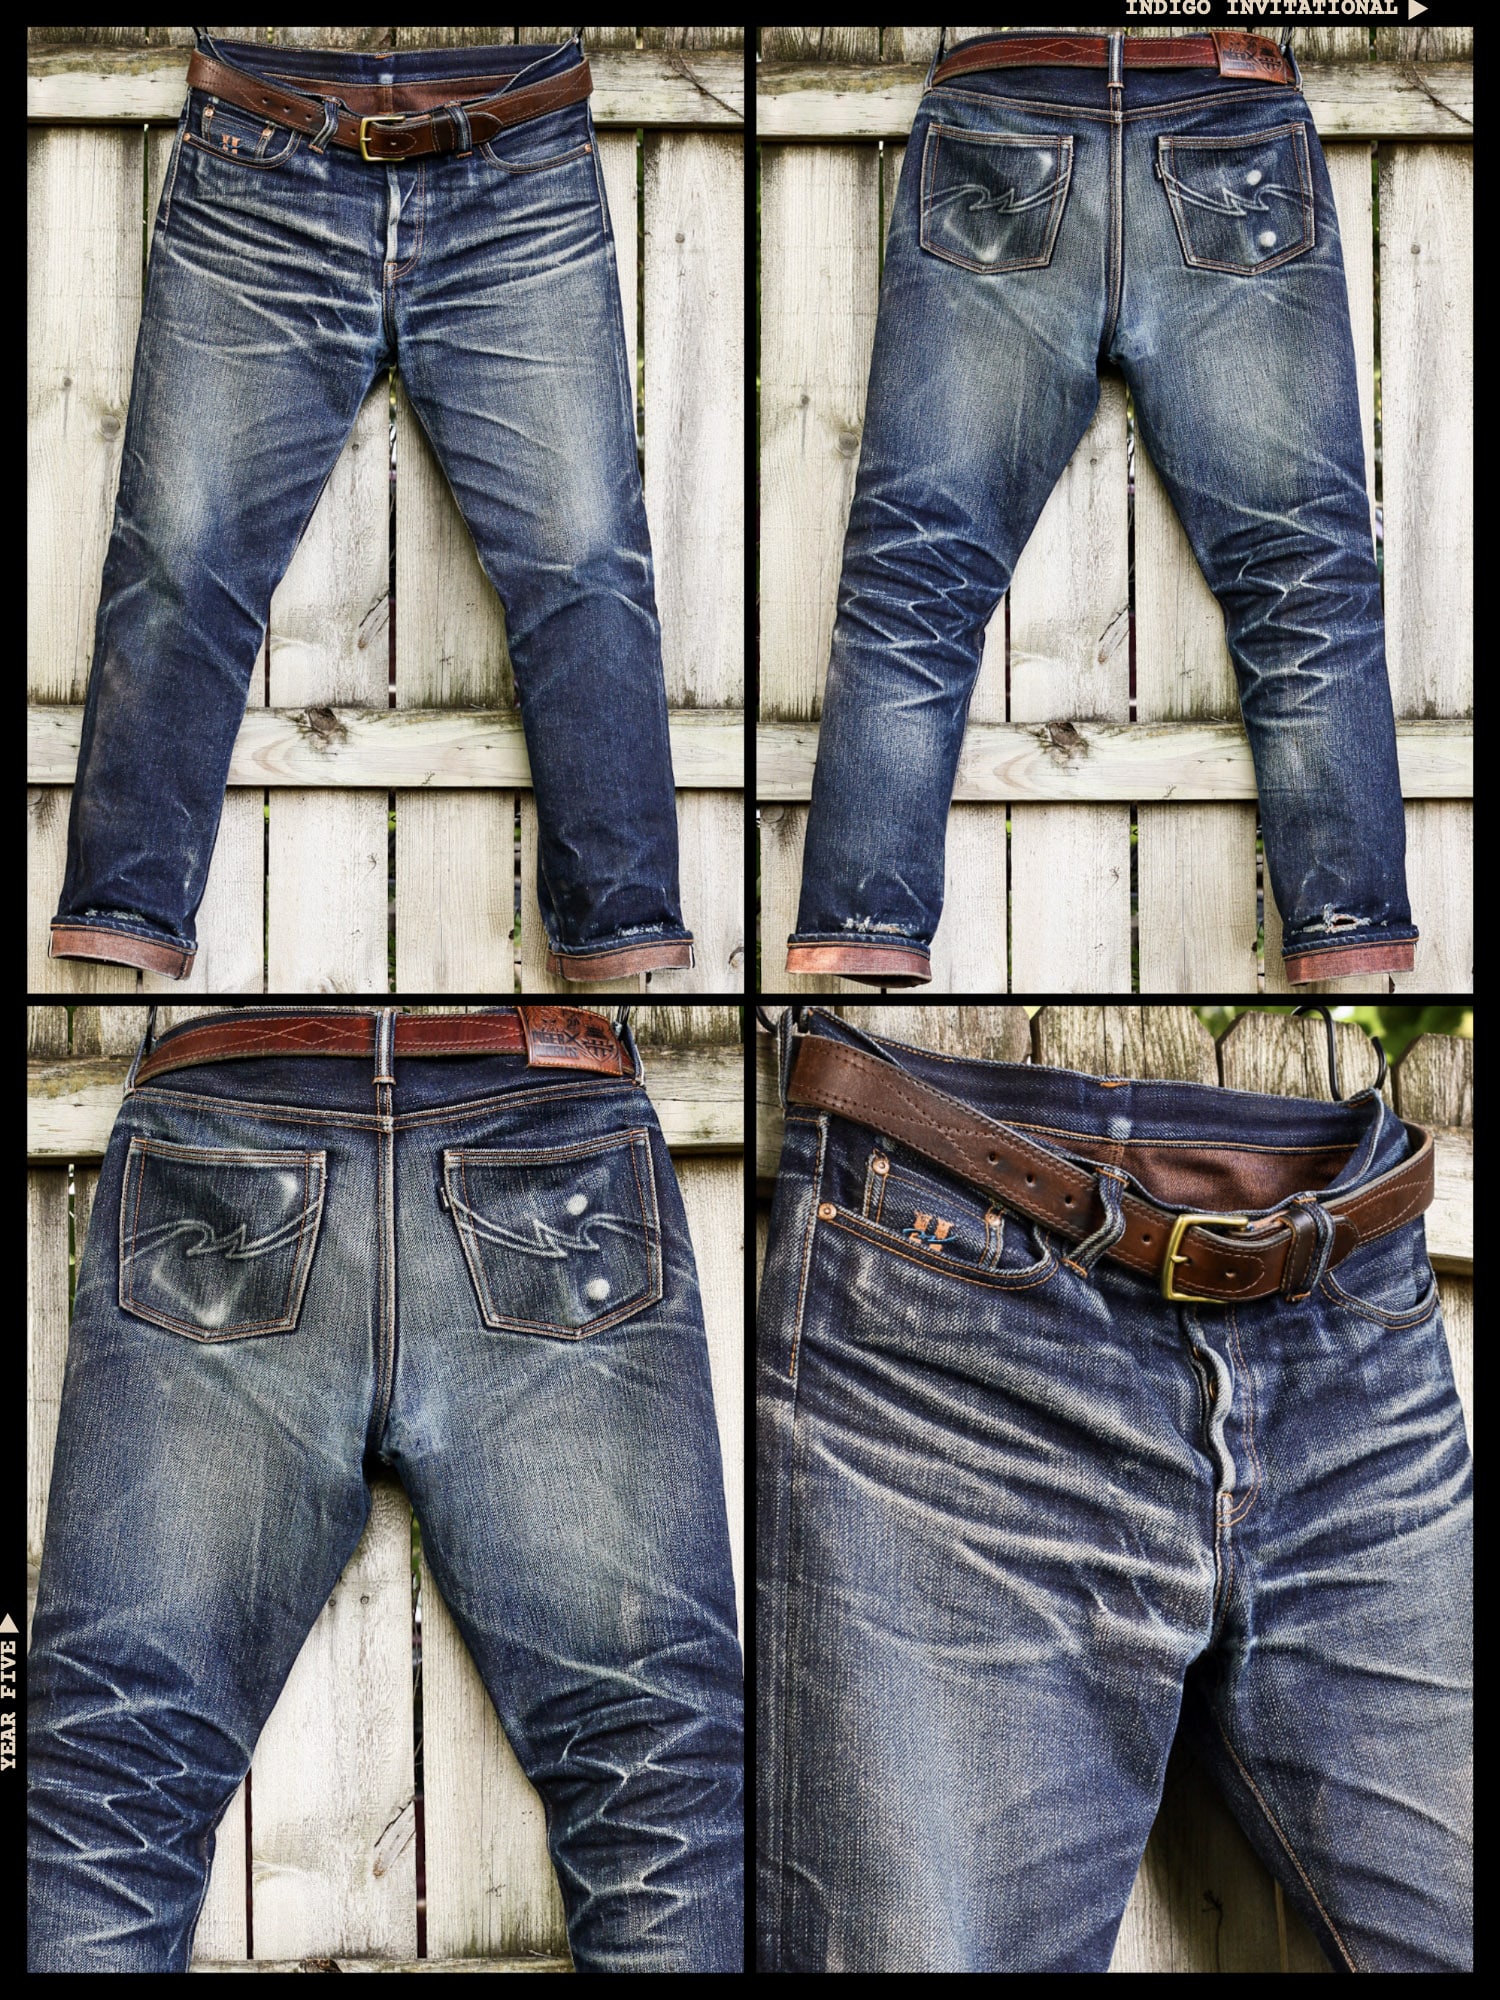
With strong marks from all but two of our judges, David was a shoe-in for the Top 10 from the moment the first judge’s cards started arriving in our inbox. He was just a point behind the fader in front of him. An excellent result.
“Nice honeycombs and contrasting whiskers.” – Daniela
“There’s loads to look at without them feeling overdone.” – Otto
“Everything I look for in a fade: sharp honeycombs, big whiskers, and the slub coming through across the fabric. The most harmonious fade of the group.” – Thomas
Piger Works is sold at Cultizm (DE)
6th Place: John Brandon (ROW043)
Competed in: Iron Heart IH-888S-19L (19 oz.)
Hailing from Phoenix, John clearly pushed his pair hard all year in the Arizona heat, lending his pair some of the character we often see from faders in the Southeast Asian conference. This is Iron Hearts done right.
The second pair of Iron Heart’s left-hand twill selvedge in the Top 10, this denim is starting to rival its heavier siblings for its ability to produce beautifully balanced and sharply contrasting fades. Expecting to see much more of this denim when we start Year Six in April.
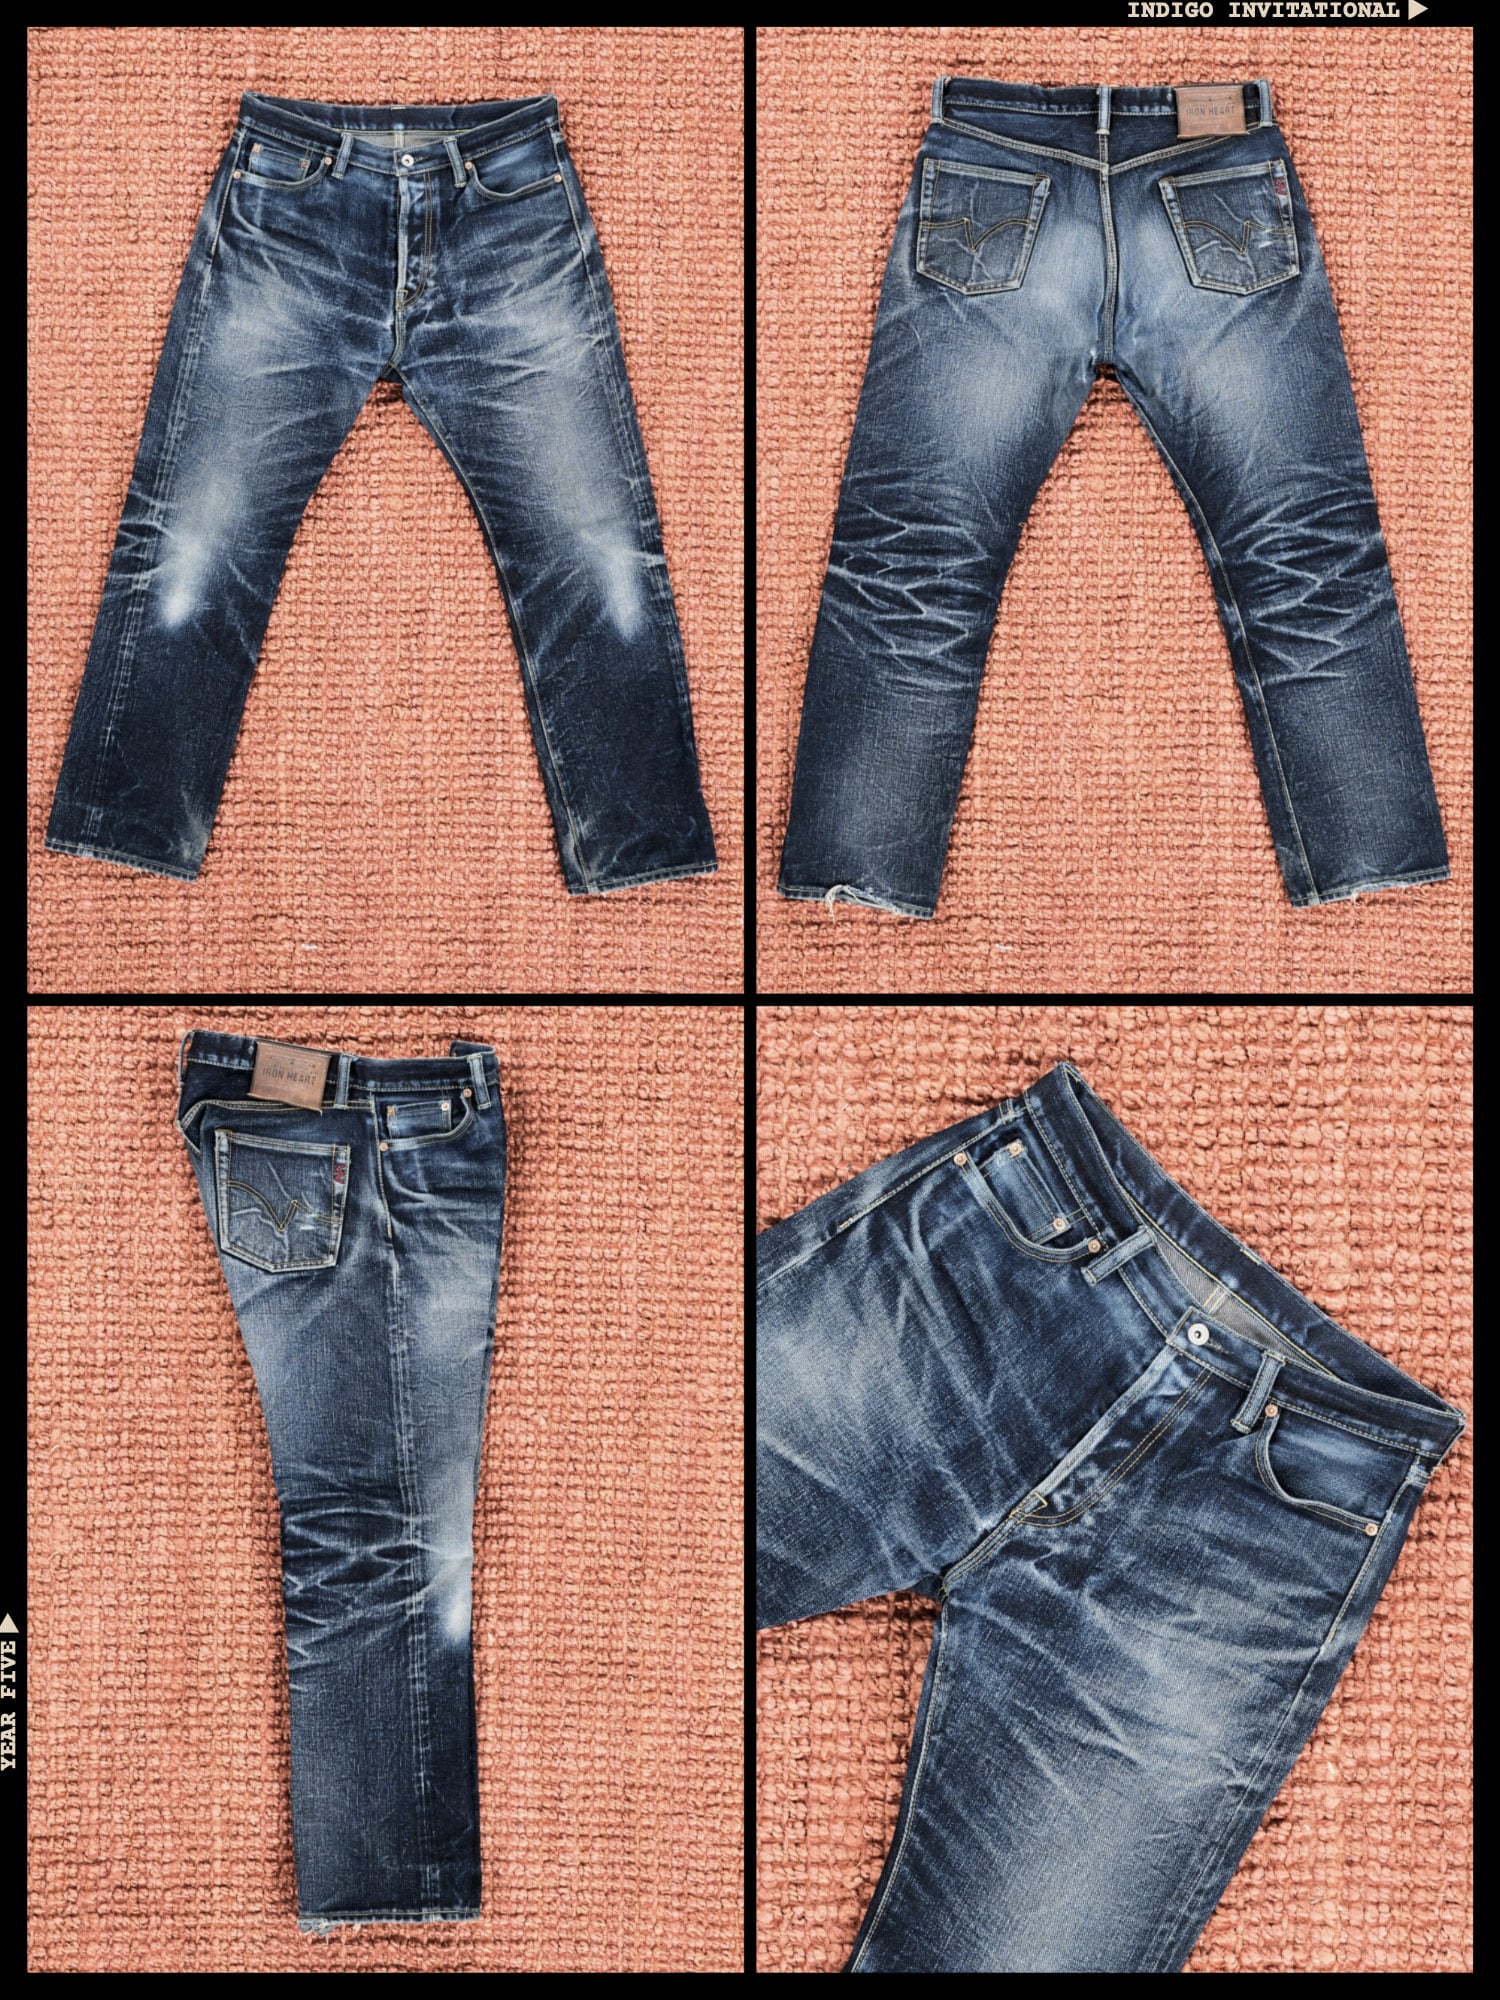
With one perfect 10 from our judges, John’s perfectly presented pair won over one of our judges in a big way. Most of the other judges placed his pair in their Top 10s, and all of them will surely be happy to see him standing in the winner’s circle.
“Really nice pair. Great honeycombs on the back and loads happening around the top block.” – Otto
“Strong contrast, but it still feels relaxed and natural. Exactly the kind of Iron Heart fade I love.” – Thomas
Iron Heart is available at: Franklin & Poe (US), Brooklyn Clothing (CA), and Iron Shop Provisions (US), and Division Road (US).
7th Place: Eddie Garcia (ROW031)
Competed in: Piger Works x II F2F20 (20 oz.)
Eddie set out on a mission this year. He wanted to push this made-to-fade Piger pair to its absolute limits without washing it. We can’t vouch for how his pair smells, but we can sure as hell vouch for how it looks.
As a mail carrier, Eddie put as many miles on this pair as anybody else in the competition, and the tones he’s managed to produce on the seat and deep in the honeycombs are a testament to how far this pair has come and how far it’s travelled.
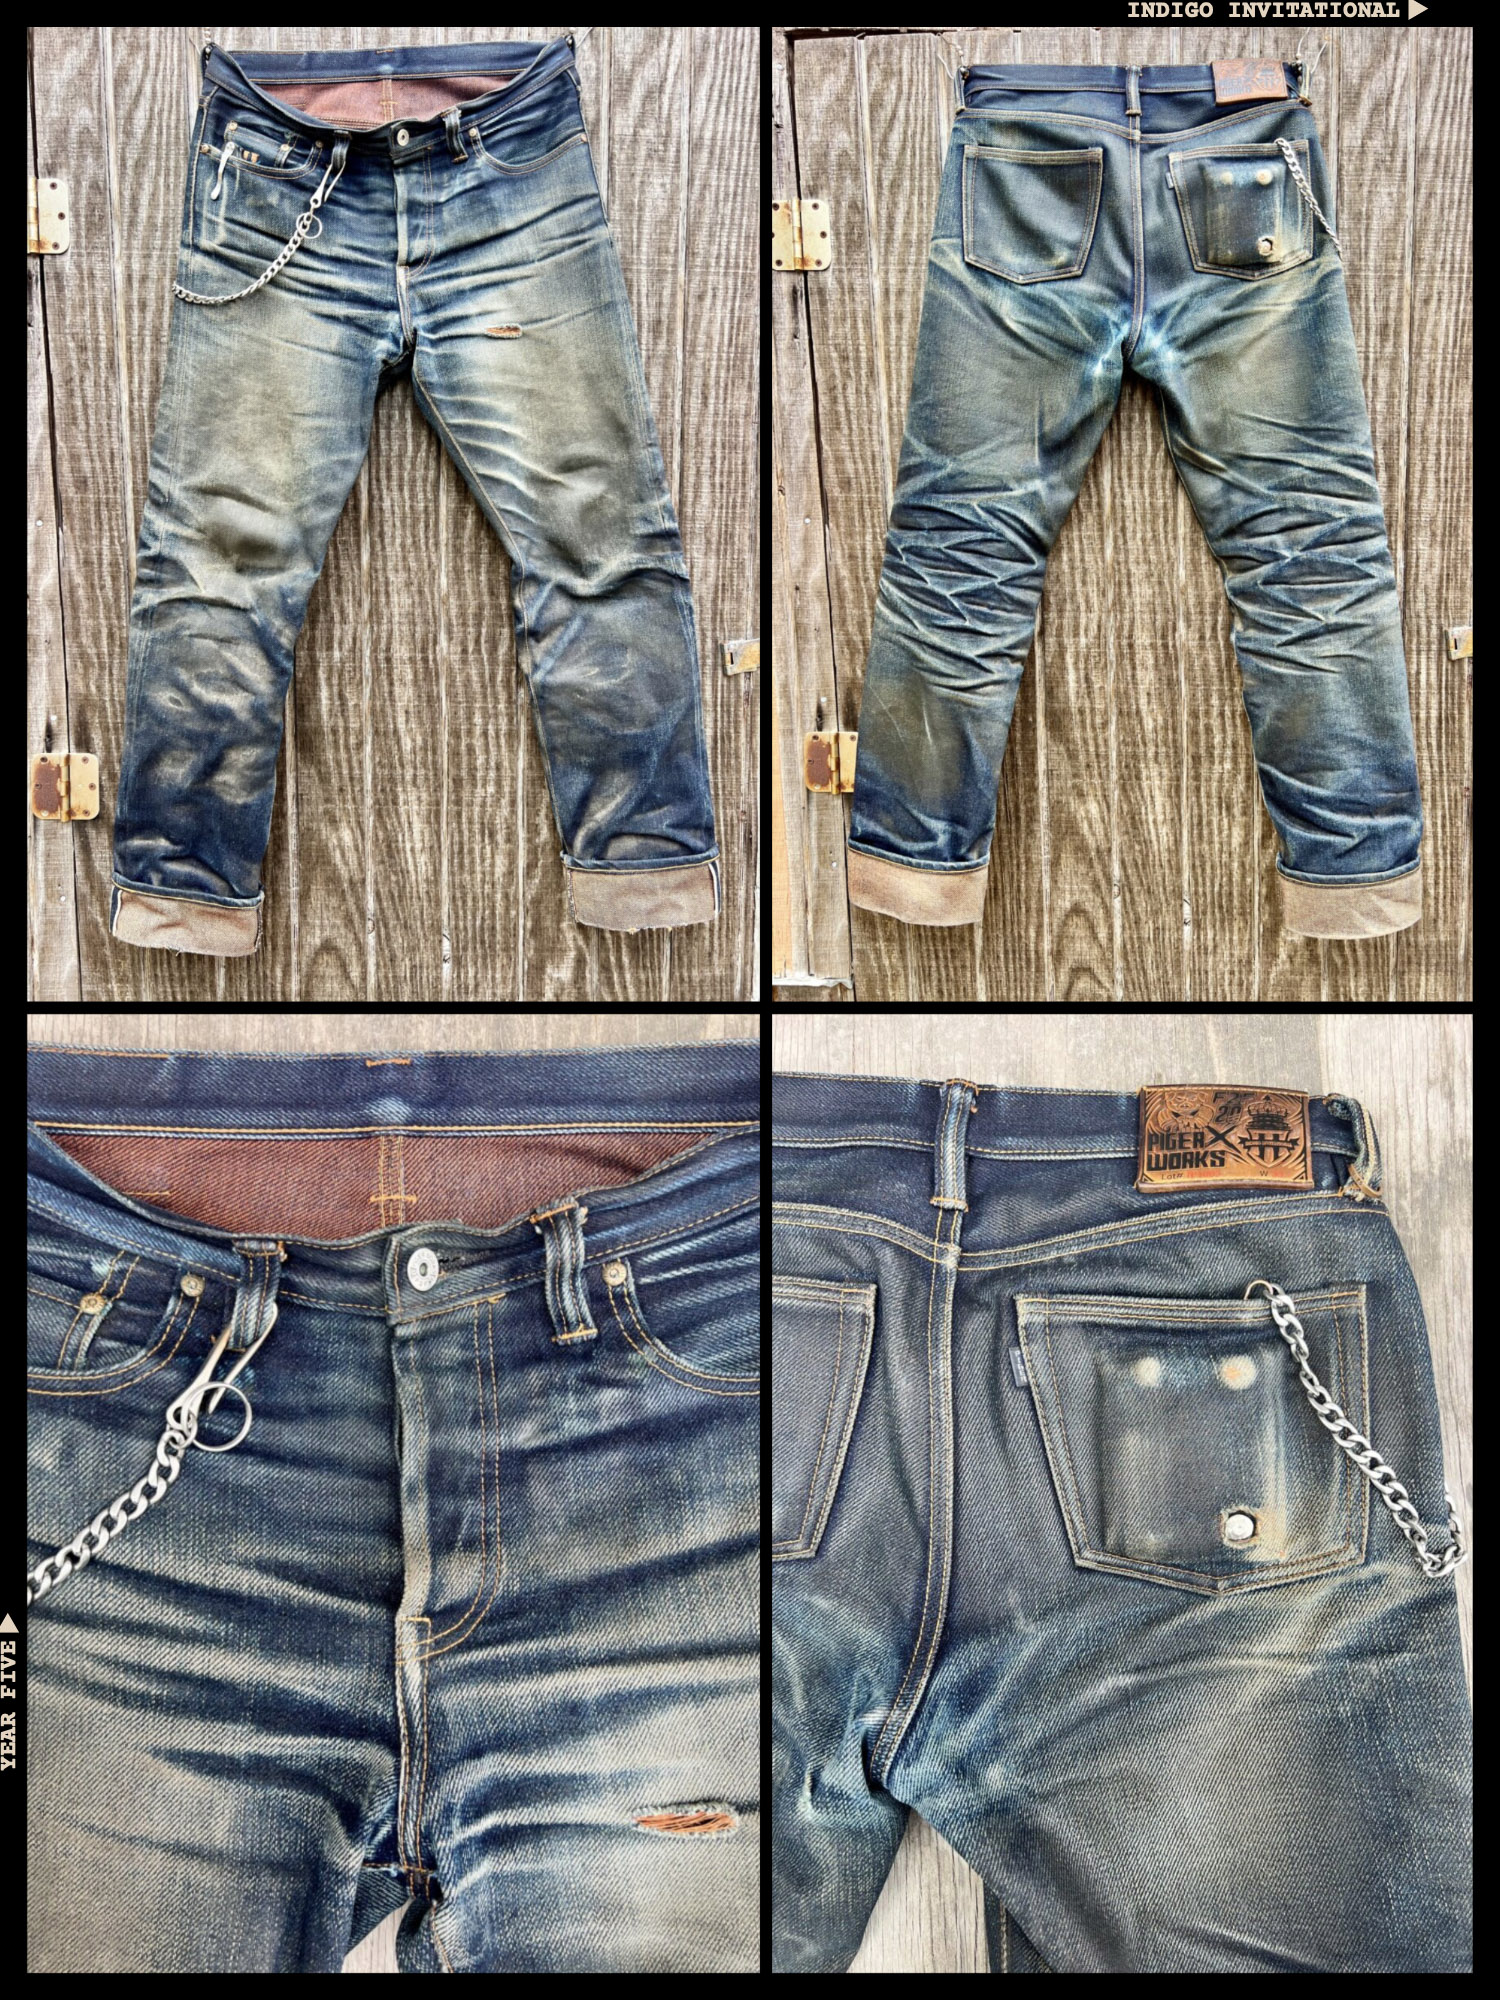
Unsurprisingly considering his approach to the fade process, Eddie’s pair split our judges down the middle. Two of our judges placed Eddie’s pair at the very top of their cards, while others kept it off their cards entirely. You can count us among some of this pair’s biggest fans.
“The blueish colour around the back side of the crotch is insane. A must for Re(Pair)!” – Ruedi
“The wear here is relentless” – Thomas
“Looks like it’s been lived and played hard.” – Daniela
8th Place: Dustin Trychta (ROW022)
Competed in: Piger Works x II F2F20 (20 oz.)
With an extremely active four-year-old keeping his legs moving almost constantly, Dustin made his pair a part of a full and rich life, complete with trips to the amusement park and trampoline park.
We’ve started referring to white patches on the knees as “good dad fades” (the result of crawling around on all fours with young ones). These are in the same vein. Some of the sharpest contrasts in the competition (and a trip to the winner’s circle) are his reward for his time well spent.
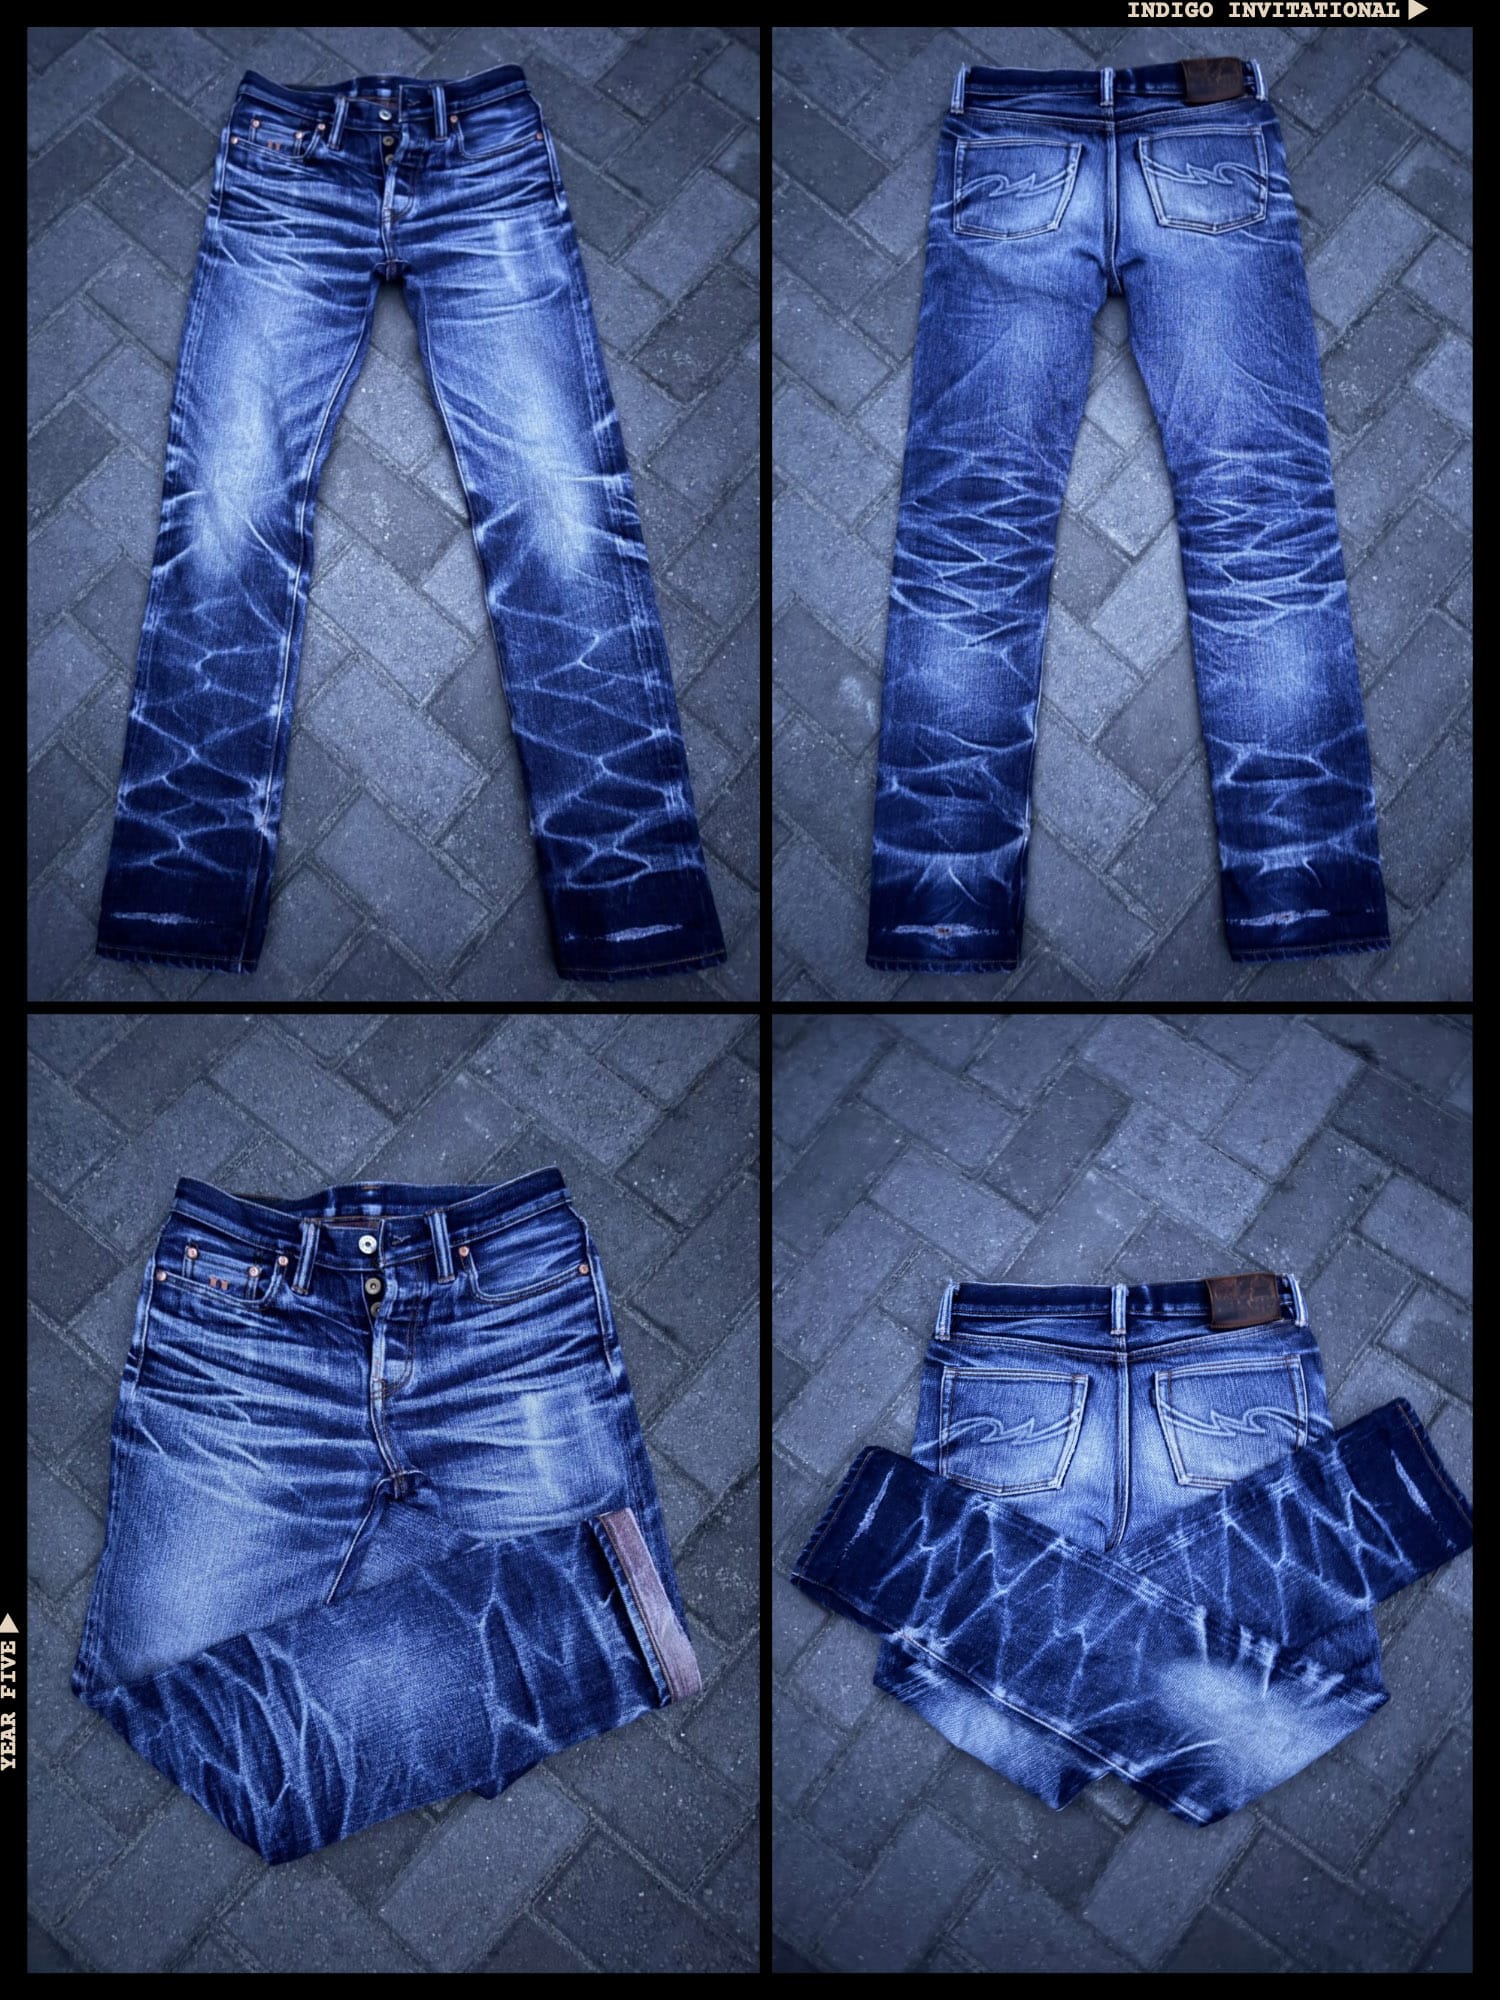
Dustin got into photography this year, and this showed a little more than we liked in his final presentation photographs, which don’t feel exactly true to life. The judges reviewed some of his earlier submissions, basing their assessments on these earlier photographs (the fades were undeniable).
A number of the judges referenced the blue tone in the photographs and said they might have ranked this pair higher if it had been presented more naturally.
“A beautiful, very even fade. The long cuff-and-stack wear has left the lower legs remarkably dark, while the honeycombs and train tracks provide loads of contrast without taking away from the overall balance.” – Thomas
“Many very strong and well-defined whiskers around both front pockets and towards both knees. Huge and deep stacks.” – Ruedi
9th Place: Daniel Wright (ROW006)
Competed in: Iron Heart IH-555S-UHR (23 oz.) – Get them here
We’re not sure exactly what Daniel does for a living, but whatever work he does, he does a lot of it, and always in this beautifully worked pair of Iron Hearts.
Rather than washing them before his final presentation and flattening them out, Daniel took them straight off his legs, resulting in a striking 3D effect, with the combs and stacks jumping off the screen.
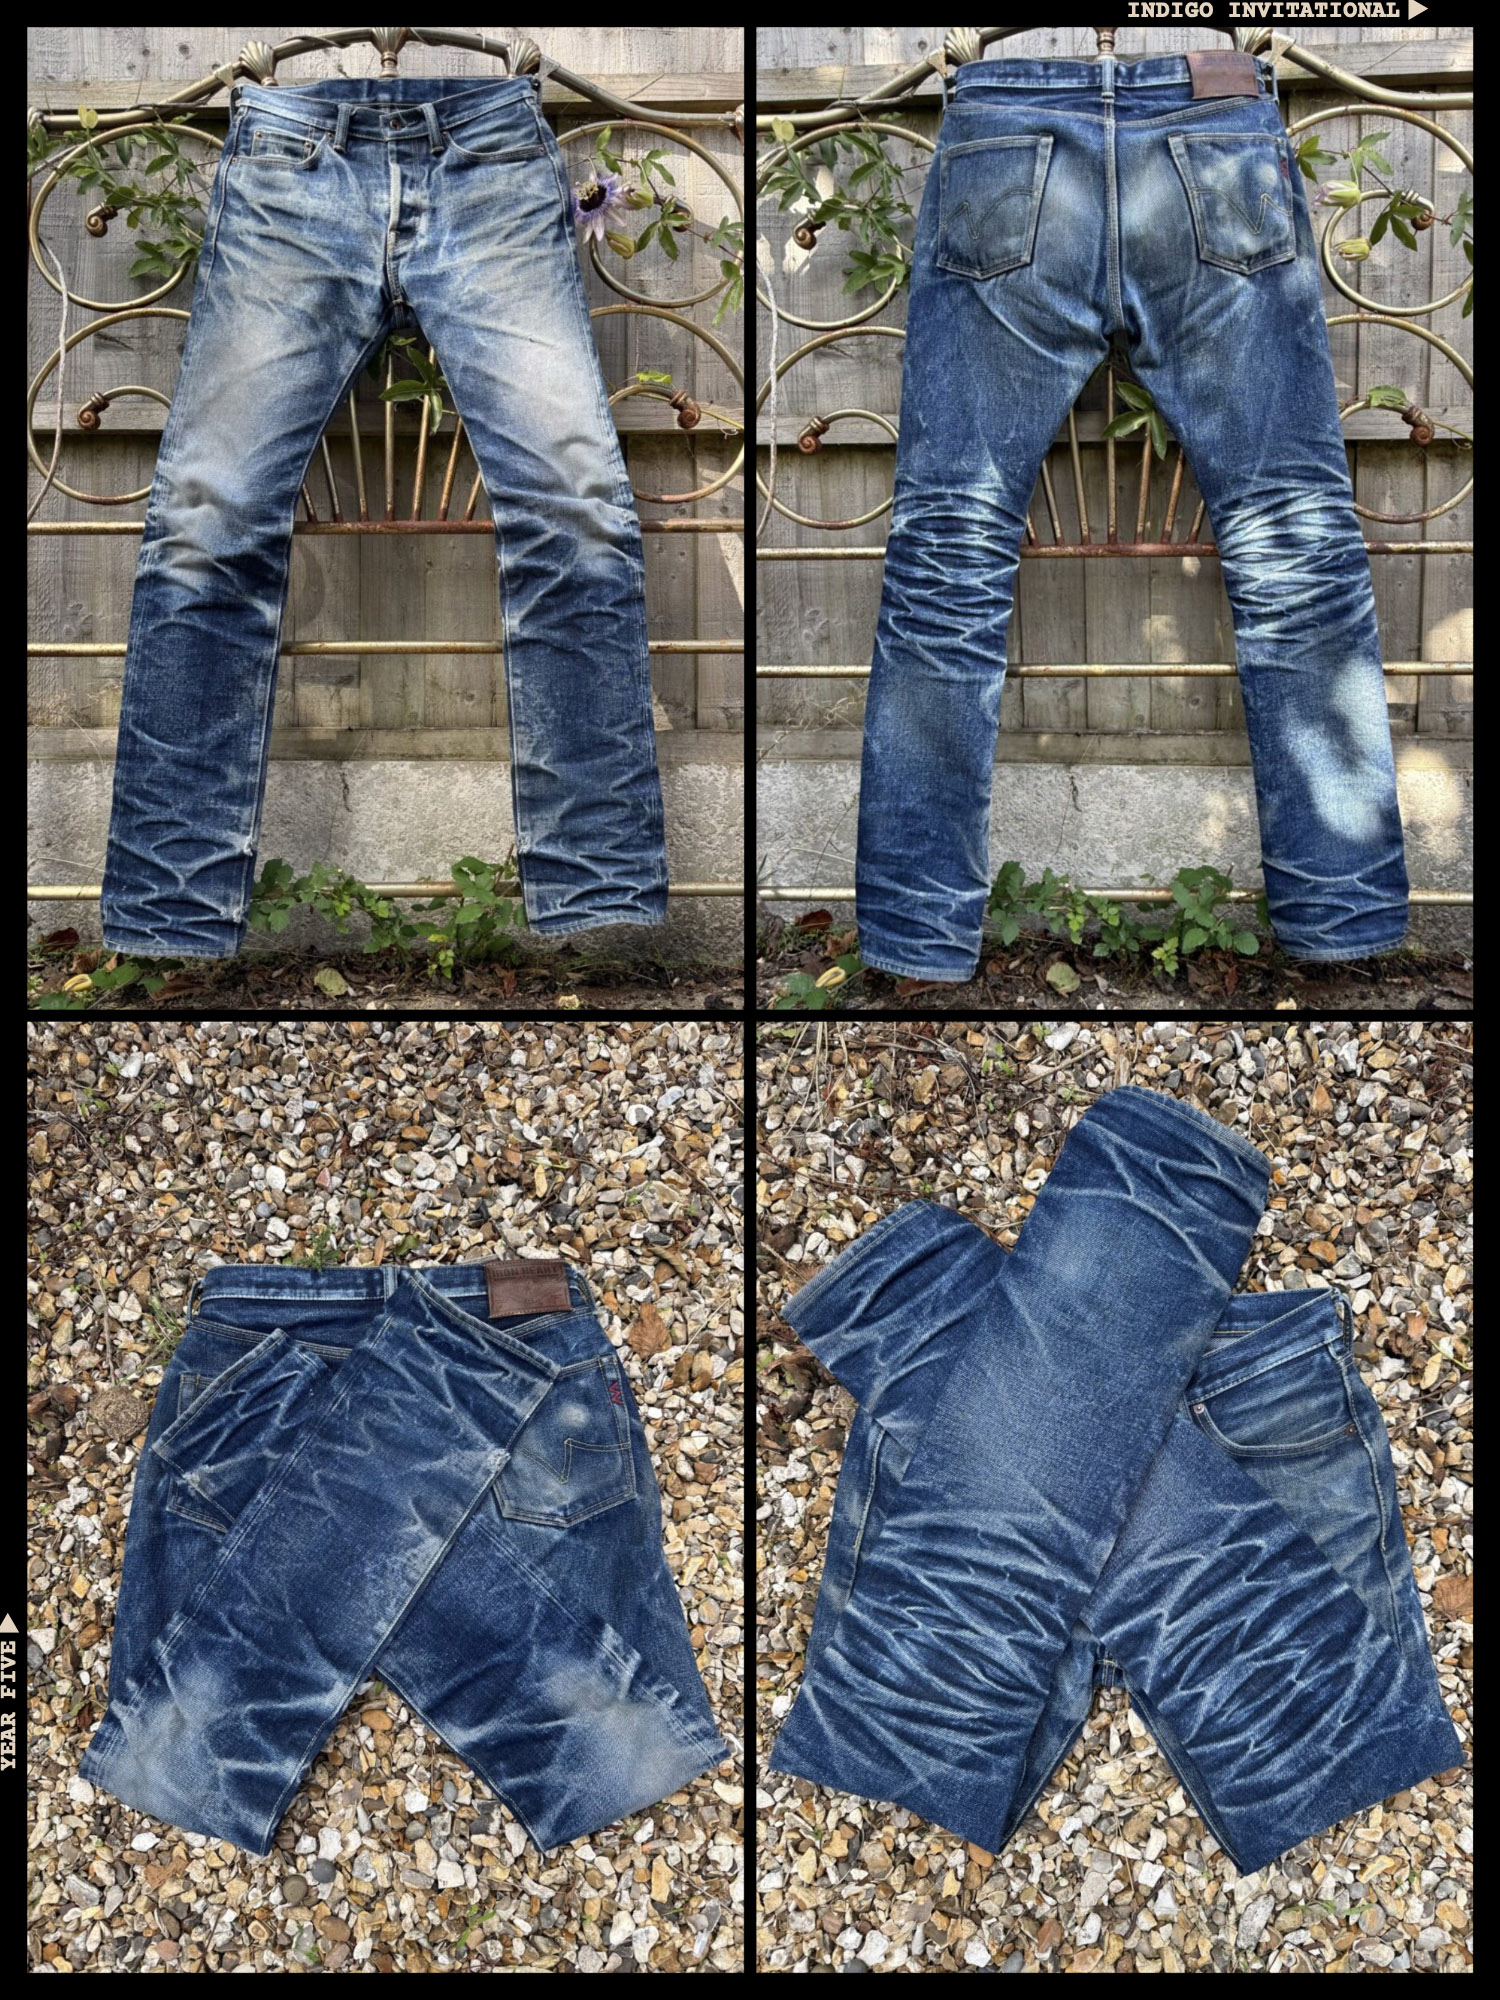
One of our judges put this pair second on his judging card, which helped lift Daniel into the winner’s circle. He appeared on a healthy number of other cards, but it was one judge that really made the difference here.
“Really close to my number one. You can actually see where the jeans have moved with the person. Really strong pair.” – Otto
“I love the beautiful contrast fades from dark blue to white around and below the knees. They would probably look much better in real life. Very difficult to judge them correctly in that light.” – Ruedi
10th Place: Ethan Eisenbarth (ROW009)
Competed in: Brave Star Die Hard Double Knee (12 oz.) – Get them here
Ethan took up bird watching this year and documented some of the places he visited with patches that he sewed to his pair. It’s one of the most artful approaches to embellishment we’ve ever seen in the competition, and we suspected we’d see this one in the winner’s circle when all was said and done.
The patches were only part of the story. The fades tell a story of their own, and we hope that we’ll see more updates from Ethan on this pair, which may one day be more patches than pair.
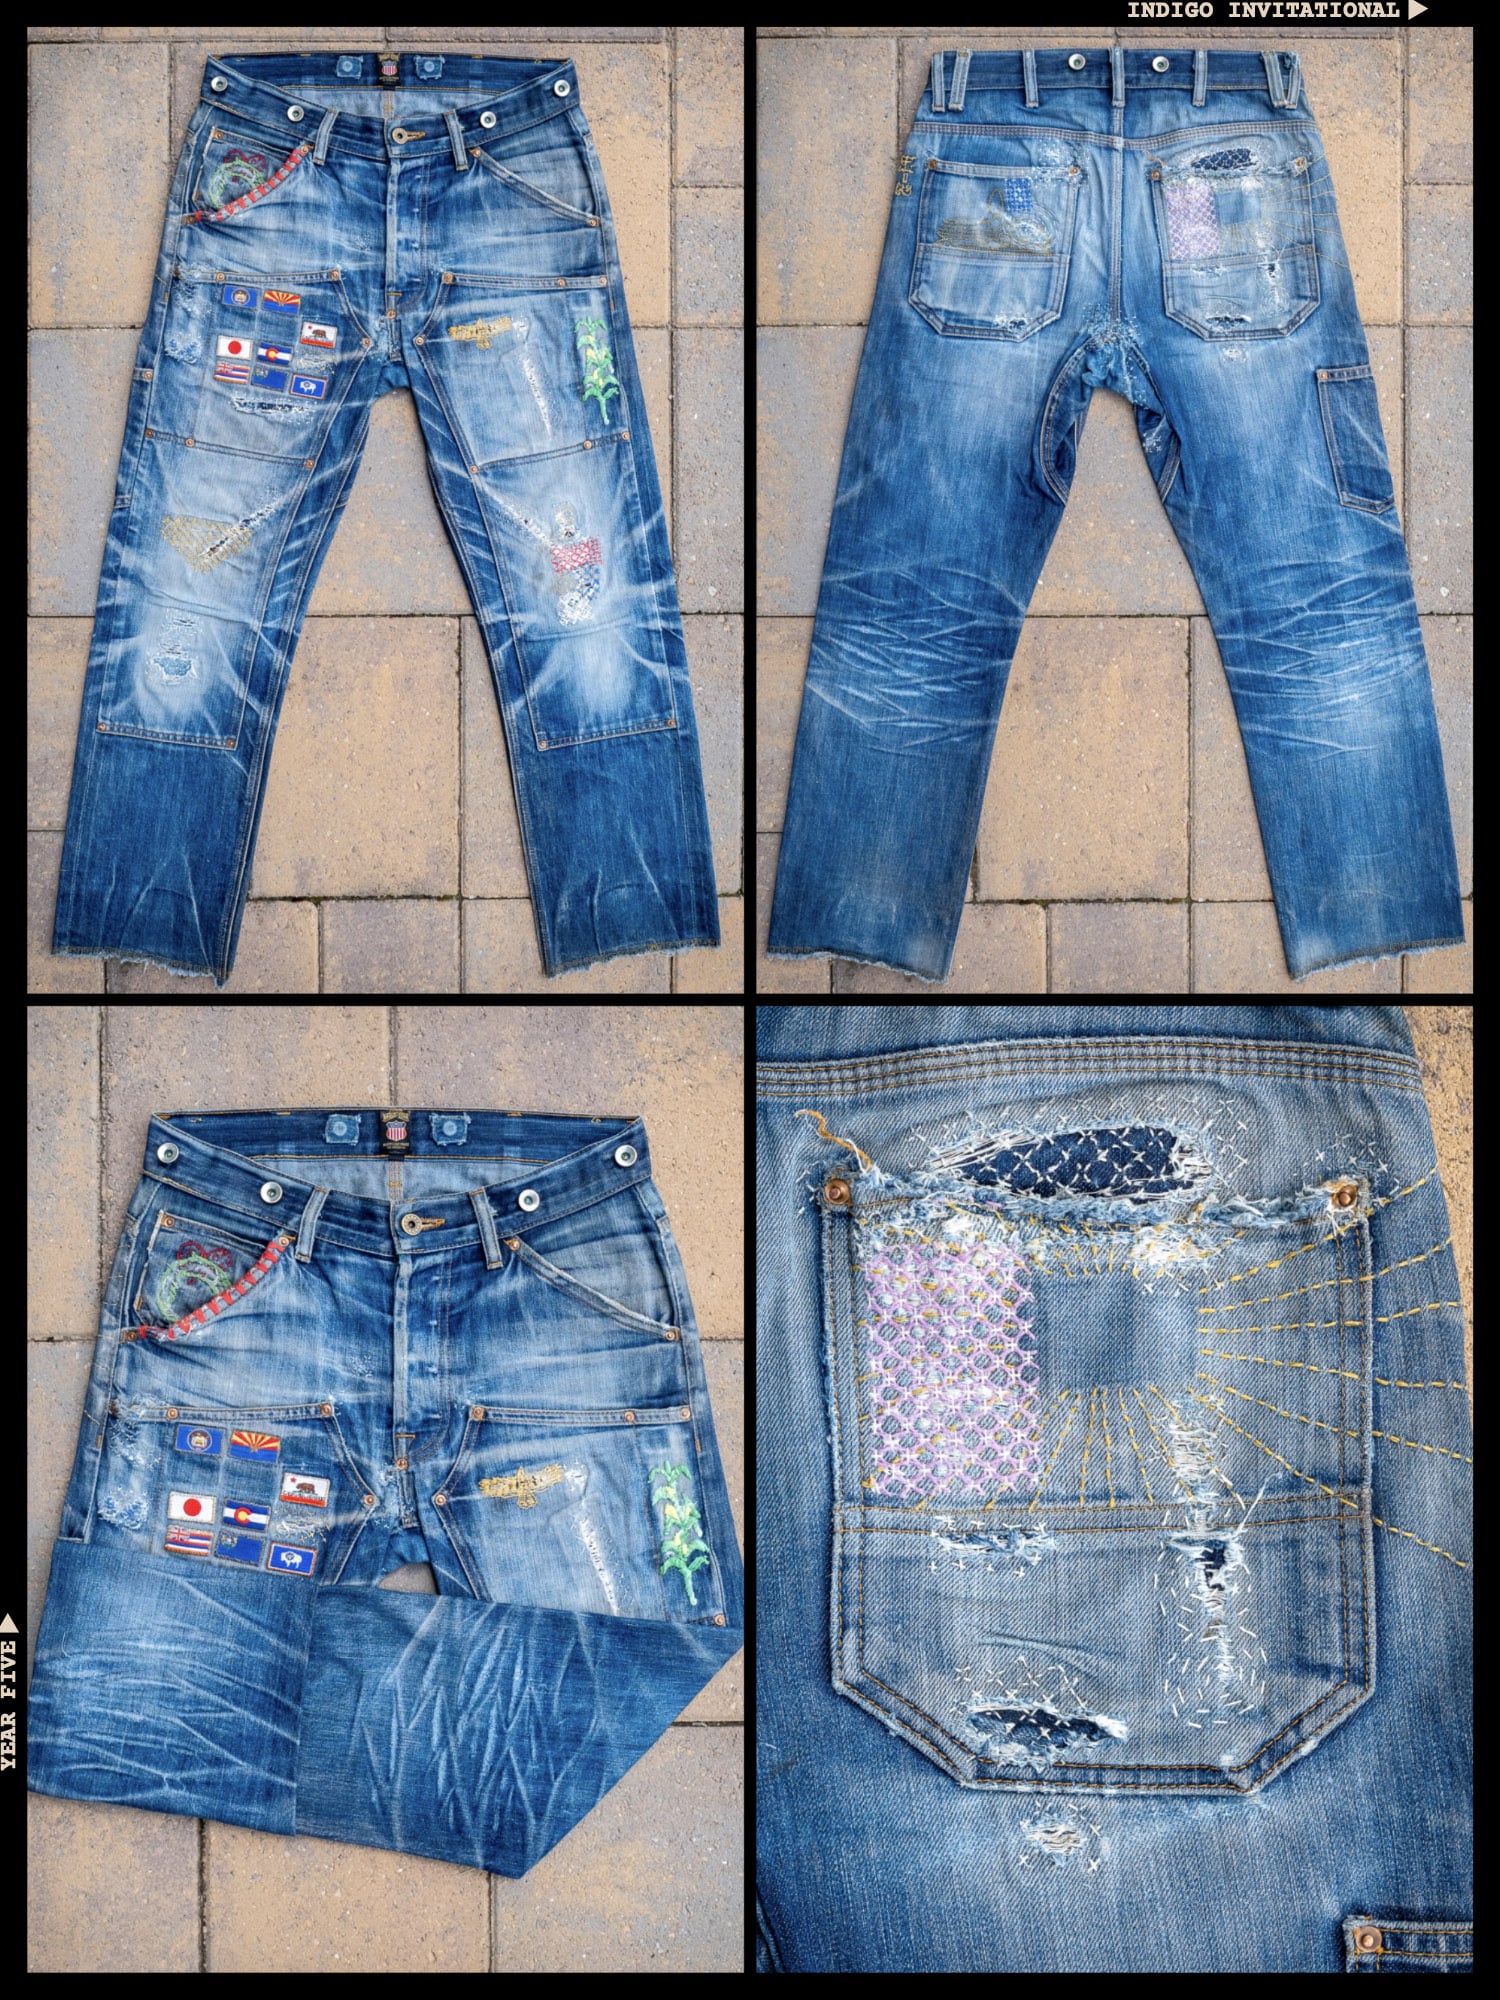
The judges who had this pair on their cards all noted the beautiful personalization, but they also recognized that, underneath the patches and embroidery, this pair is a brilliant example of honest and hard-earned fades.
“Those double knees have faded beautifully, but the real story is the repairs and personalization—sashiko, embroidery, flag, and patches everywhere. It has the kind of layered history you normally see on a heavily customized denim jacket.” – Thomas
“Very well-loved and well-used.” – Daniela
IIY5 Southeast Asian Conference Top 10
While a truly remarkable pair of Samurais finished the year on top of the podium in our Southeast Asian Conference, the real story in our equatorial conference is the domination of Piger Works and their contingent of Thai faders, who took six of the slots in our Top 10.
Year Five has been something of a coming out party for the Thai brand and a return to glory for the Thai faders, who were shut out from last year’s Malaysian-dominated podium. In Y4, the Malaysians had a statement year, declaring their supremacy in the SEA fade scene. This year, Thailand and Indonesia answered.
1st Place: Bima Rosyid Wicaksono (SEA043)
Competed in: Samurai S710XX (19 oz.) – Get them here
Personal trainer Bima knows the value of toil and sweat, and he’s put this pair of Samurais through one hell of a workout in Y5. We’ve been highlighting this pair frequently this year, singing its praises at every opportunity—and clearly for good reason!
Samurai’s legendary Kiwami Selvedge is flexing its muscles here. Renowned for the remarkable contacts it can produce, this selvedge continues to be one of the best-possible choices for those planning to push their pair hard in between washes (Bima washed his pair five times during the competition).
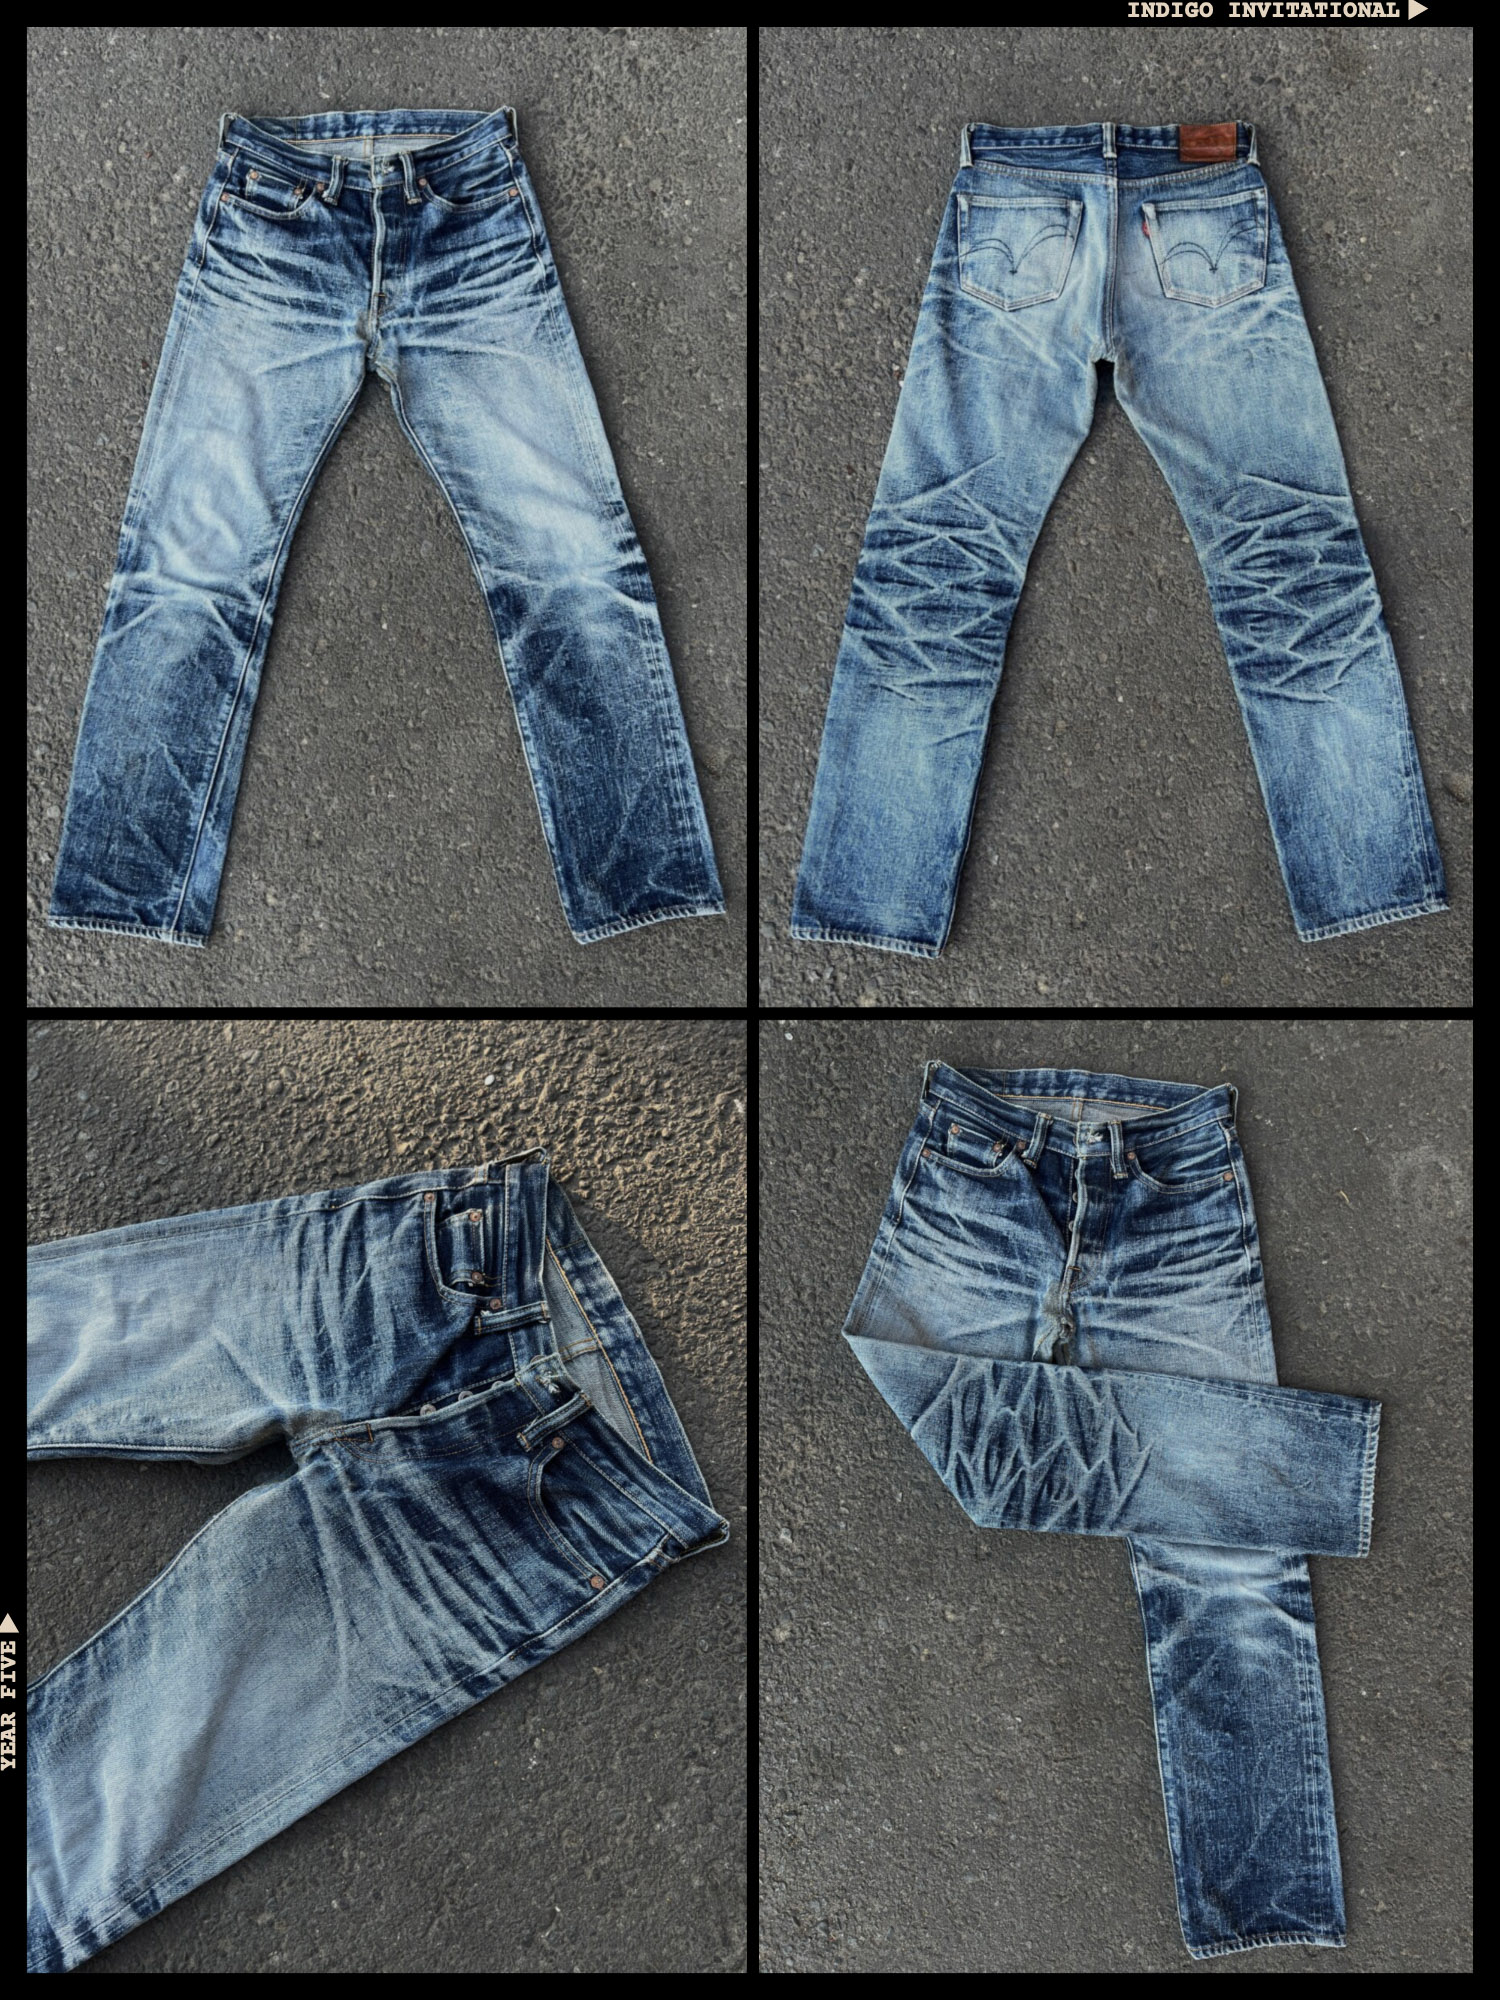
Bima’s pair was a clear favourite among the judges. It appeared prominently on every judging card, with four of the seven judges giving the pair top marks. It cleared its closest competitor by 8 points (an incredibly wide margin). An utter and complete triumph.
“My top pick. Perfect colour, awesome whiskers and combs, nice marbling, high contrast yet vintage looking. It doesn’t get much better in any category.” – Florian
“Sharp in all the right places. Everything just feels right. Definitely my favourite.” – Cheese
“The level of wear and surface development shows just how much potential this denim has—and this pair has truly extracted almost all of it.” – Noenggaling
You can buy Samurai from these retailers: Franklin & Poe (US), Brooklyn Clothing (CA), Blue in Green (US), and Redcast Heritage (ES).
2nd Place: Prawit Pooyam (SEA046)
Competed in: Piger Works 20MFSI (20 oz.)
Prawit is religious about wearing his competition pairs every single day for at least 10 hours. His dedication paid off with some silver hardware, and we couldn’t be happier for him.
This year’s top Piger Works finisher showcased all of the beautiful highs and lows that Piger’s aptly named Master of Fades selvedge can produce. We used the warp yarns from this selvedge in our collaboration, and this pair makes it clear why this choice was an obvious one.
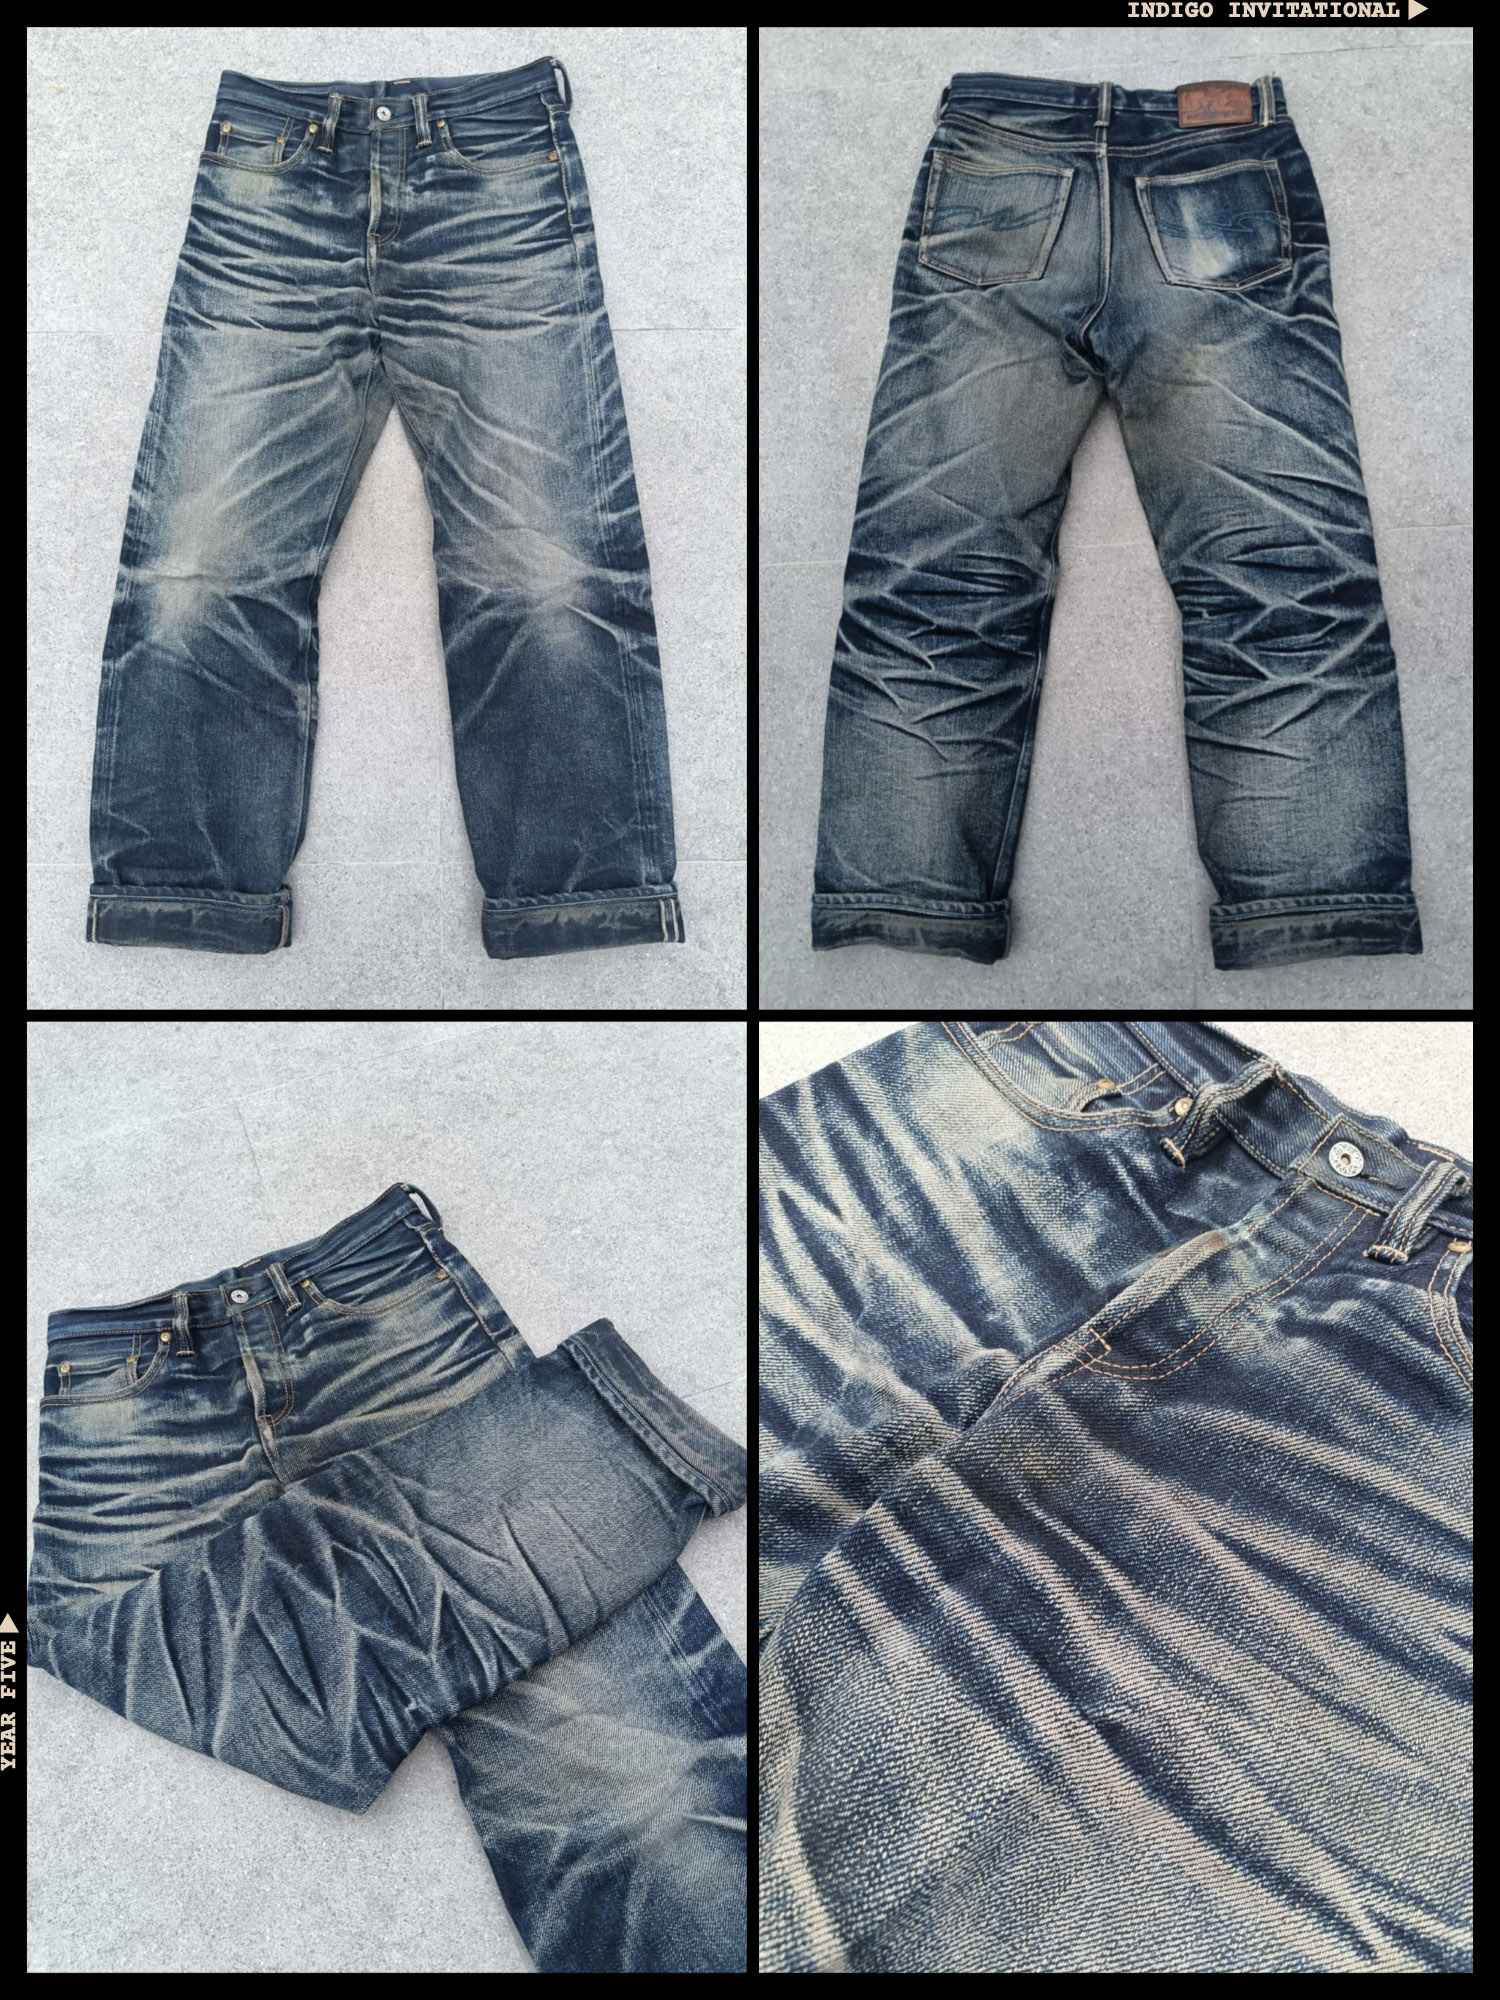
Prawit got top marks on two of our judge’s cards. They were especially appreciative of Prawit’s choice of a more generous cut, which makes contrast fades like these more difficult to achieve.
“Huge and deep whiskers and honeycombs with deep 3D shaded effects.” – Ruedi
“Great collour, crazy amount of whiskers and creases throughout the whole pair, and fantastic contrast.” – Florian
Piger Works is sold at Cultizm (DE)
3rd Place: Suwit Tullawanthana (SEA025)
Competed in: Piger Works x II F2F20 (20 oz.)
Ticking every possible box for remarkable fades, Suwit’s Pigers cruised to a third place finish with just one point less than the second place finisher. There’s so much to love here, and Suwit’s got to be as pleased with his result as he is happy with his pair.
This denim casts off indigo remarkably quickly, and there’s strong evidence of this on the seat of Suwit’s pair, which is closer to white than it is to blue. A vivid example of both the denims and the fade styles that have pulled Thailand and their best selvedge brand onto the podium.
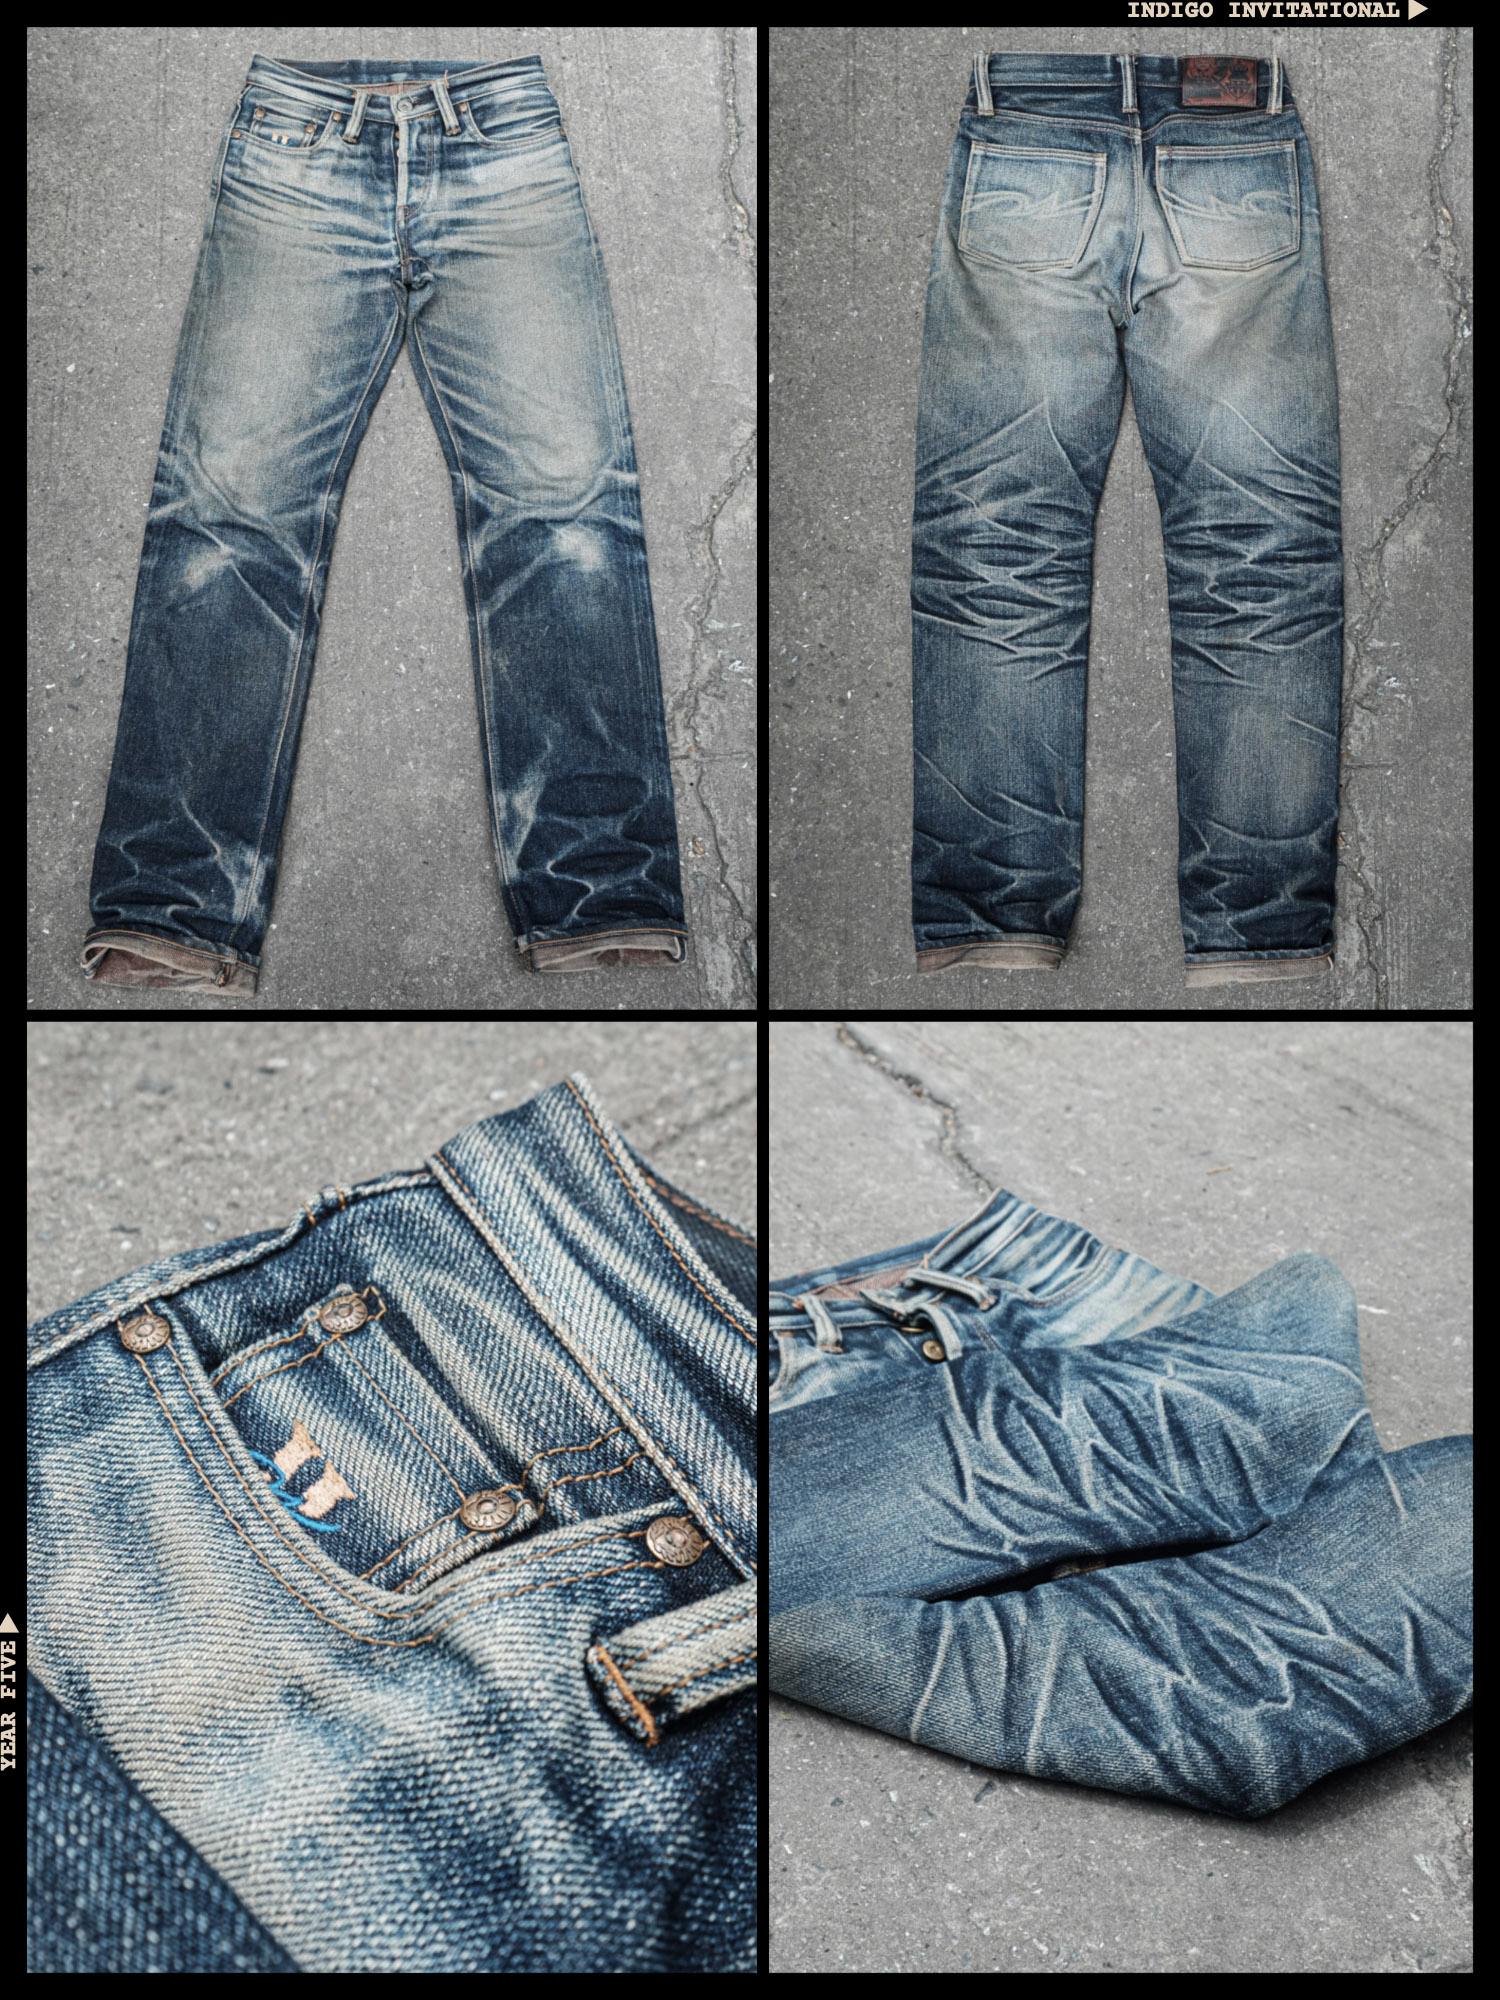
Our judges will likely be very happy with how Suwit’s pair placed. Quite high marks all around from nearly all of the judges.
“Worn to the bitter end delivering excellent overall contrast and impressive fade development. The level of wear and saturation in the high-friction areas is outstanding.” – Noenggaling
“Very nice stacks and fading on the inside of the hems (probably his walking style).” – Ruedi
4th Place: Nigon Konkhamrat (SEA035)
Competed in: Piger Works x II F2F20 (20 oz.)
Nigon cracked the Top 10 in last year’s Invitational, and we’re very pleased to welcome this Thai repairman back to the winning circle. He’s climbed the ranks to sit comfortably in the Top 5, and, with these remarkable fades, he’s definitely earned his place.
After last year’s Top 10 finish in a pair of Piger Works Master of Fades, he returned to the competition armed with our collaboration pair, and he seems to have struck on the winning formula.
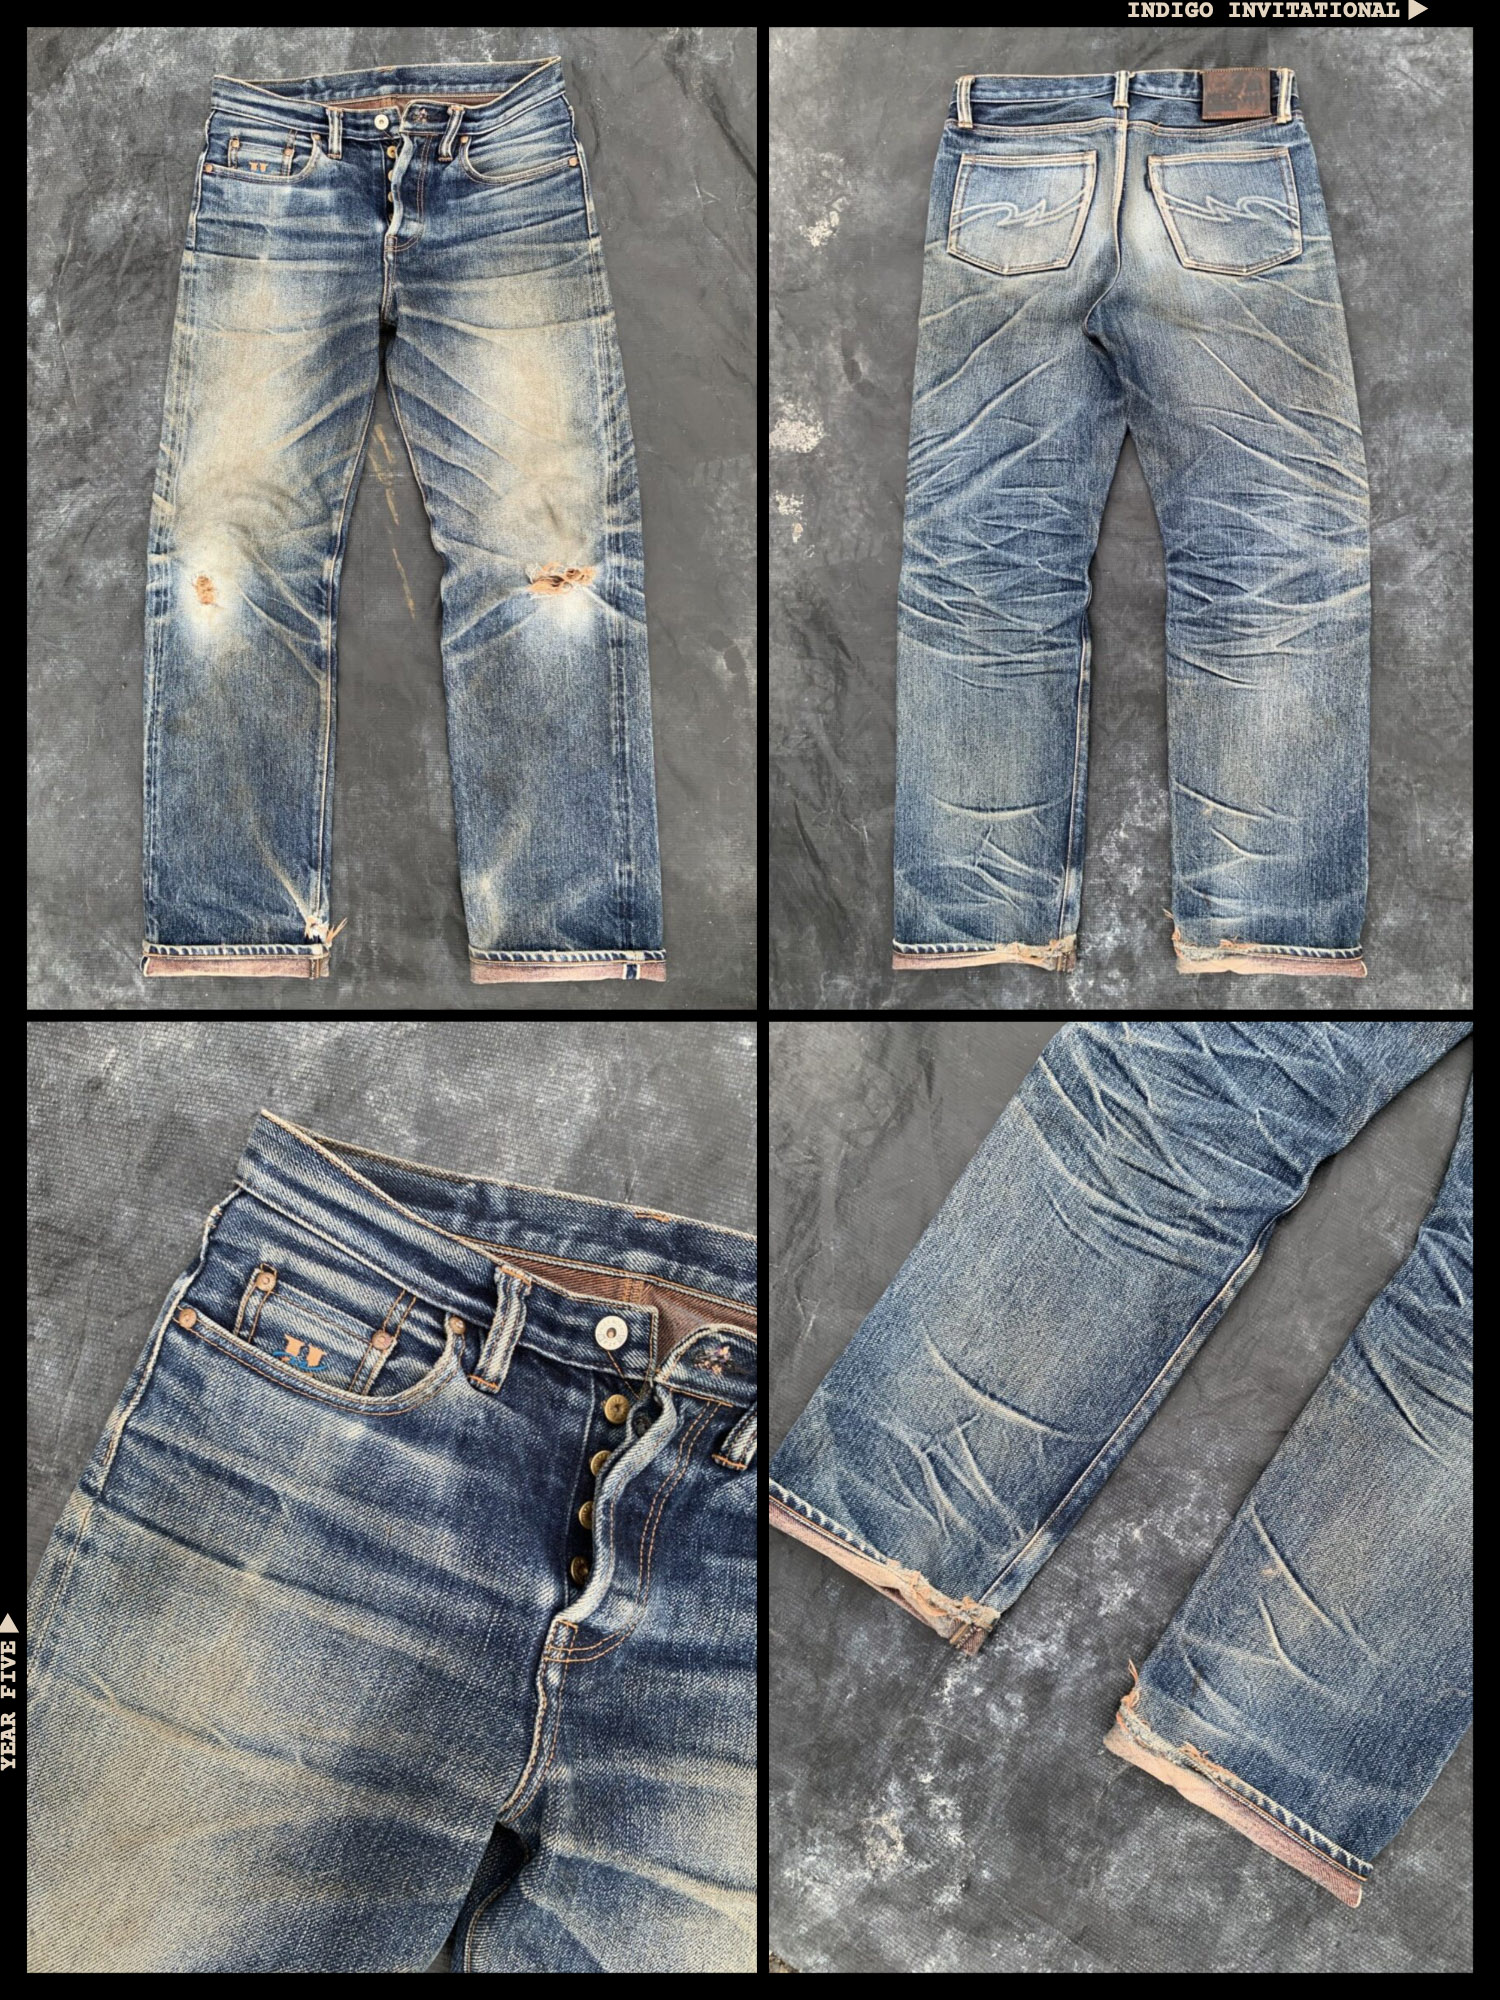
With high marks from a number of our judges, Nigon clearly charmed our panel with his frayed knees and yellowed thighs. Very near the top of three of our judges’ cards.
“The front side is extremely faded all the way from the pocket bags to the knees.” – Ruedi
“Reminds me of the very best vintage Levi’s 501s worn by miners. I especially love the colour, dirty, and the orange weft showing through the rips.” – Florian
“Raw, authentic wear lines with earned knee distressing, presumably from daily abuse.” – Hasri
5th Place: Haziq Syazwan (SEA001)
Competed in: Pure Blue Japan PER-EX-013-ID (15 oz.) – Get them here
After dominating the podium last year, Malaysian faders took home two slots in the Top 10, tying with Indonesia for national representation. First-time Indigo Invitational competitor Haziq is the top Malaysian fader this year, and he did his country proud with these gorgeous PBJs.
We’ve seen Southeast Asian faders gravitating towards local brands, but top Japanese brands continue to be serious status symbols in the region. When faded (and photographed) this beautifully, it’s hard to imagine a pair with more clout.
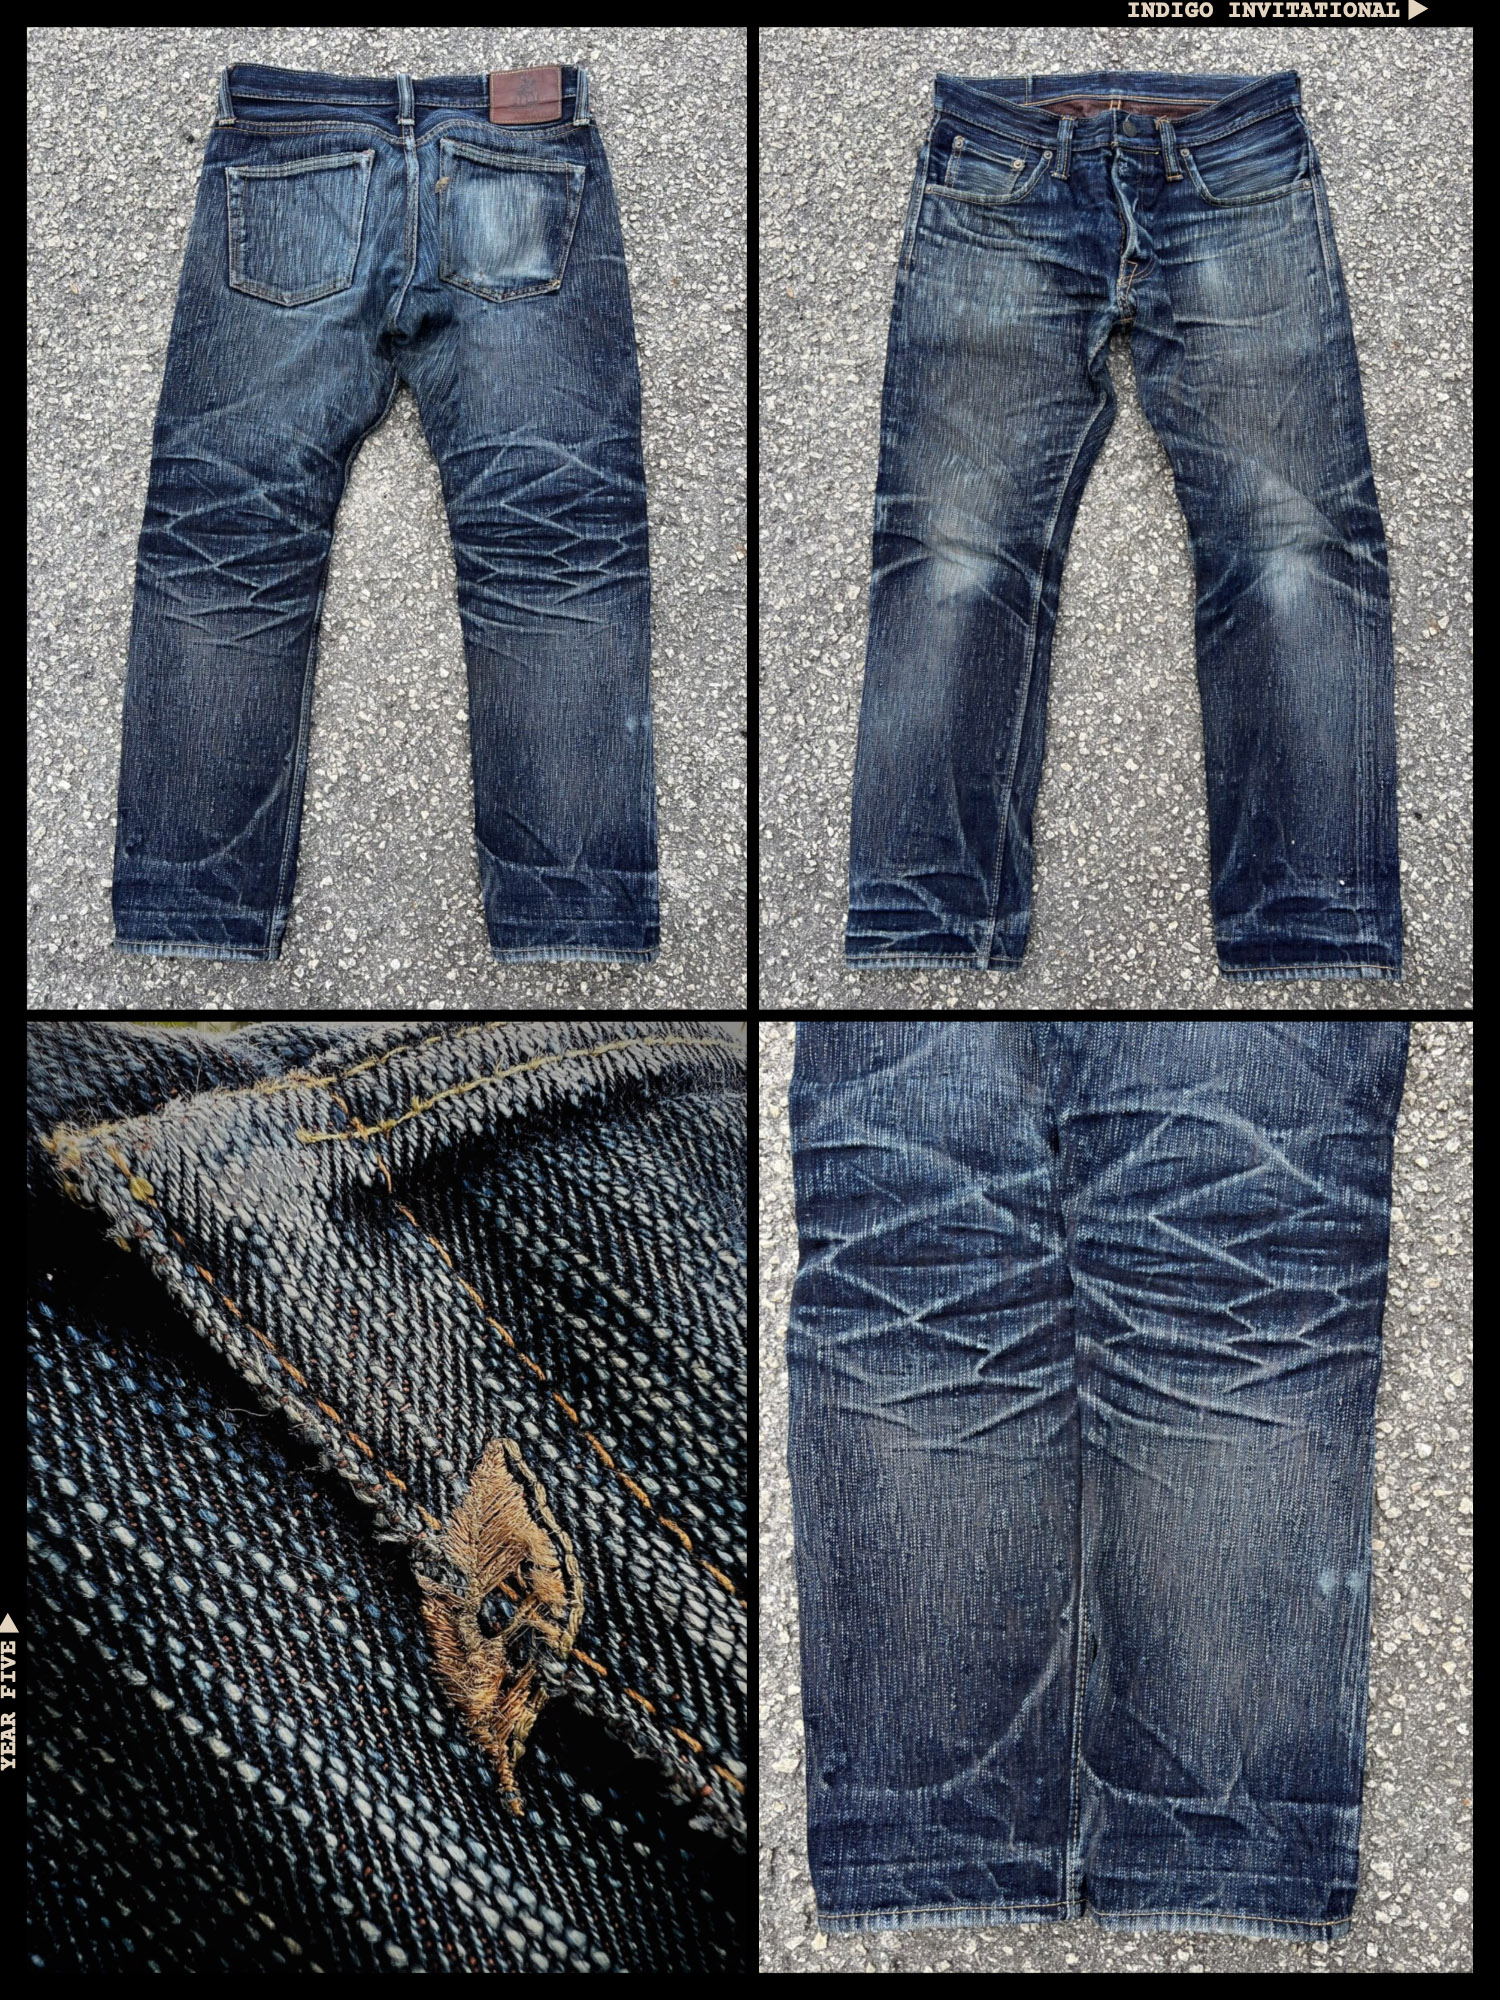
With strong marks nearly across the board from our judges, Haziq made a strong impression on our panel, and we hope we’ll see much more of him in the years to come.
“You can really see the texture and irregularity of the fabric coming through in the fades.” – Cheese
“The end result of the kakishibu persimmon dye blended with indigo is exotic.” – Hasri
“It takes serious patience and mileage to really unlock what this fabric can do. This isn’t about chasing the highest contrast—it’s about letting the fabric do the talking.” – Noenggaling
You can get Pure Blue Japan at Redcast Heritage (ES), Franklin & Poe (US), Brooklyn Clothing Co. (CA), Blue in Green (US), DeeCee Style (CH), and Clutch Café (UK)
6th Place: Fajrin Karza Juniarzal (SEA023)
Competed in: Samurai S710XX II (19 oz.) – Get them here
Two pairs of Samurai in the Southeast Asian Top 10, both of them Kiwami Selvedge. That (and these pictures) should tell you everything you need to know about Samurai’s fade-primed selvedge.
Fajrin works as a maintenance engineer in Bekasi. The work is indoors, so these fades aren’t the product of heavy, dirty work (this isn’t a mark against them). They’re a shining example of what is possible when denim like this is pushed along rather than shoved.
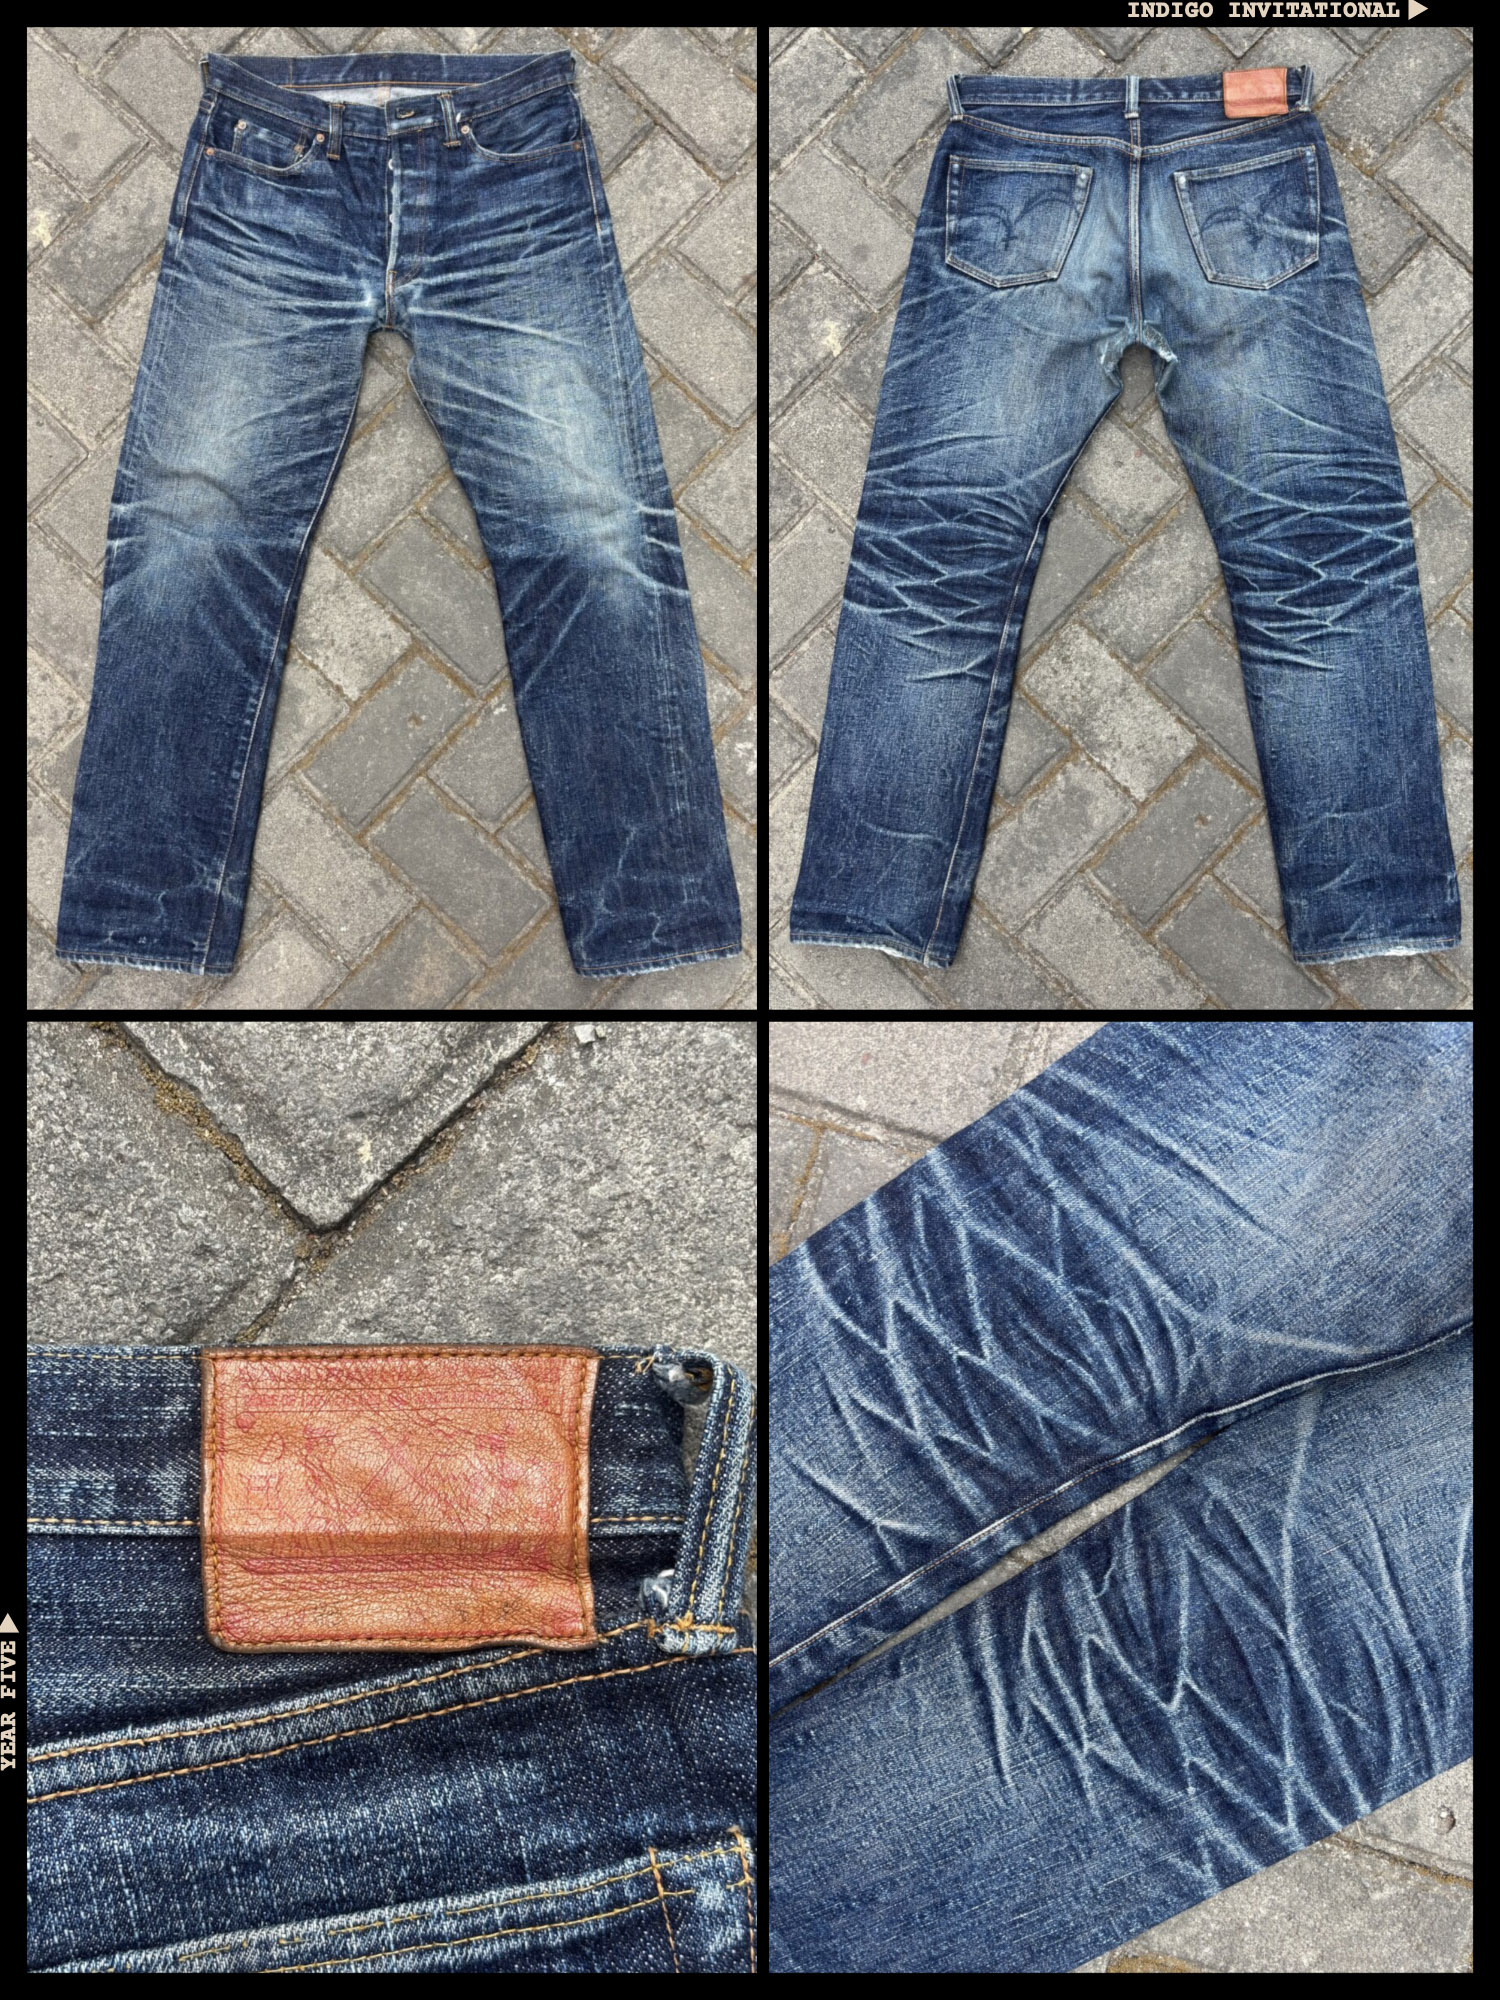
Fajrin’s pair didn’t appear on a lot of judging cards, but, when he did, he appeared very close to the top of the card. Enough judges adored this pair to pull it into the middle of our Top 10.
“Remind me of the good old SUFU days. Very traditional—nothing too extreme but you can see the dedication in the combs and whiskers, with the stacks adding to a great rounded look.” – Florian
“The fades feel natural and well balanced, showing that strong development does not always require extremely aggressive wear.” – Noenggaling
7th Place: Mohd Sukry Nordin (SEA003)
Competed in: Sukajin Terletak (18 oz.)
A competitor who has been steadily climbing through the ranks, Mohd Sukry Nordin cracked the Top 50 in Y3, the Top 20 in Y4, and the Top 10 this year. At this rate, he’ll be standing on the podium next year.
He’s worn a home-grown pair of Sukajins for the second year in a row. This premium Malaysian selvedge brand has become one of the top choices for Malaysian faders, and it’s easy to see why when the brand’s acolytes are producing faded examples like this one.
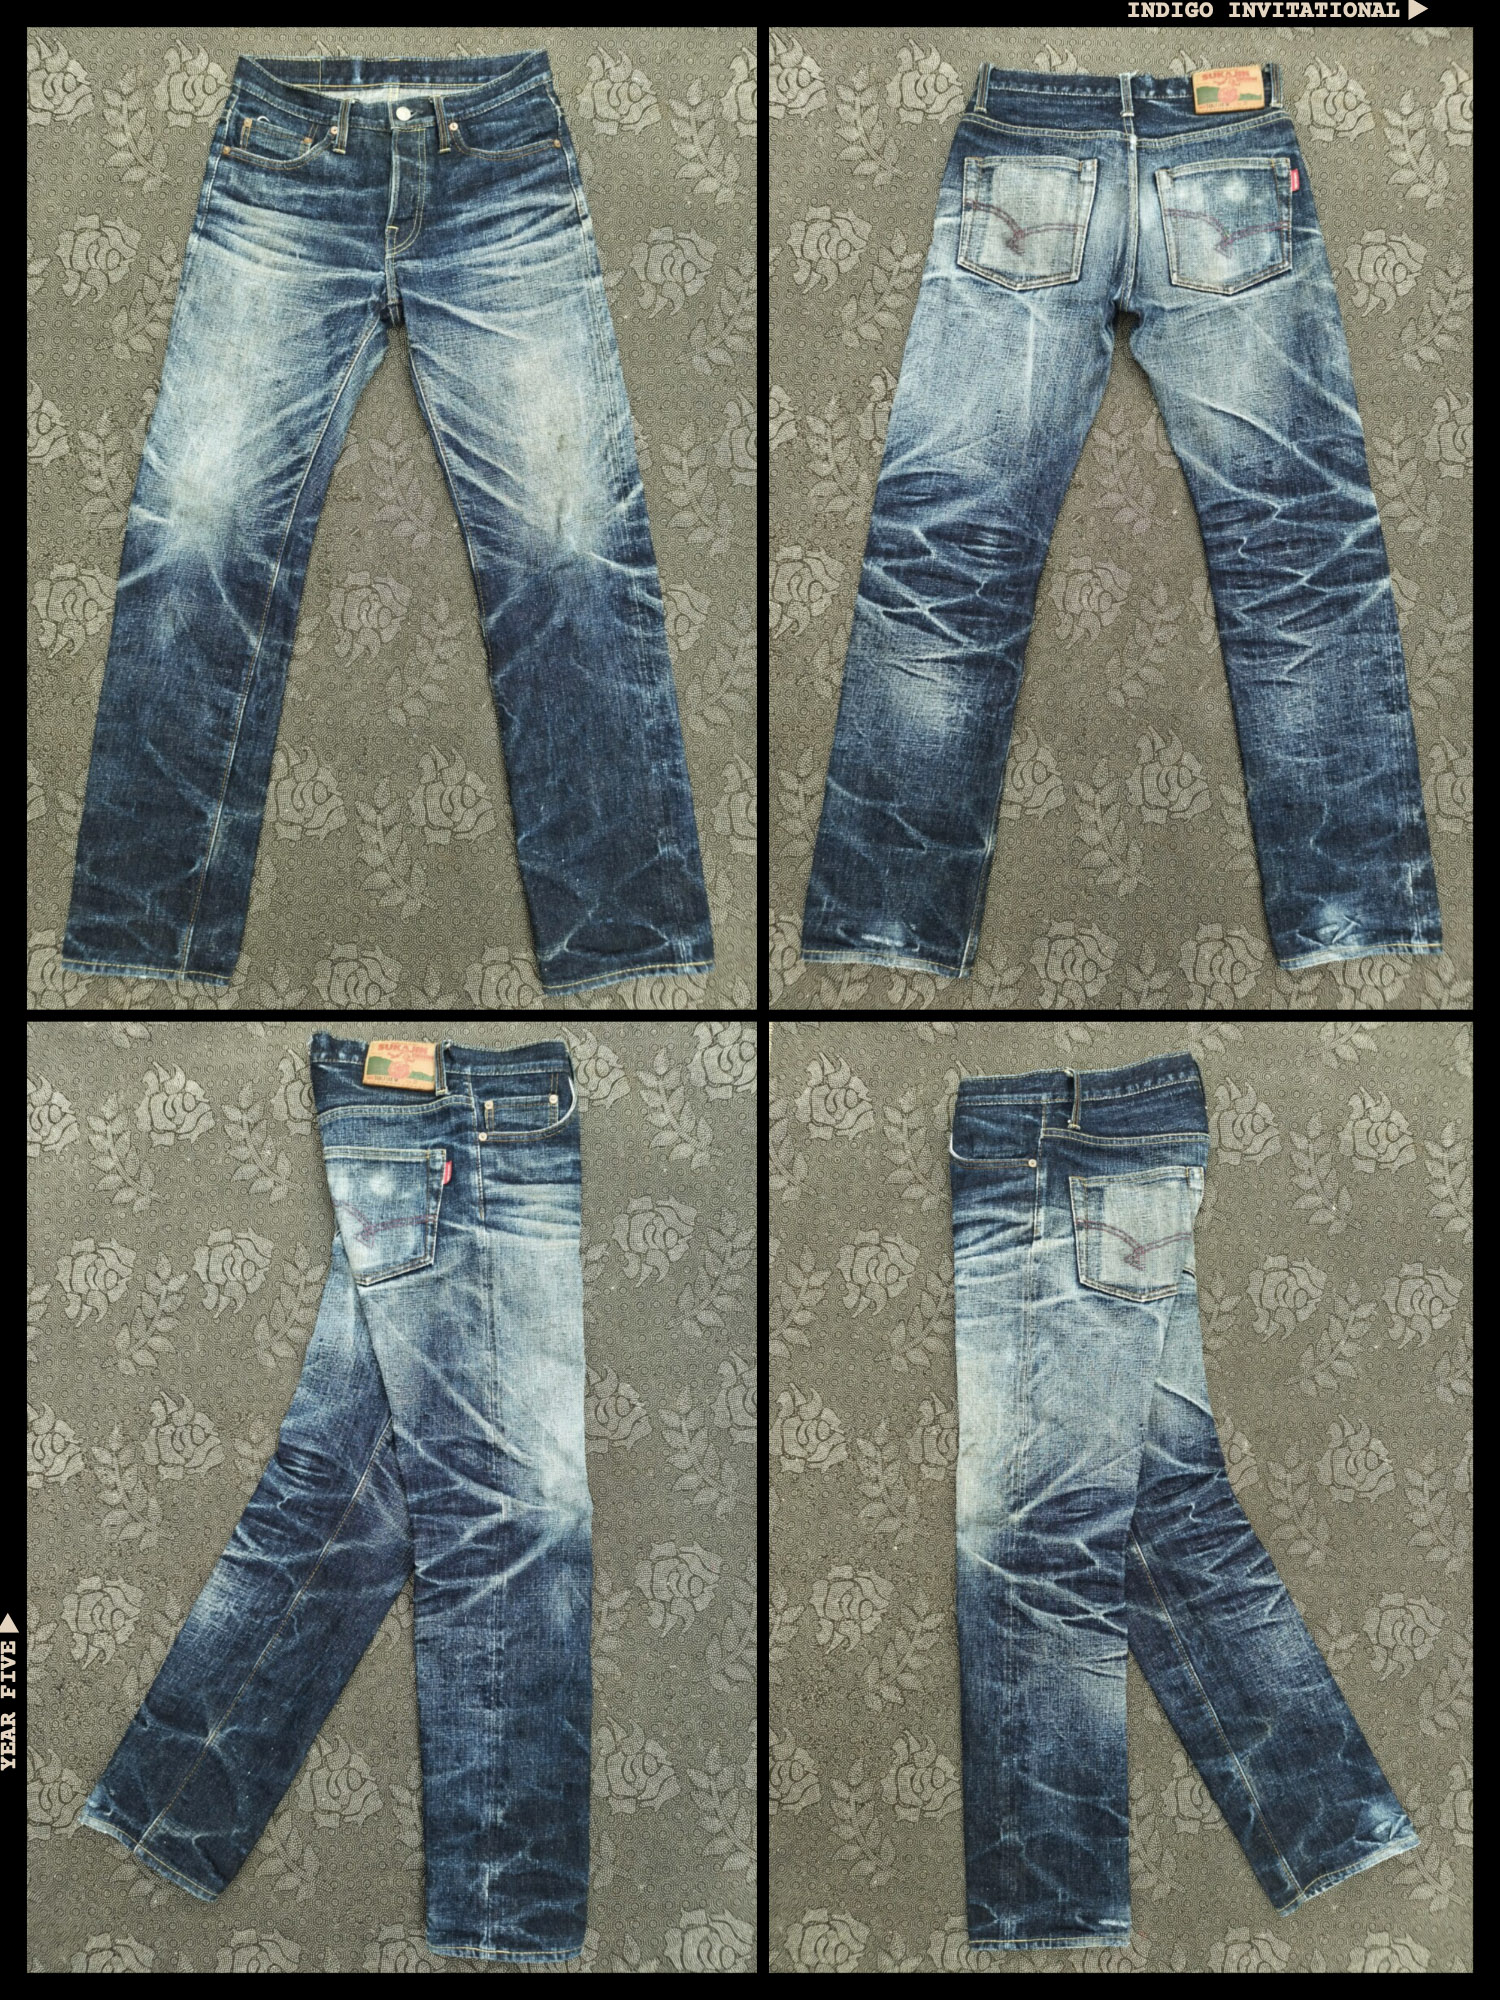
The judges who liked Mohd’s pair placed it around the middle of their cards.
“Great contrast, very nicely shaped whiskers, roping, stacks, and colour.” – Florian
“Badass fades! The lighter areas have developed really nicely too. Really cool pair.” – Cheese
“Rejects standard high-contrast whisker lines for a smooth, full-on marble fade that looks evenly worn.” – Hasri
8th Place: Pathorn Wongmaen (SEA012)
Competed in: Piger Works 20MF (20 oz.) – Get them here
First-time Indigo Invitational competitor Pathorn had a strong debut this year, with expert-level fades that caught our eye in a big way when we first spotted them in the crowd. Another excellent example of the kind of approach to contrast fading that have brought so much deserved attention to the SEA fading scene.
With that attention has come a growing amount of interest in the brands that are producing fast-fading pairs tailor-made for the region’s deeply passionate fade enthusiasts. Piger Works can no longer say that it is the secret weapon behind Thailand’s army of faders. The secret’s out.
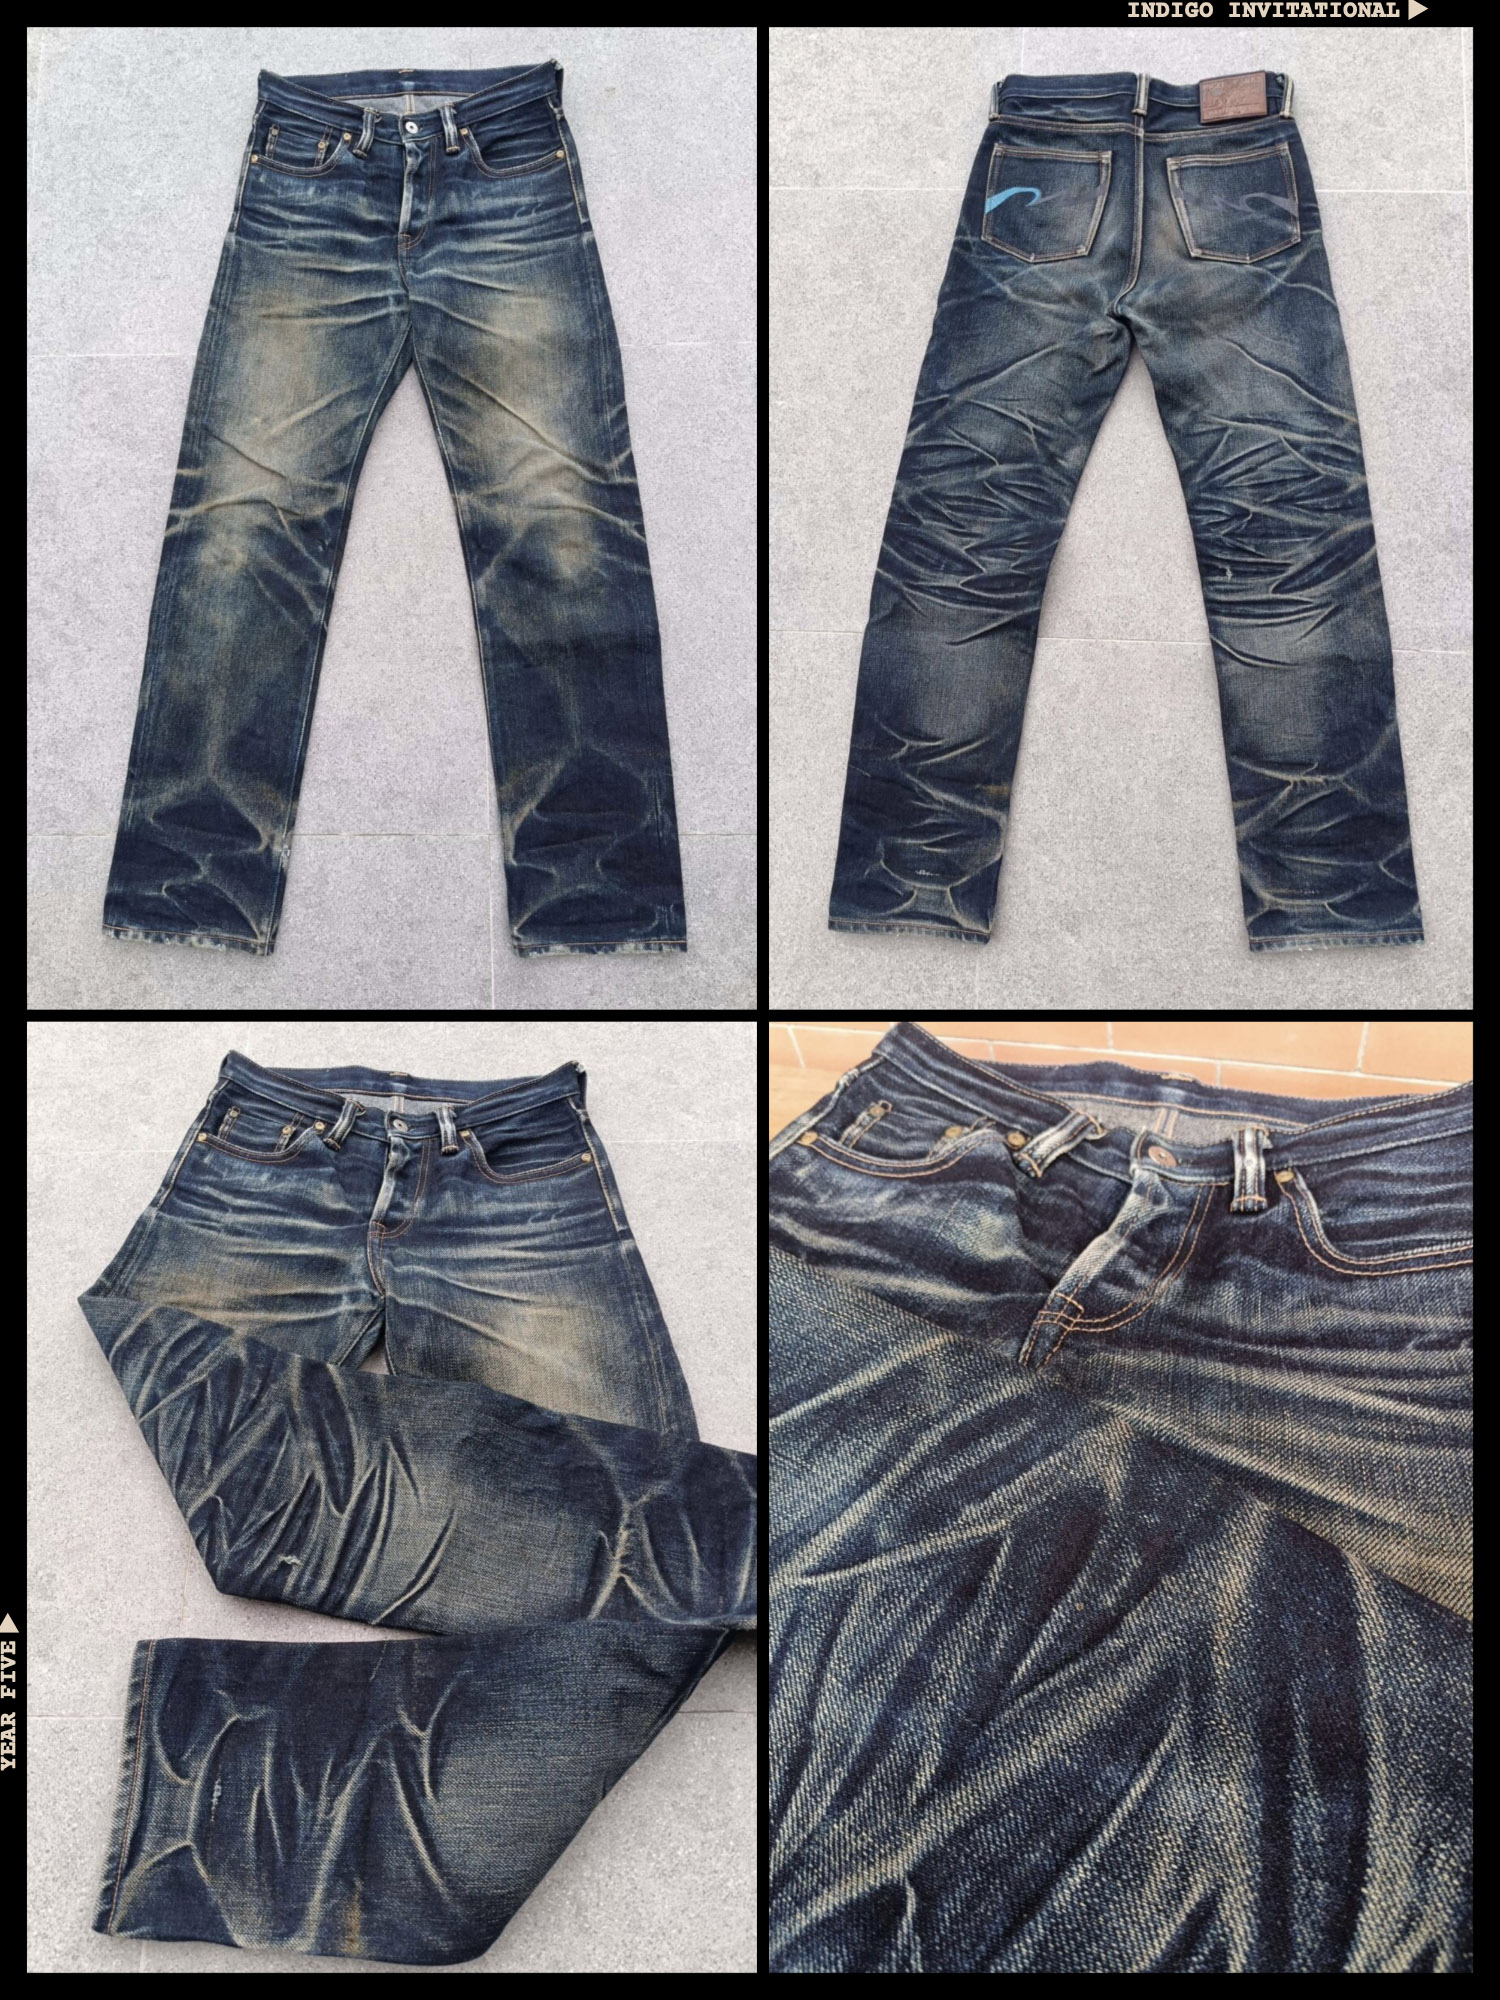
The judges were split on this pair, but Ruedi gave these near-perfect marks on his card. For those who appreciate this typical Southeast Asian approach to fading, these leave very little to be desired.
“Second place. Huge deep honeycombs, amazing stacks, well-defined whiskers. A typical Piger Works denim fade.” – Ruedi
“Now this is a clean representation of daily worn jeans. I like the overall smooth indigo tones.” – Hasri
9th Place: Teerapol Kitkajornpaisan (SEA047)
Competed in: Piger Works 21BSU IBK (21 oz.)
With the shield-shaped pockets and intense fading, this pair caught the eyes of the team of enthusiasts who helped us pick the SEA Top 50. The pair made it into the Top 16 by a whisker (thanks to a tie-break), but we knew that this one had Top 10 potential written all over it.
Teerapol works as an electrical service engineer in Thailand, and this requires frequent site visits. The slanted entry pockets on the front and the tool pockets and loop on the side and back of the jeans really help this pair stand out.
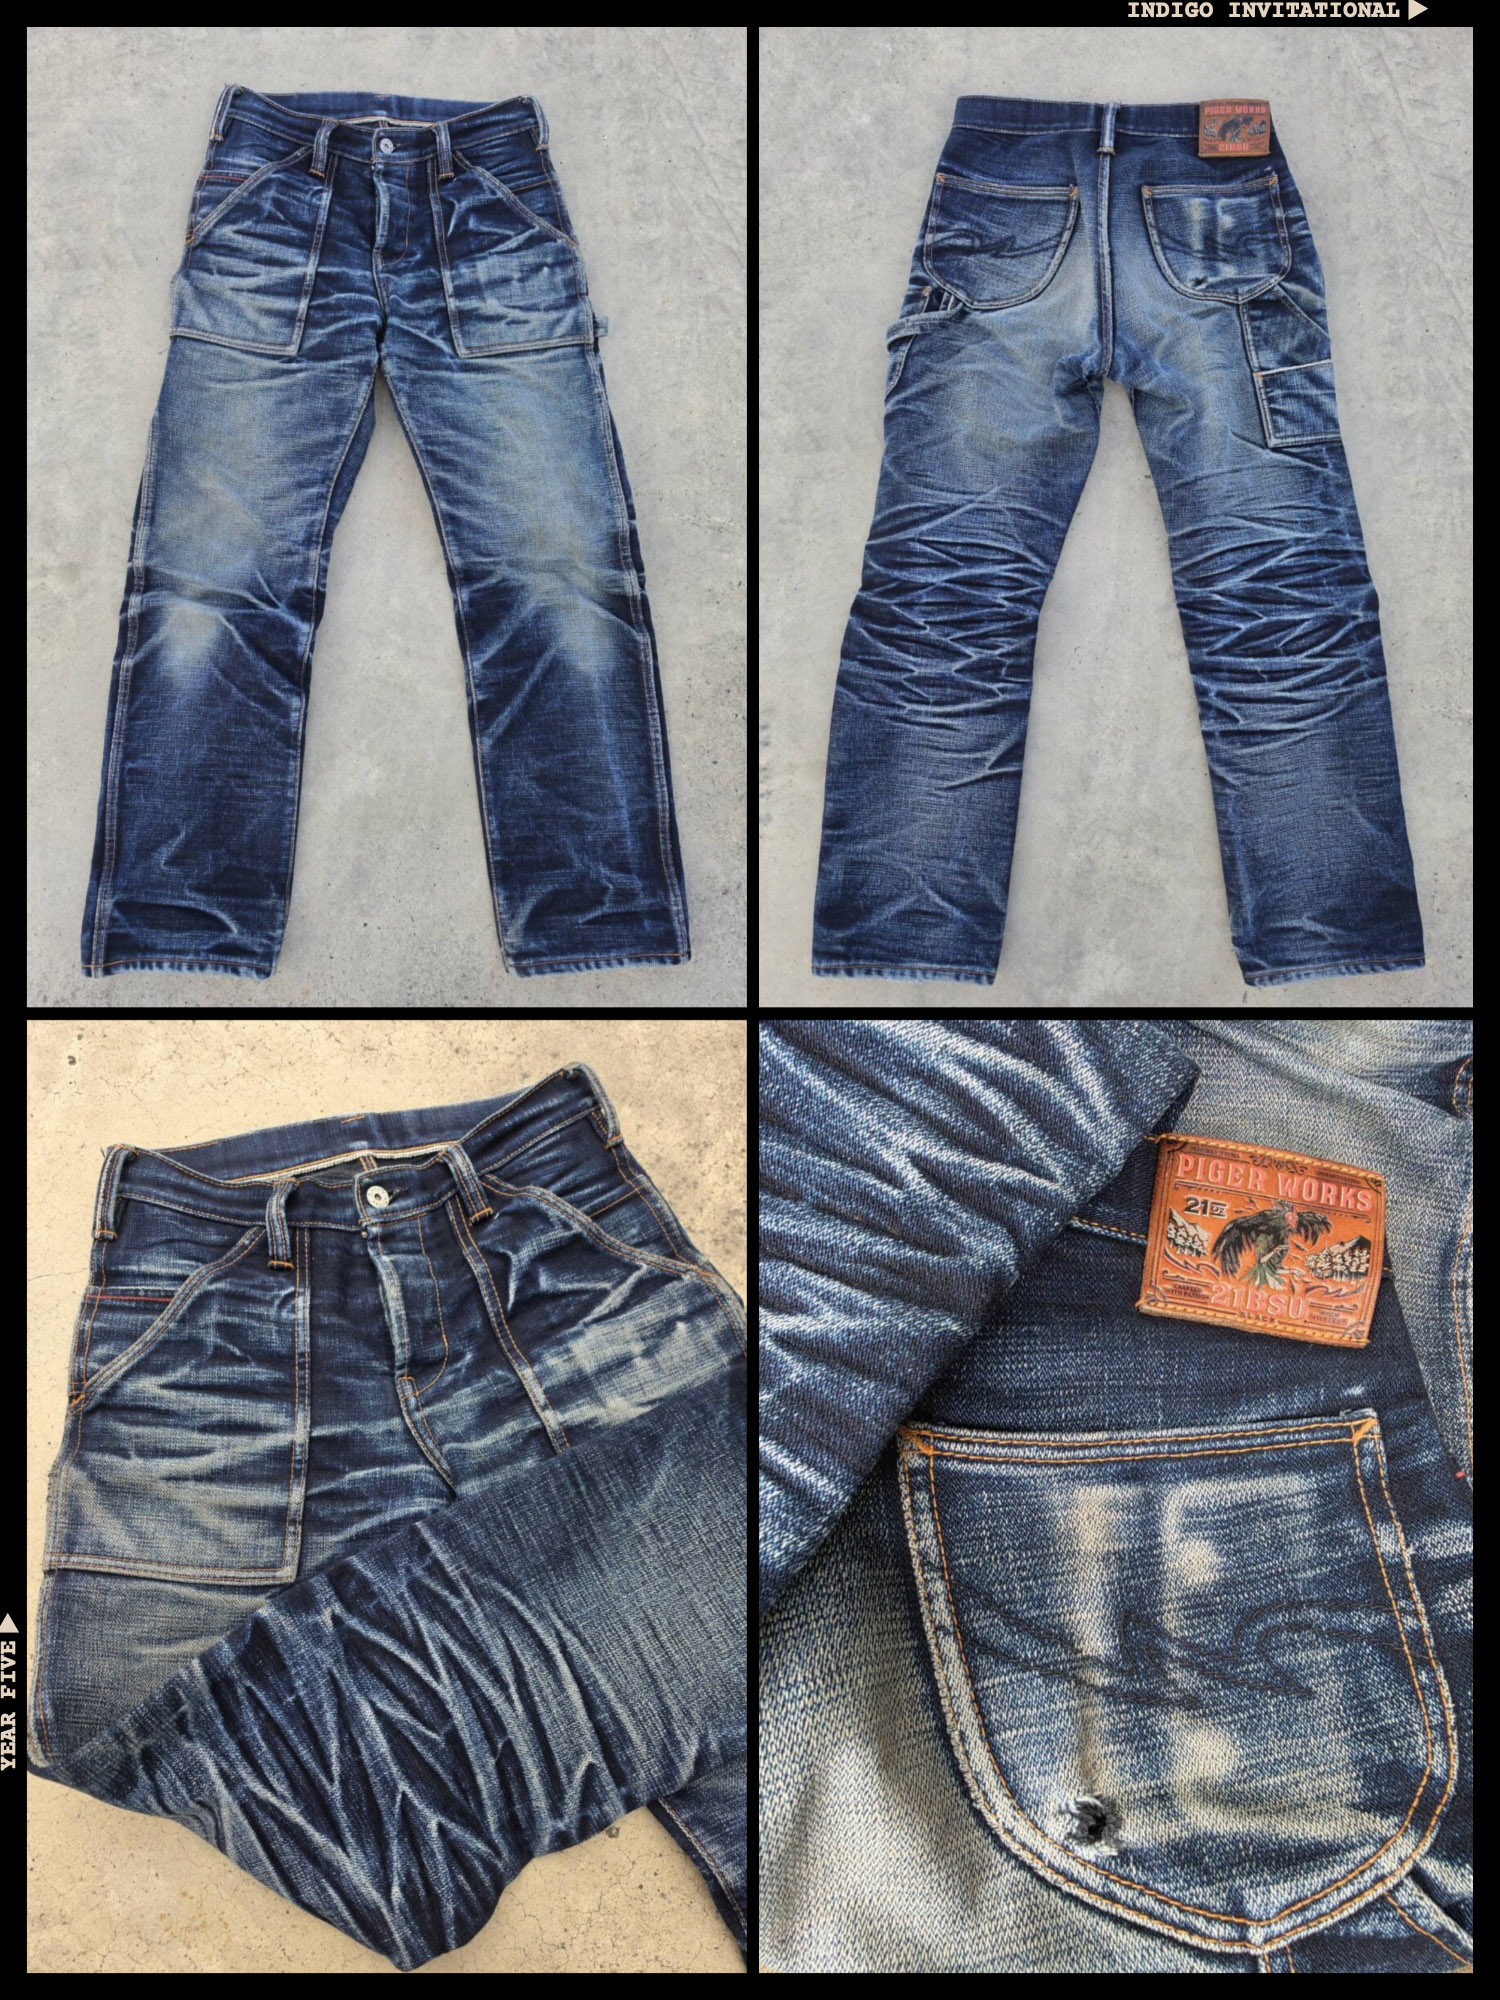
One of our judges adored this pair, putting it second from the top on his judging card.
“Not your standard textbook fade. Those thick panel pockets force bold crease lines that deserve a lot of credit. An intensely worn utilitarian pair. Kudos to you, sir!” – Hasri
“Great high-contrast fades! Didn’t wash much. Big effort” – Edie
“Definitely one of the more heavily worn pairs here. I considered the repairs and marks when ranking it, but the fading itself is seriously impressive.” – Cheese
10th Place: Khomsan Koedsap (SEA018)
Competed in: Piger Works 20MFSI (20 oz.)
We’re rounding out our Top 10 with another first-time competitor who worked hard in his pair of Pigers all year. It’s somehow appropriate that his highlight photos show this pair in the garden. They’ve clearly not spent the year sitting on the shelf or the couch.
If you’re keeping track, that makes six pairs of Piger Works in the SEA Top 10. Five of these pairs use the Master of Fades warp yarns. The results speak for themselves. This blend of indigo and cotton is the perfect fade recipe for those who want dramatic fades and want them fast.
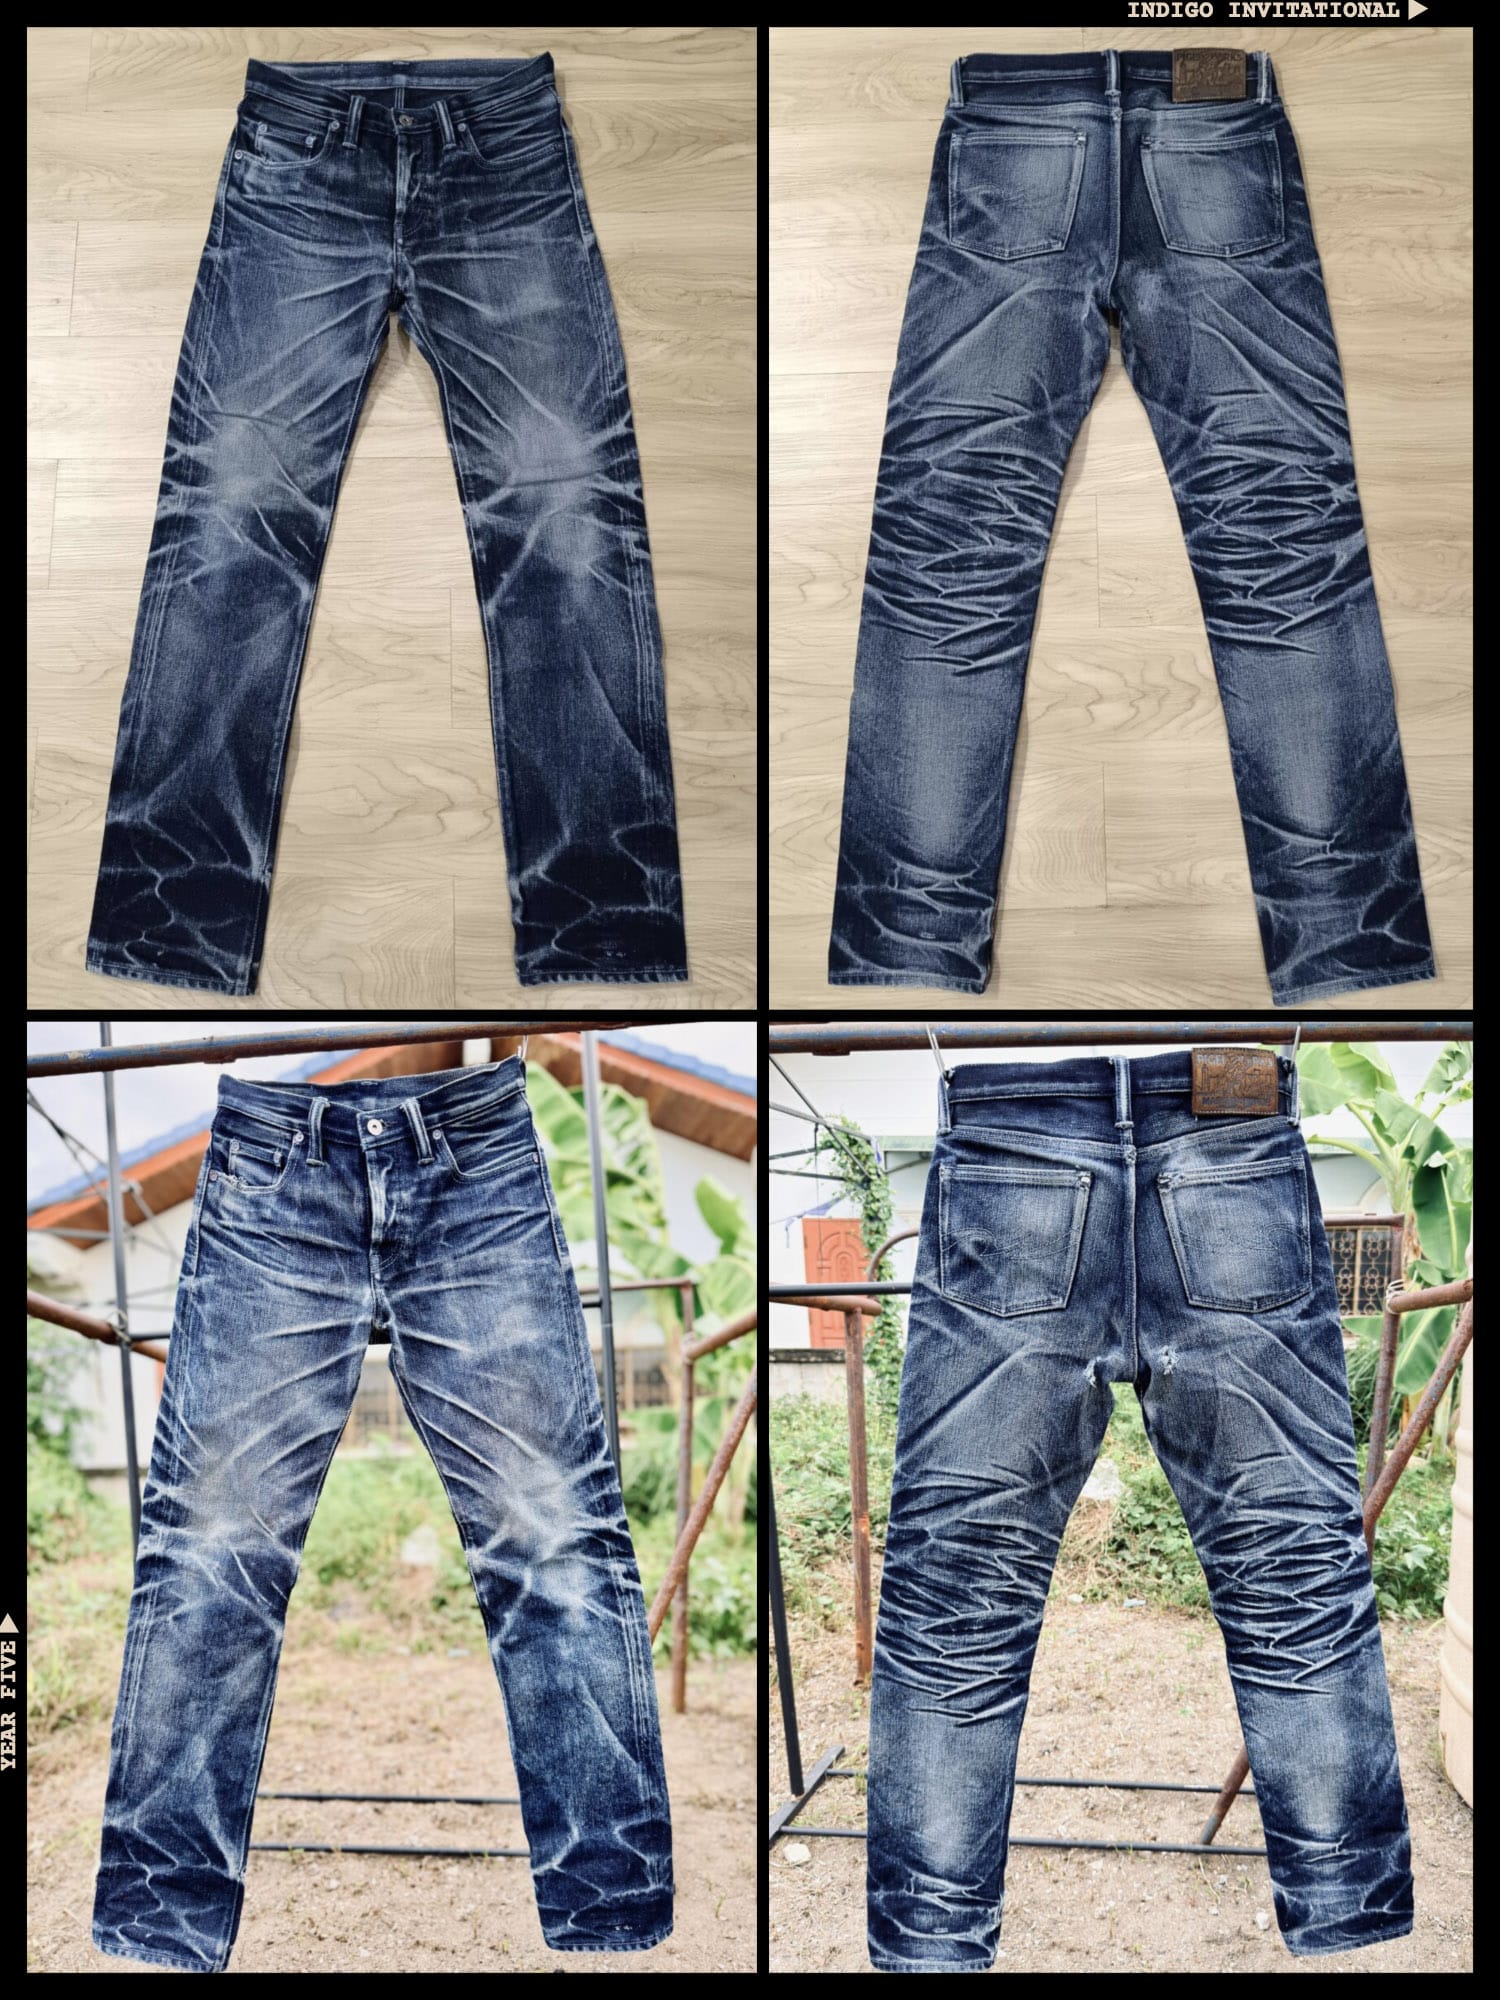
Khomsan’s pair appeared on three of our judge’s cards, and always on the upper half. Those who really liked this pair placed it just off of their podium placements. A well-earned finish for a hard-working fader.
“Love the typical Asian fade lines running from the back pockets towards the outer knee—likely caused by thin legs and perhaps riding a scooter or motorbike a lot in the tropical heat.” – Ruedi
“The fades on this one are seriously sharp. An amazing pair.” – Cheese
IIY5 Re(Pair) Top 5
We introduced Re(Pair) in Year Four to give competitors a chance to take their faded pairs around the track a second time. We wanted to give slower faders a chance to produce their best-ever fades, but also to see what champion-level fades would look like if pushed hard for a second full year.
It’s a small group of competitors, but out of this group has come some of the most beautifully faded pairs we’ve seen in the competition. If you’ve finished the competition and are keen for a second lap of the track, you can register for Y6 Re(Pair) here.
1st Place: Alex Scheibner (RE001)
Competed in: Brave Star True Straight (21 oz.) – Get them here
All year, we knew this would be the pair to beat. It came into the competition carrying a pile of hardware from Year Three, when it stood on the very top of the podium, beating out competitors all over the world (this was before we divided the competition into conferences).
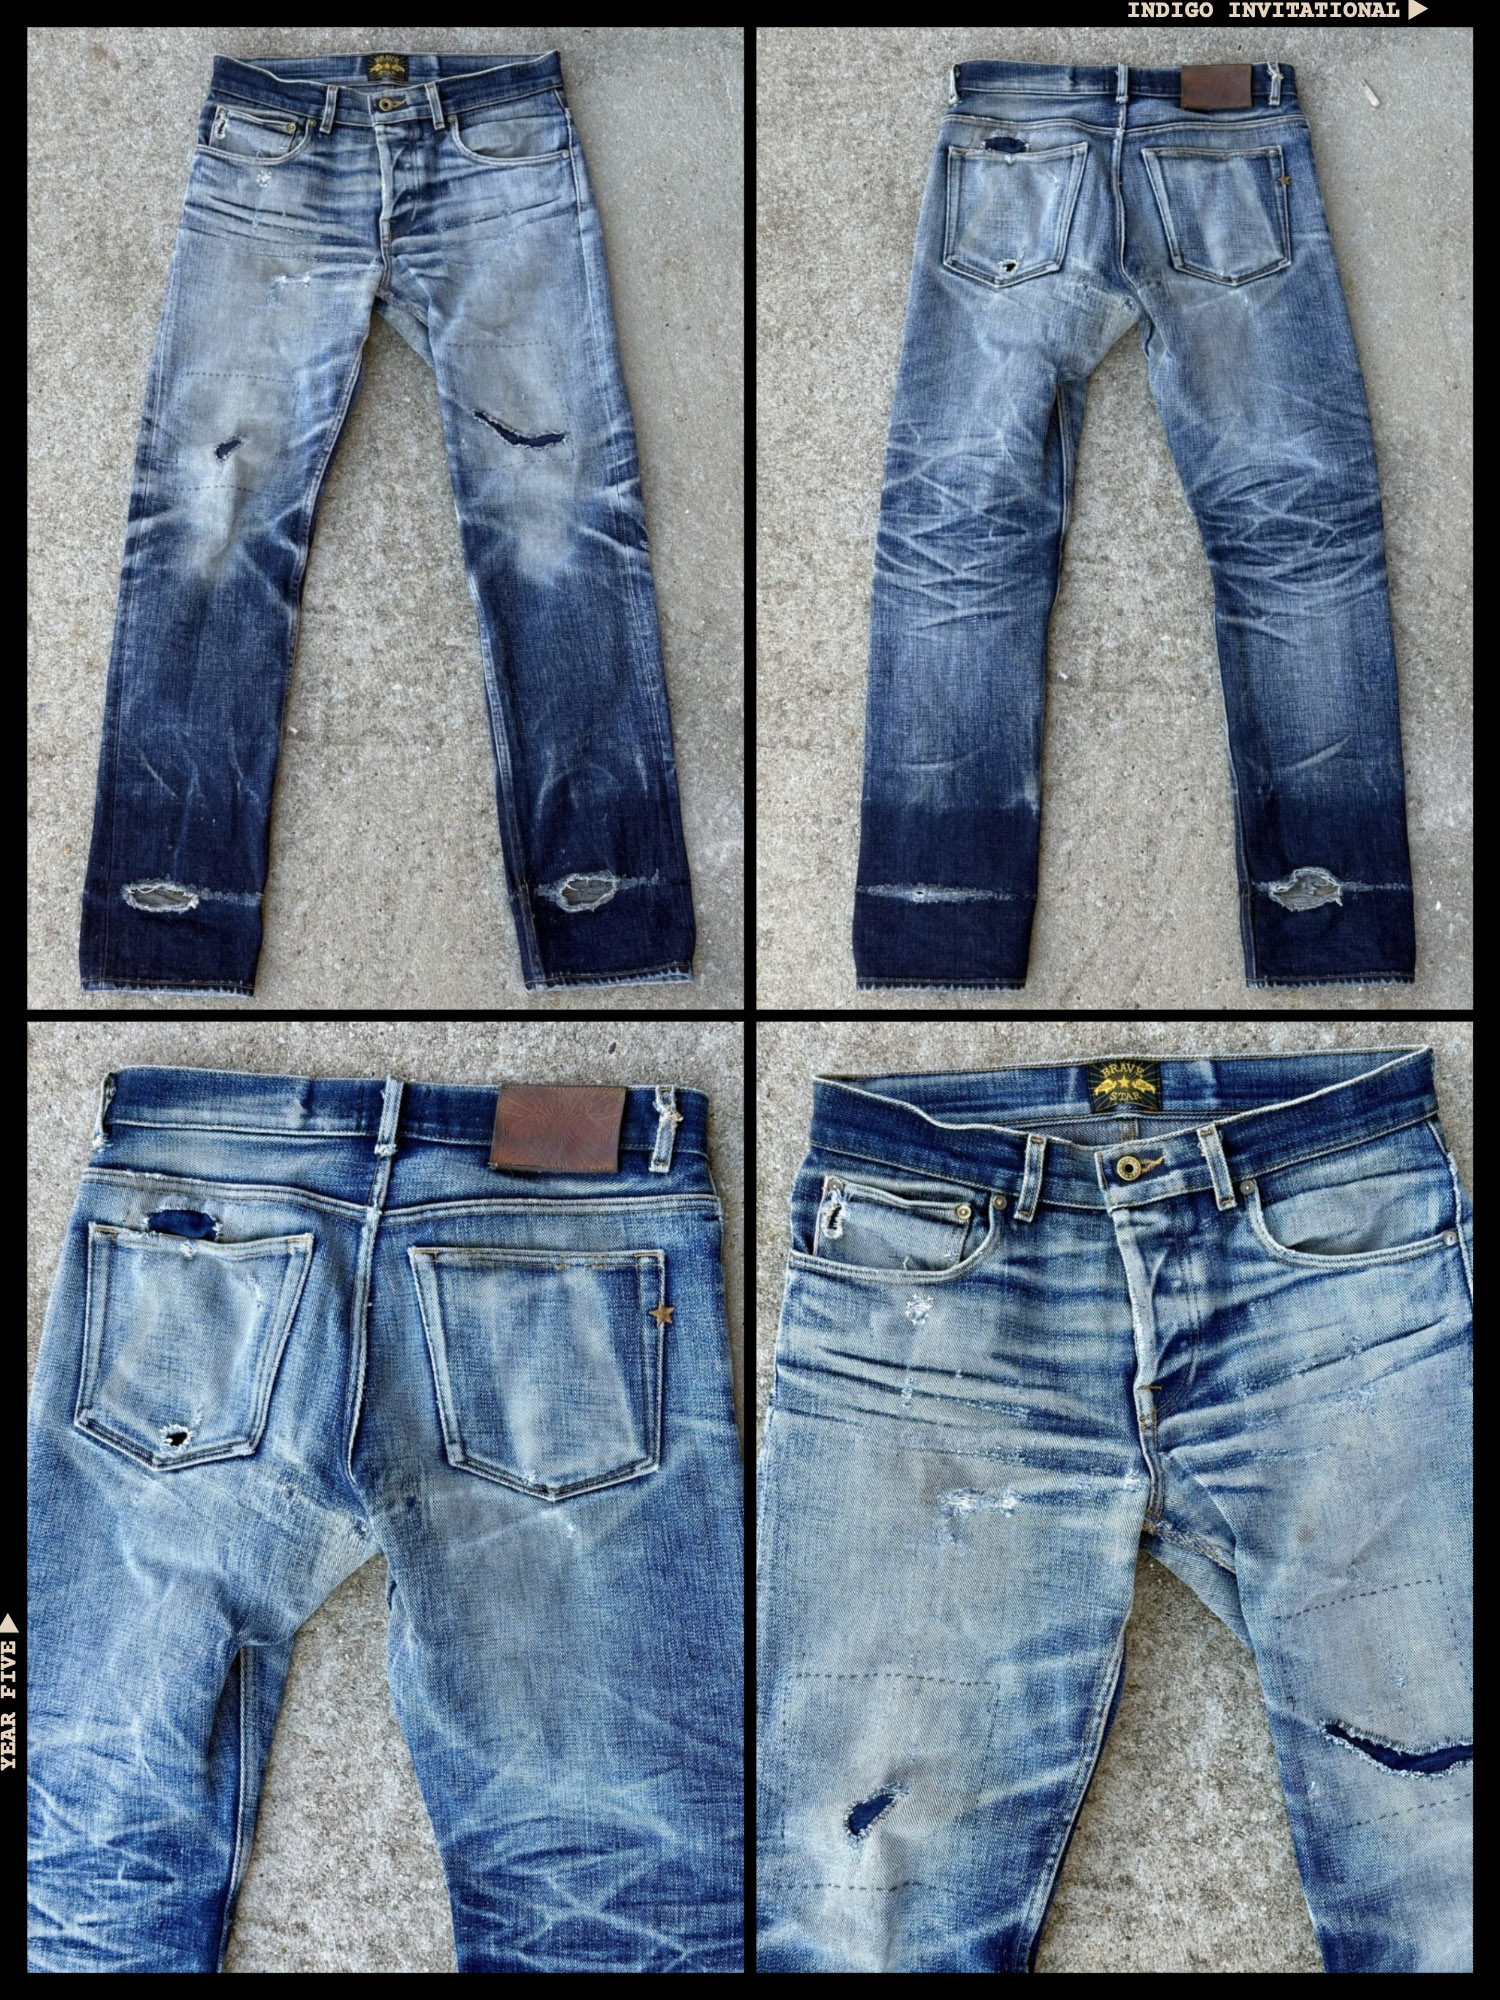
Alex brought the same kind of approach to his pair that he did when he won the competition, adding some gorgeous repairs into the mix to keep his pair from disintegrating. The judges were in perfect agreement on this one. First place by a comfortable margin.
2nd Place: Dimas Putra Anugrah Pratama (RE005)
Competed in: Adelaide Mantis VIII (17 oz.)
Dimas clearly kept his foot on the gas pedal all year with this pair. The paper-thin and shredded thighs and the overall lightening are all new developments, and we can confidently say that nobody pushed their Re(Pair) pair as hard as Dimas did this year.
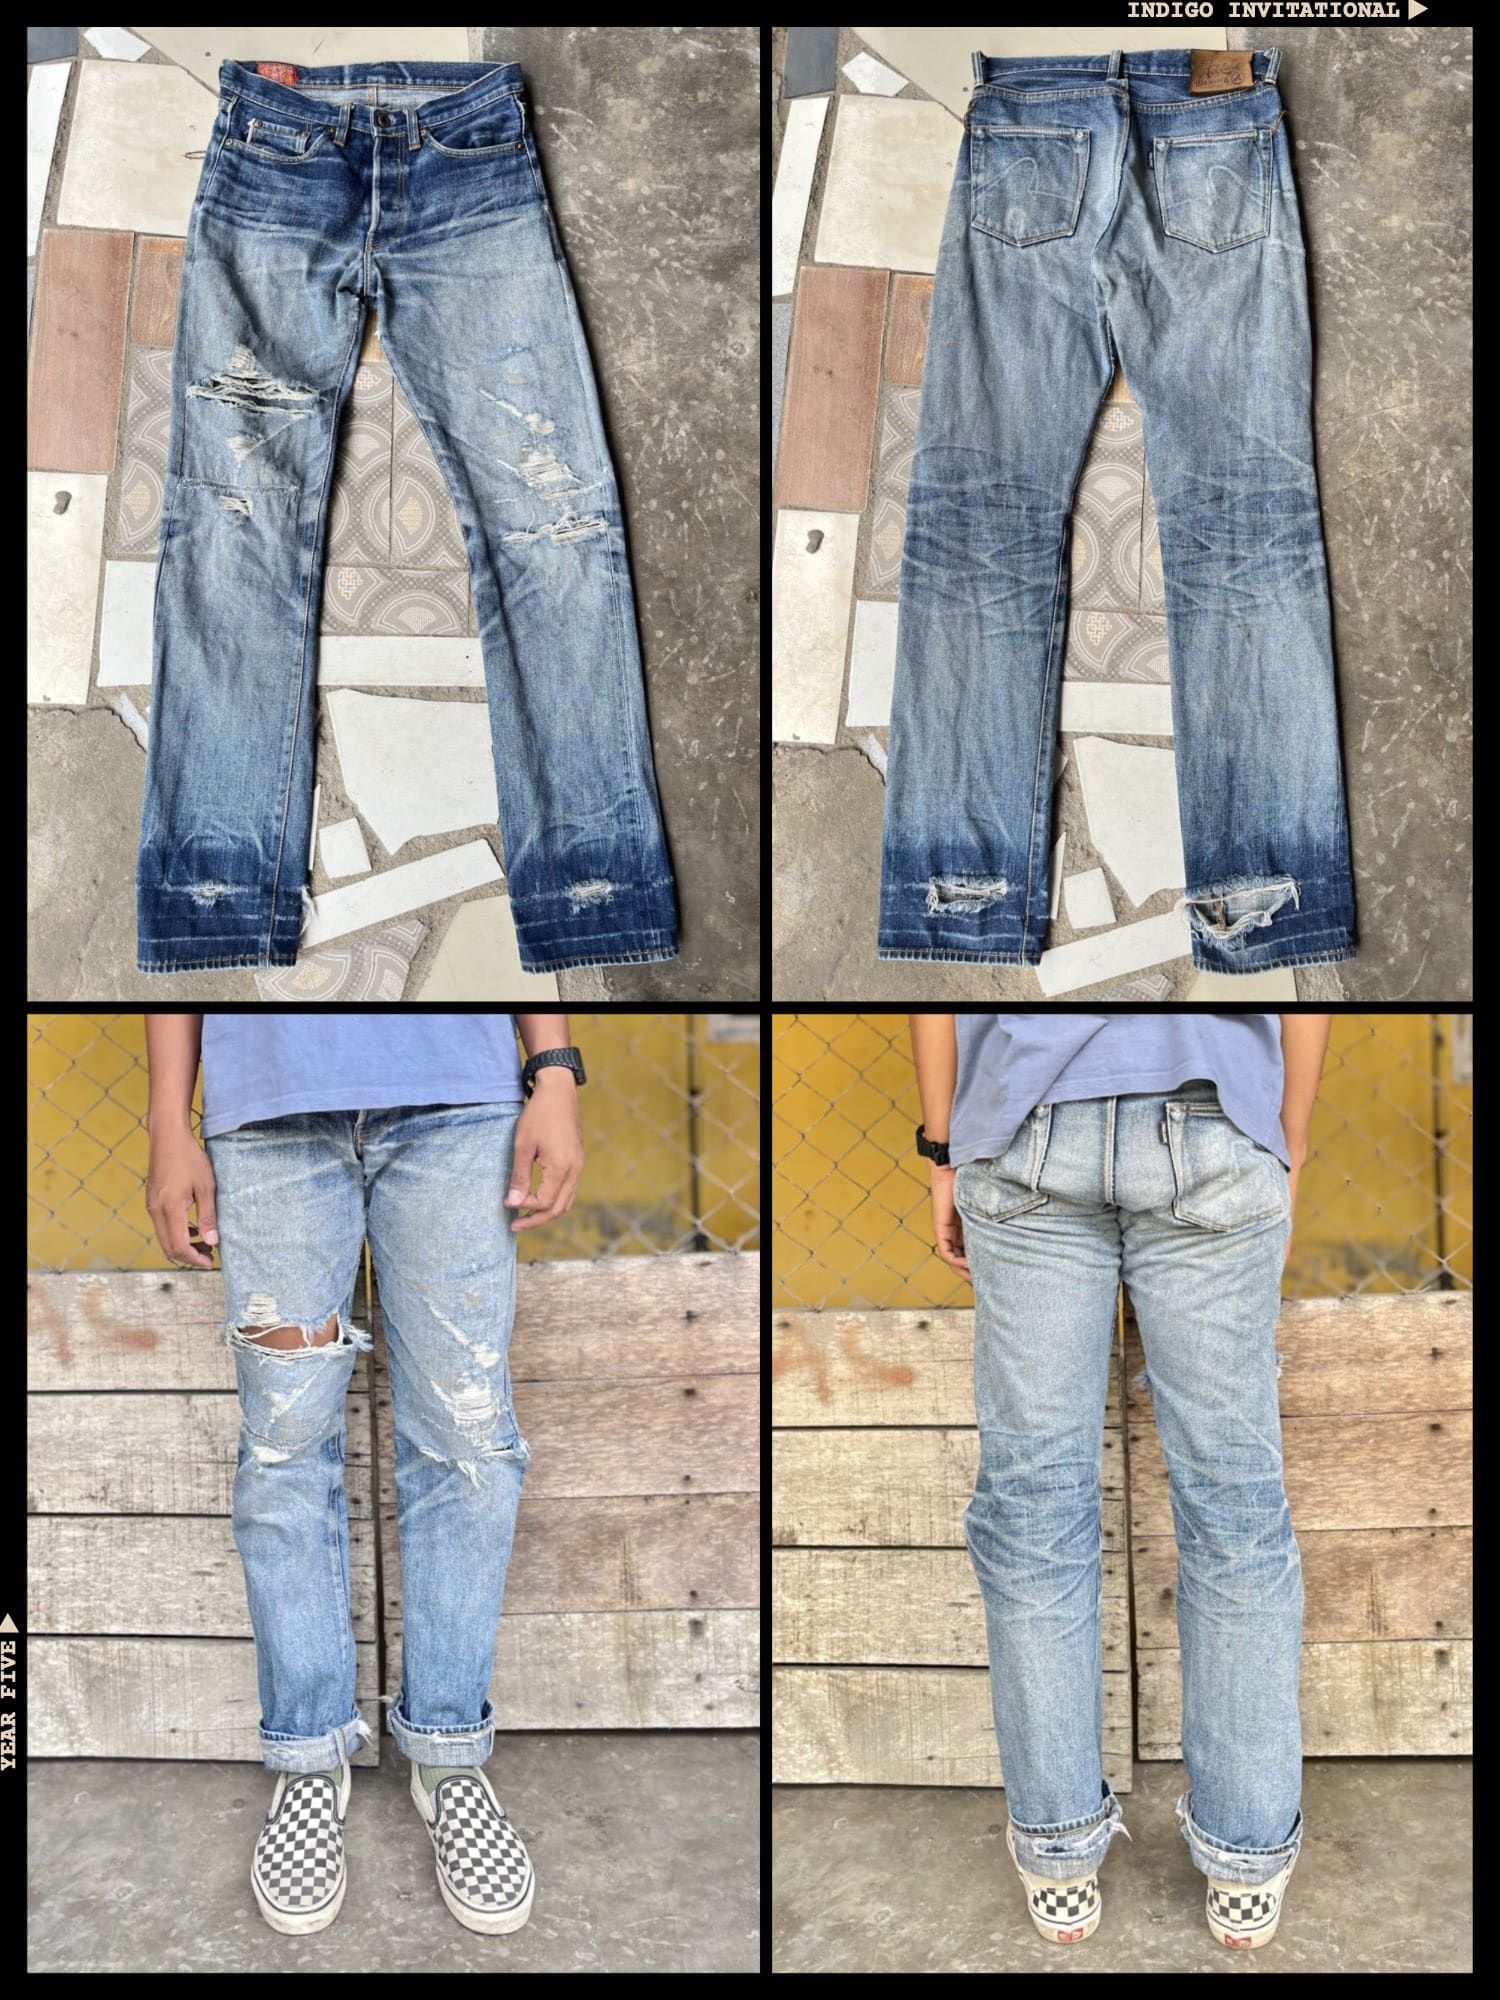
What struck us most about this pair was the way the indigo has held on around the cuffs and the waistband. As you’d expect, the pair has been washed north of 10 times over the last two years of competition, but it’s not the washing that’s faded this pair. It’s wear and a LOT of it.
3rd Place: Jumadi Hutapea (RE003)
Competed in: Momotaro 0205SP (15.7 oz.) – Get them here
Another pair with clear evidence of extensive wear over the course of the year, these fades very nearly took second place. We’re obviously big fans of speed runs here, but the kind of rich indigo tones and fade depth you see here needed the full two years to develop.
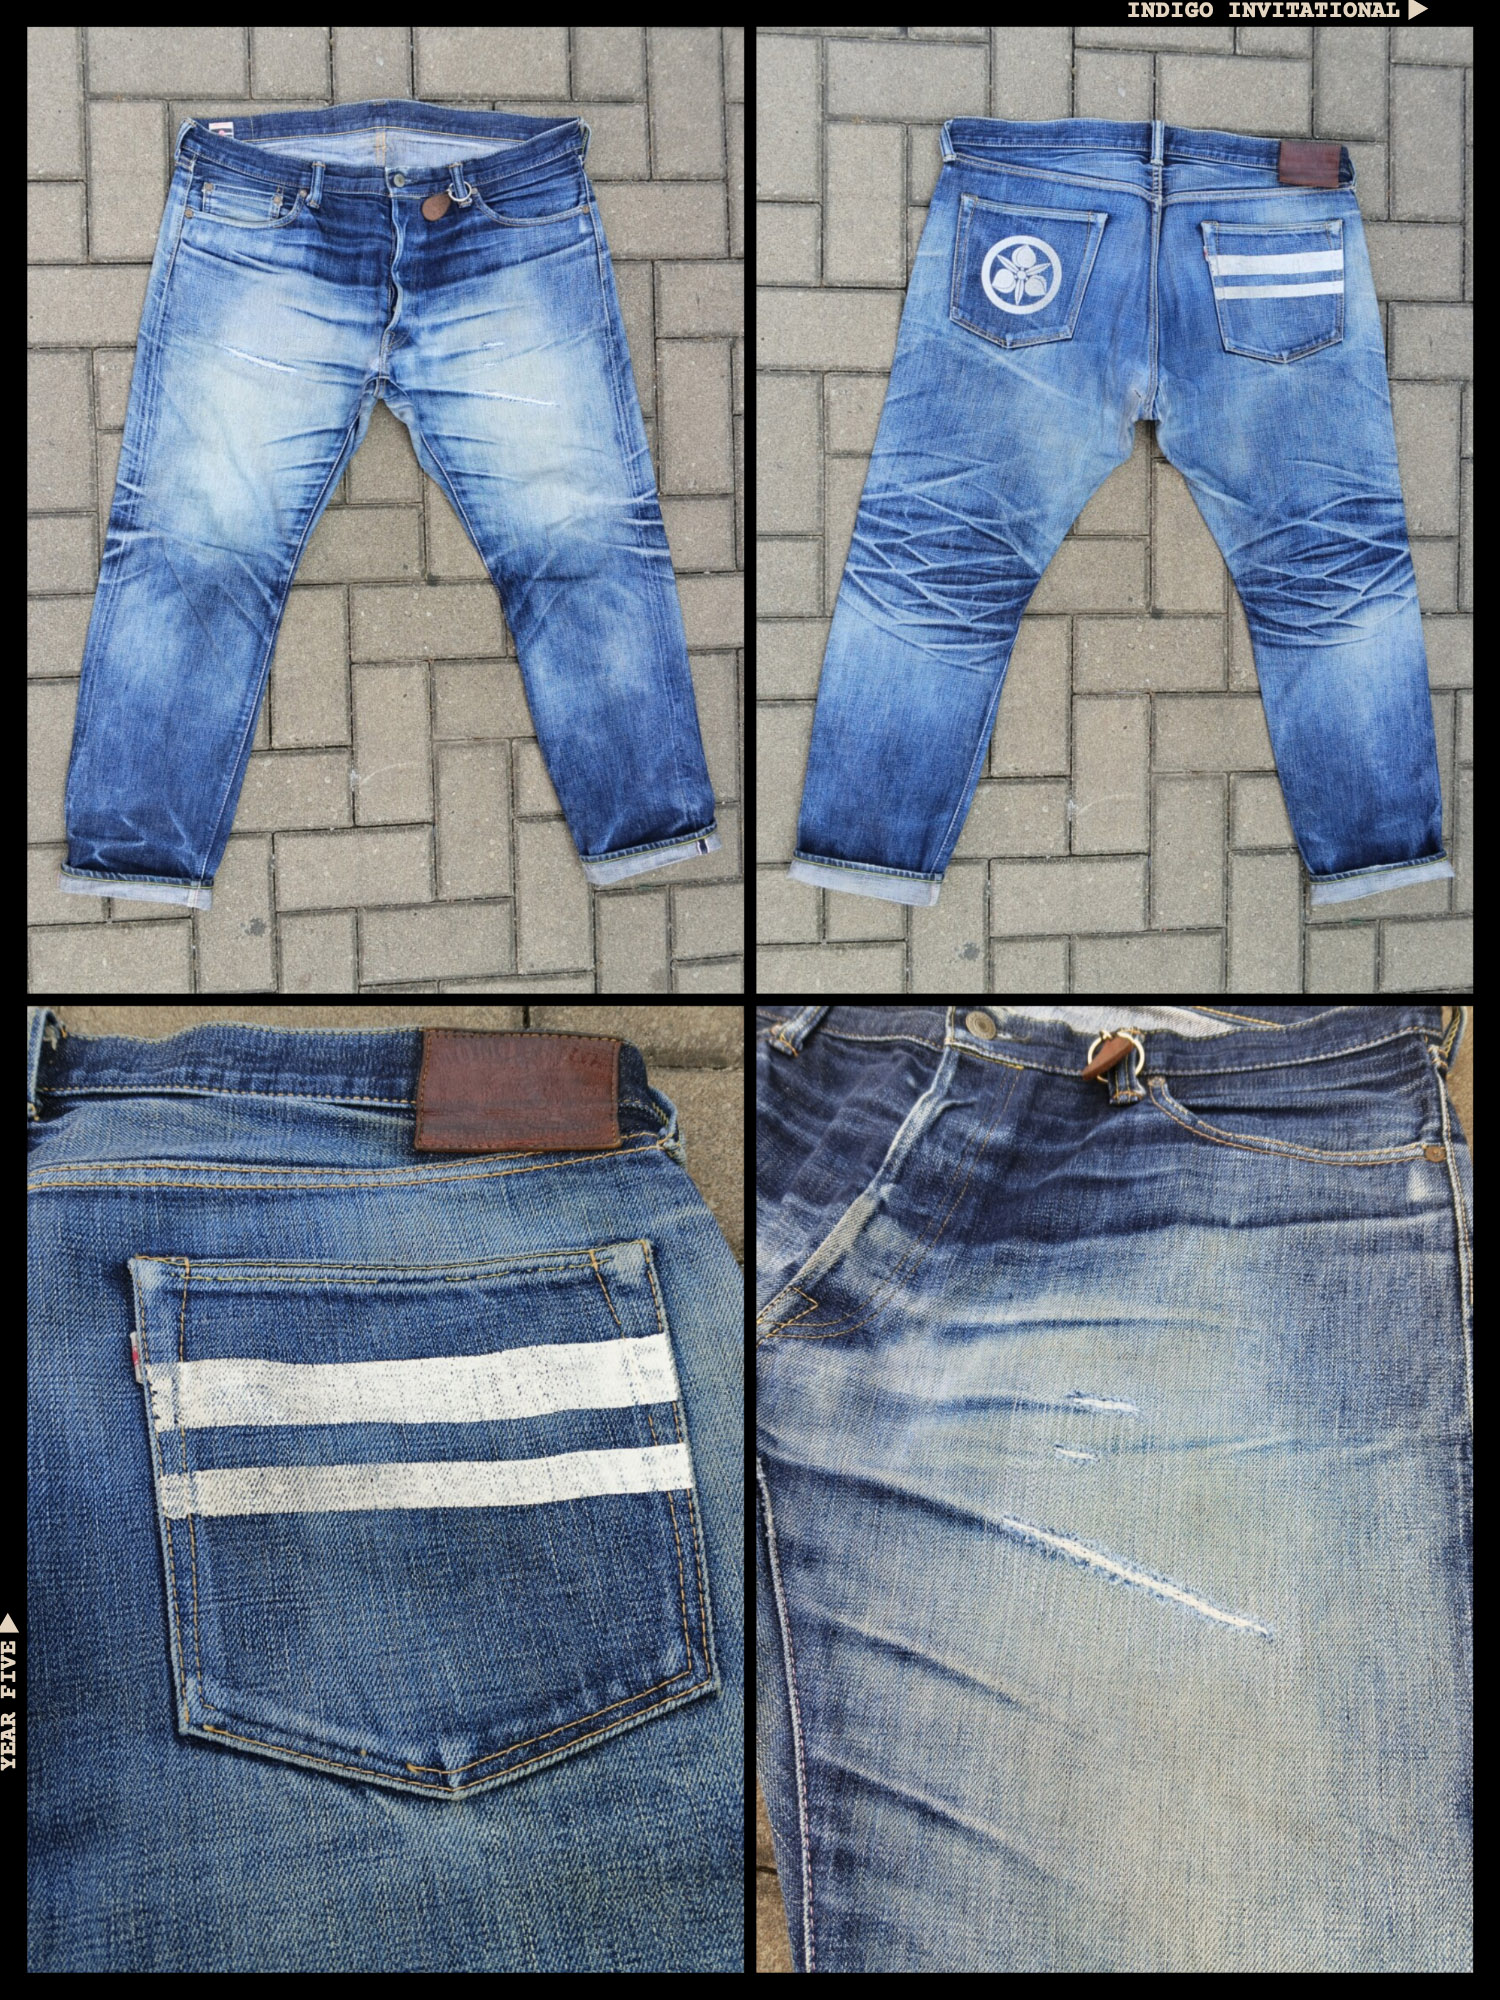
The ripped whiskers only add to the charm of this pair, which have a museum-level quality to them. Who among us wouldn’t want to have this exact pair hanging in their closet? Remarkable.
4th Place: Richard Lee (RE017)
Competed in: Naked & Famous Greencast Slub (15 oz.)
A pair that rocked through the ranks when we started looking at competitors’ registration photos. Worn through in the thighs, back pocket, and the crotch, this pair shows clear evidence everywhere you look that it has been worn hard for the full two years.
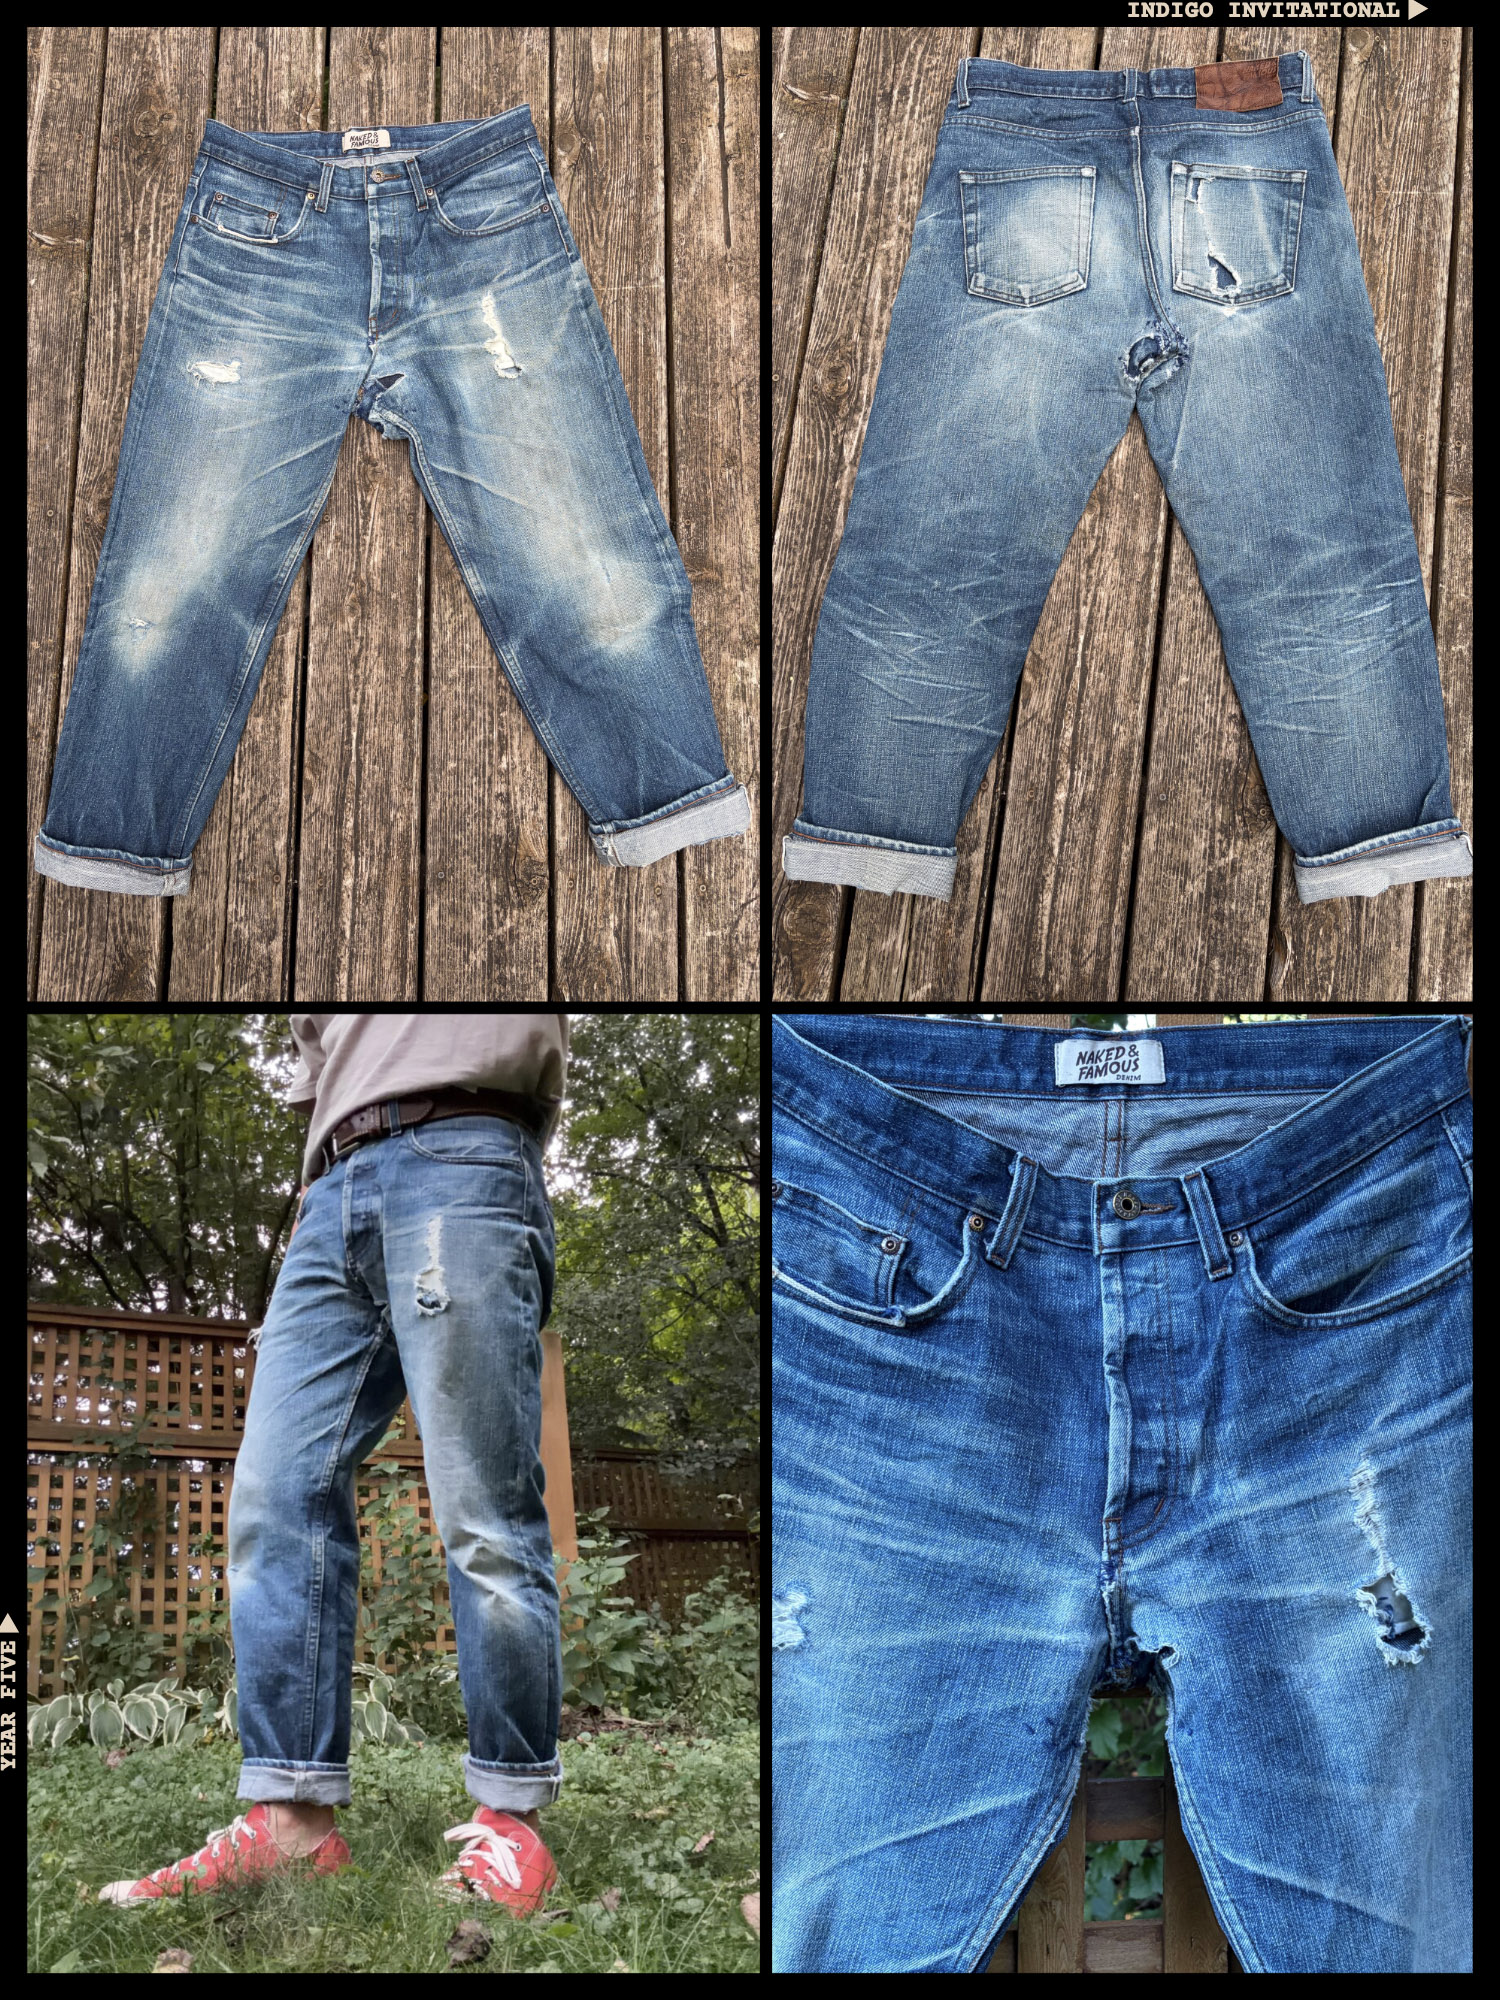
At the same time, they haven’t been faded to the point where it is difficult or impossible to appreciate the denim’s texture. One of the most beautifully faded pairs of Naked & Famous jeans we saw in the competition this year.
5th Place: Liam Breslin (RE016)
Competed in: Big John M104G (23 oz.) – Get them here
This Big John super heavyweight selvedge fades slowly but beautifully, making it an excellent choice for faders like Liam who are willing to invest years into a fade project.
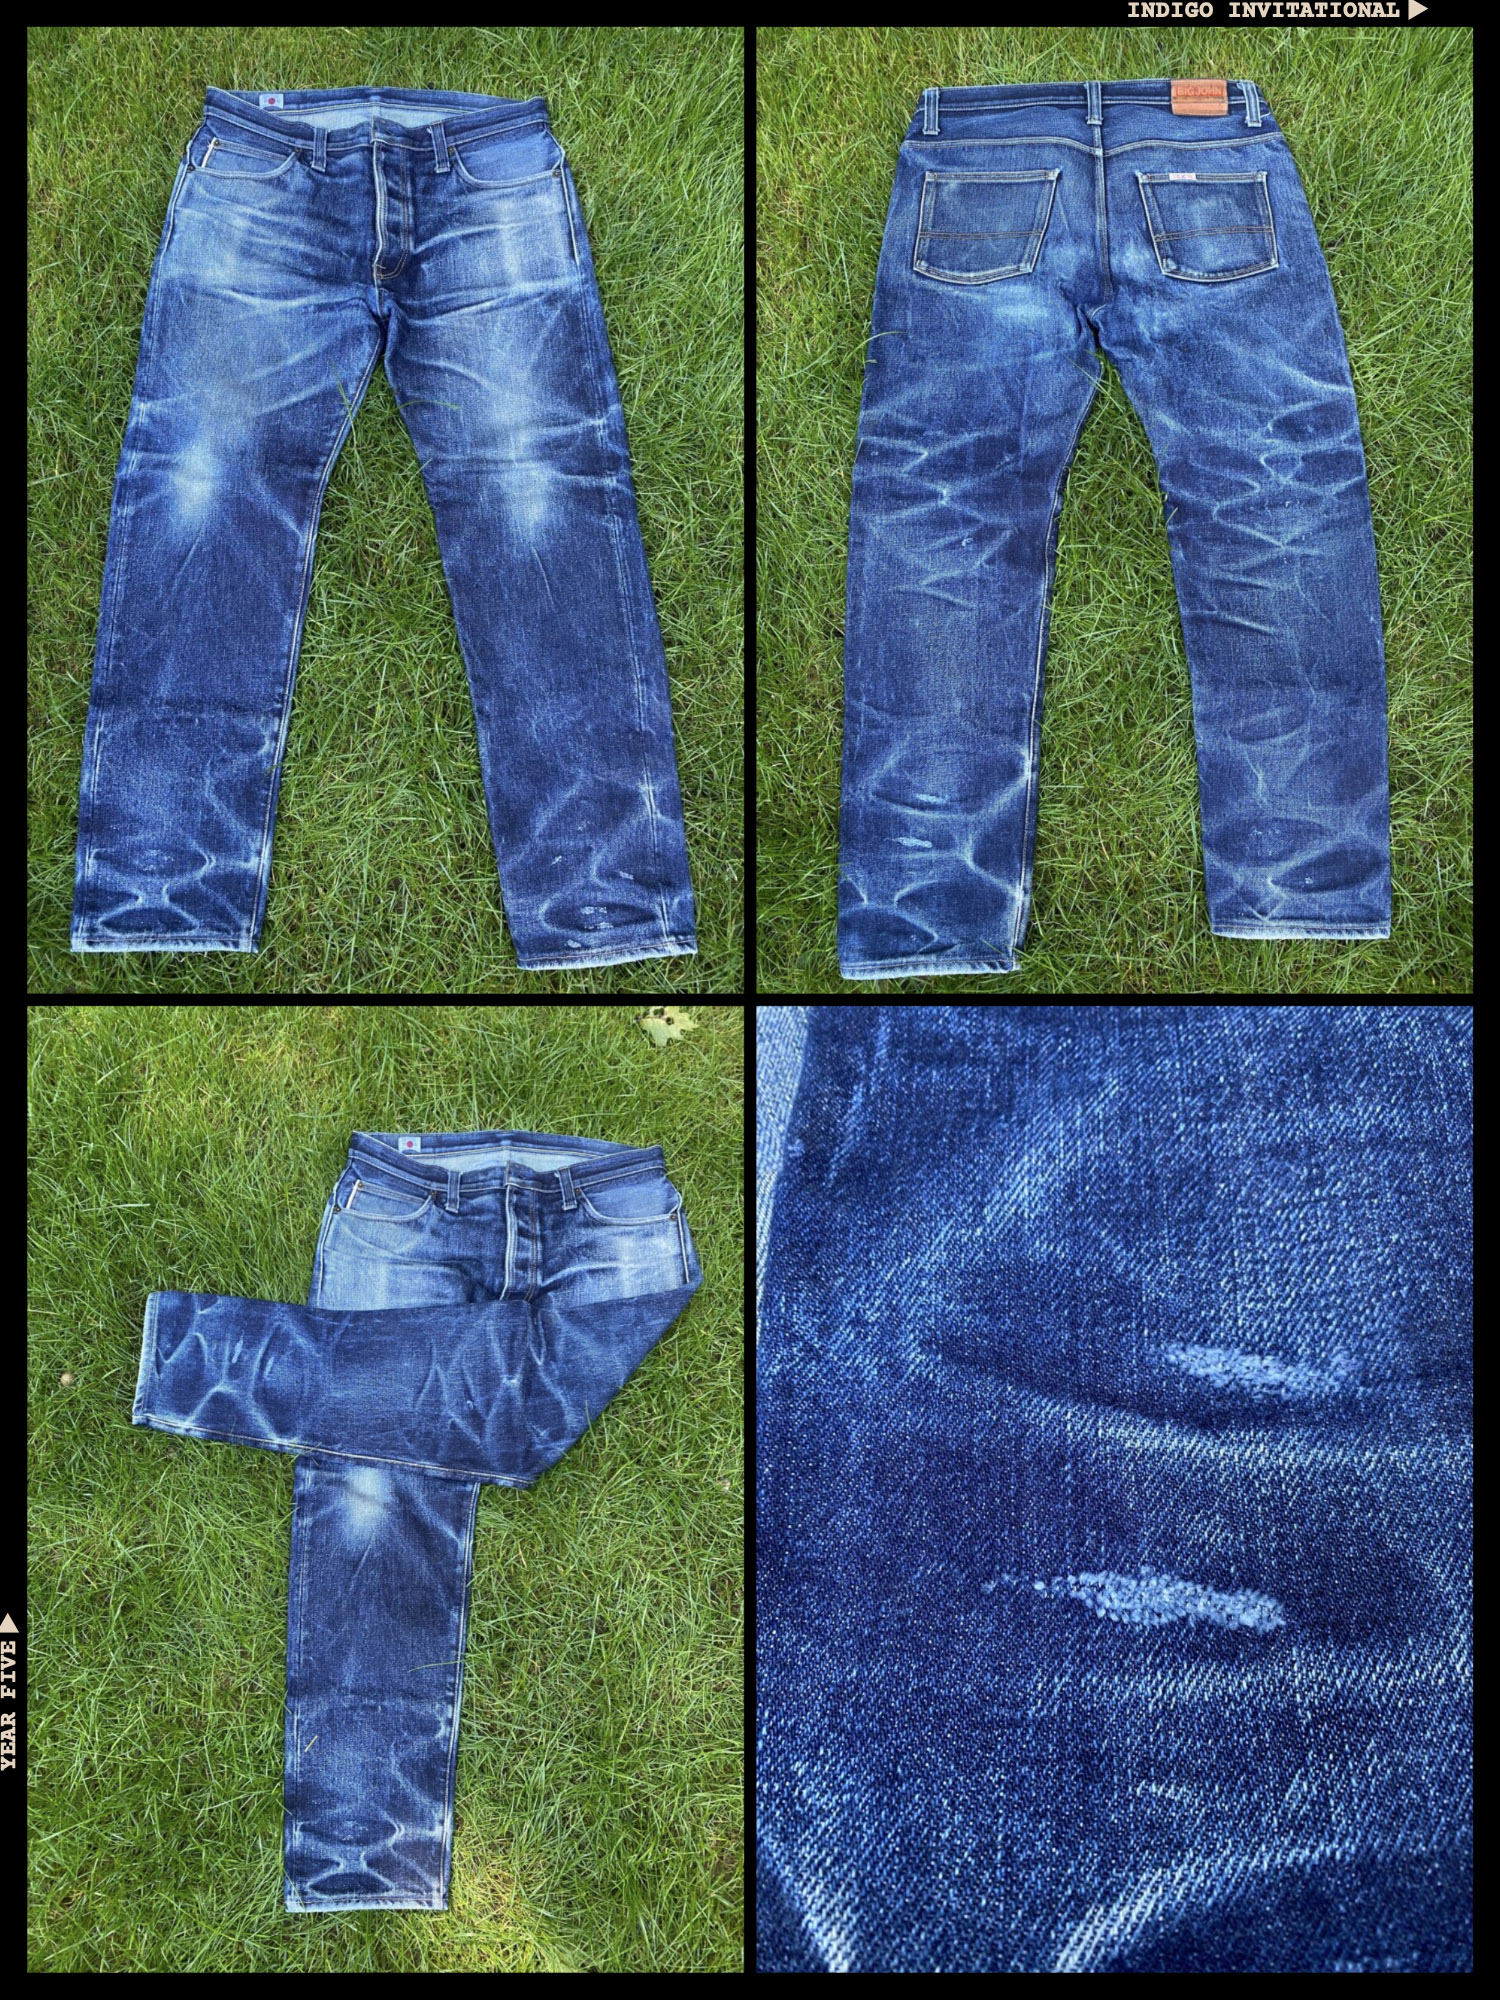
They still have more to give, but they’ve come so far since we first saw them the beginning of Year Four. During Year Five, the combs, thighs, and stacks showed unmistakable signs that they were being pushed ever onwards, going deeper and revealing more of this denim’s rich inner character.
Closing Thoughts
The community continues to grow, drawing more of the world’s top faders out of the woodwork and into this competition. The battle for those Top 50 slots is more intense than ever, but each year, we’re able to recognise newcomers and veterans alike who have given their all in pursuit of championship-level fades.
We wish we had enough accolades and prizes to give all of the faders who pushed themselves and their pairs this year something for their efforts. We have a long list of spot prizes that will be announced separately, so if you didn’t manage to crack the Top 10, it’s not over yet.
Congratulations to all our winners, all our finalists, and all our finishers. It’s been an incredible year, and we’re already working to make sure that Year Six, beginning on April 1st, is the biggest and best year ever.
If you’ve got a brand-new pair of raw denim that you’d like to enter into the competition, the button below will take you to the registration page. The competition is—and always will be—entirely free for competitors. We look forward to seeing all of you on the starting line.
The post What Do the World’s Best Raw Denim Fades Look Like in 2026? appeared first on Denimhunters.
DENIM and PATCHES sourced this post originally published on this site